Camunda Cloud Helm charts
Helm is a package manager for Kubernetes resources. Helm allows us to install a set of components by simply referencing a package name, and allowing us to override configurations to accommodate these packages to different scenarios.
Helm also provides dependency management between charts, meaning that charts can depend on other charts. This allows us to aggregate a set of components together that can be installed with a single command.
The Camunda Cloud Helm chart is currently available and can be found in the Camunda Cloud Helm repository. By default, the following will be installed:
- Camunda Cloud self-managed Helm (ccsm-helm):
- Zeebe: Deploys a Zeebe Cluster with three brokers using the
camunda/zeebedocker image. - Zeebe Gateway: Deploys the standalone Zeebe Gateway with two replicas.
- Operate: Deploys Operate, which connects to an existing Elasticsearch.
- Tasklist: Deploys the Tasklist component to work with user tasks.
- Elasticsearch: Deploys an Elasticsearch cluster with two nodes.
- Zeebe: Deploys a Zeebe Cluster with three brokers using the
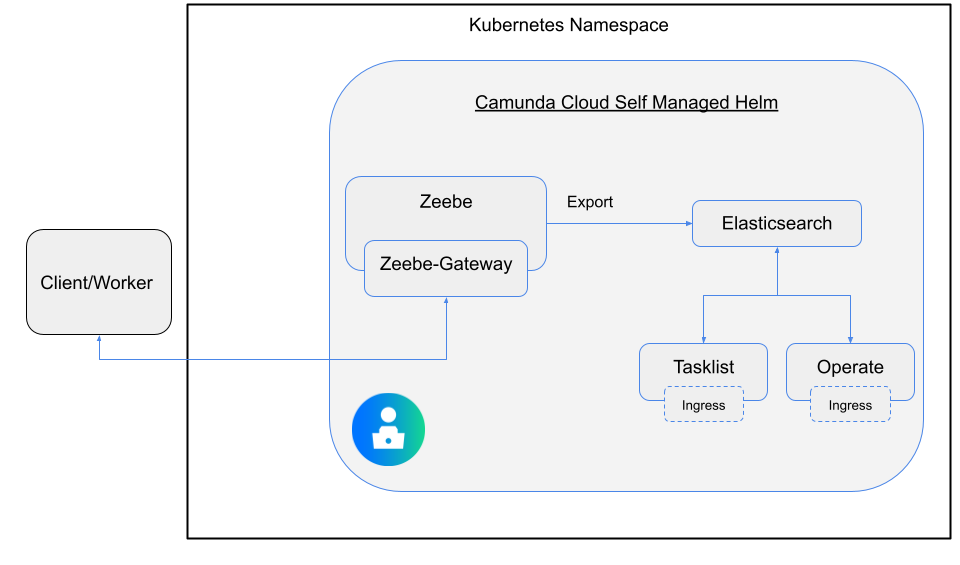
When installing the ccsm-helm chart, all the components in this picture are installed.
Add Camunda Cloud Helm repository
The Camunda Cloud Helm chart repository needs to be added. Once this is done, Helm is able to fetch and install charts hosted in http://helm.camunda.io.
> helm repo add camunda-cloud https://helm.camunda.io
> helm repo update
Once this is complete, we are ready to install the Helm chart hosted in the official Camunda Cloud Helm chart repo.
Installing the Camunda Cloud Helm chart in a Cloud environment
In this section, we will install all the available Camunda Cloud components inside a Kubernetes cluster. Notice that this Kubernetes cluster can have services which are already running; Zeebe is simply installed as another set of services.
> helm install <RELEASE NAME> camunda-cloud/ccsm-helm
Change >RELEASE NAME< with a name of your choice.
Also, notice that you can add the -n flag to specify in which Kubernetes namespace the components should be installed.
Installing all the components in a cluster requires all Docker images to be downloaded to the remote cluster. Depending on which Cloud provider you are using, the amount of time it will take to fetch all the images will vary.
Review the progress of your deployment by checking if the Kubernetes PODs are up and running with the following:
> kubectl get pods
This will return something similar to the following:
NAME                                                   READY   STATUS    RESTARTS   AGE
elasticsearch-master-0                                 1/1     Running   0          4m6s
elasticsearch-master-1                                 1/1     Running   0          4m6s
<RELEASE NAME>-operate-XXX                             1/1     Running   0          4m6s
<RELEASE NAME>-zeebe-0                                 1/1     Running   0          4m6s
<RELEASE NAME>-zeebe-1                                 1/1     Running   0          4m6s
<RELEASE NAME>-zeebe-2                                 1/1     Running   0          4m6s
<RELEASE NAME>-tasklist-XXX                             1/1     Running   0          4m6s
<RELEASE NAME>-zeebe-gateway-XX1                       1/1     Running   0          4m6s
<RELEASE NAME>-zeebe-gateway-XX2                       1/1     Running   0          4m6s
Installing the Camunda Cloud Helm chart locally using KIND
If you want to use Kubernetes KIND, add -f ccsm-kind-values.yaml. The file can be downloaded here.
Be aware that using KIND is only recommended for development purposes.
helm install <RELEASE NAME> camunda-cloud/ccsm-helm -f ccsm-kind-values.yaml
This will deploy the same components, but with a set of parameters tailored to a local environment setup.
All Docker images will be downloaded to your local KIND cluster, so it might take some time for the services to get started.
Review the progress of your deployment by checking if the Kubernetes PODs are up and running with the following:
> kubectl get pods
This will return something similar to the following:
NAME                                                   READY   STATUS    RESTARTS   AGE
elasticsearch-master-0                                 1/1     Running   0          4m6s
<RELEASE NAME>-operate-XXX                           1/1     Running   0          4m6s
<RELEASE NAME>-zeebe-0                                 1/1     Running   0          4m6s
<RELEASE NAME>-tasklist-XXX                          1/1     Running   0          4m6s
<RELEASE NAME>-zeebe-gateway                           1/1     Running   0          4m6s
Troubleshooting the installation
Check that each POD has at least 1/1 running instances. If one or more of your PODs stay pending, it means that it can not be scheduled onto a node.
Usually this happens because there are insufficient resources that prevent it. Use the kubectl describe ... command to check on messages from the scheduler:
> kubectl describe pods ${POD_NAME}
If the output of the describe command was not beneficial, tail the logs of these PODs by running the following:
> kubectl logs -f <POD NAME>