Dual-region setup (EKS)
Review our dual-region concept documentation before continuing to understand the current limitations and restrictions of this blueprint setup.
This guide explains how to deploy two Amazon Web Services (AWS) Elastic Kubernetes Service (EKS) clusters in a dual-region setup using Terraform, a widely used Infrastructure as Code (IaC) tool. The dual-region EKS clusters serve as the infrastructure foundation for running Camunda 8 with disaster recovery capabilities.
For advanced EKS scenarios, see the Amazon EKS documentation.
New to Terraform or Infrastructure as Code? Start with the Terraform IaC documentation and try the interactive quick start. Additionally, review the single-region EKS Terraform setup for the essentials of setting up an Amazon EKS cluster and configuring AWS IAM permissions.
Requirements
- AWS account – Required to create AWS resources. See What is an AWS account?.
- AWS CLI – Command-line tool to manage AWS resources. Install AWS CLI.
- Terraform – IaC tool used to provision resources. Install Terraform.
- kubectl – CLI for interacting with Kubernetes clusters. Install kubectl.
- Helm – Package manager for Kubernetes. Install Helm.
- AWS service quotas – Verify your quotas before deployment:
- At least 6 Elastic IPs (three per availability zone, per region).
- Adequate quotas for VPCs, EC2 instances, and storage in both regions.
- Request increases if needed via the AWS console. You pay only for used resources. See AWS service quotas and Amazon EC2 service quotas.
For the tool versions used in testing, see the repository's .tool-versions file. It contains an up-to-date list of versions used for testing.
Considerations
This setup provides a solid starting point for running Camunda 8 on AWS in a dual-region configuration. It is not optimized for peak performance. Use it as a foundation you can extend and adapt for production with Infrastructure as Code (IaC) tools.
- To test or develop against Camunda 8, consider signing up for our SaaS offering.
- If you already have two Amazon EKS clusters (peered together) and an Amazon S3 bucket, skip ahead to deploy Camunda 8 via Helm charts.
Reference architectures and examples provided in this guide are not turnkey modules. Camunda recommends cloning the repository and modifying it locally.
You are responsible for operating and maintaining the infrastructure. Camunda updates the reference architecture over time and changes may not be backward compatible. You can use these updates to upgrade your customized codebase as needed.
This guide will incur costs on your cloud provider account, specifically for the managed Kubernetes service, running Kubernetes nodes in EC2, Elastic Block Storage (EBS), traffic between regions, and S3. For more details, see AWS EKS pricing and the AWS Pricing Calculator. Costs vary by region.
Outcome
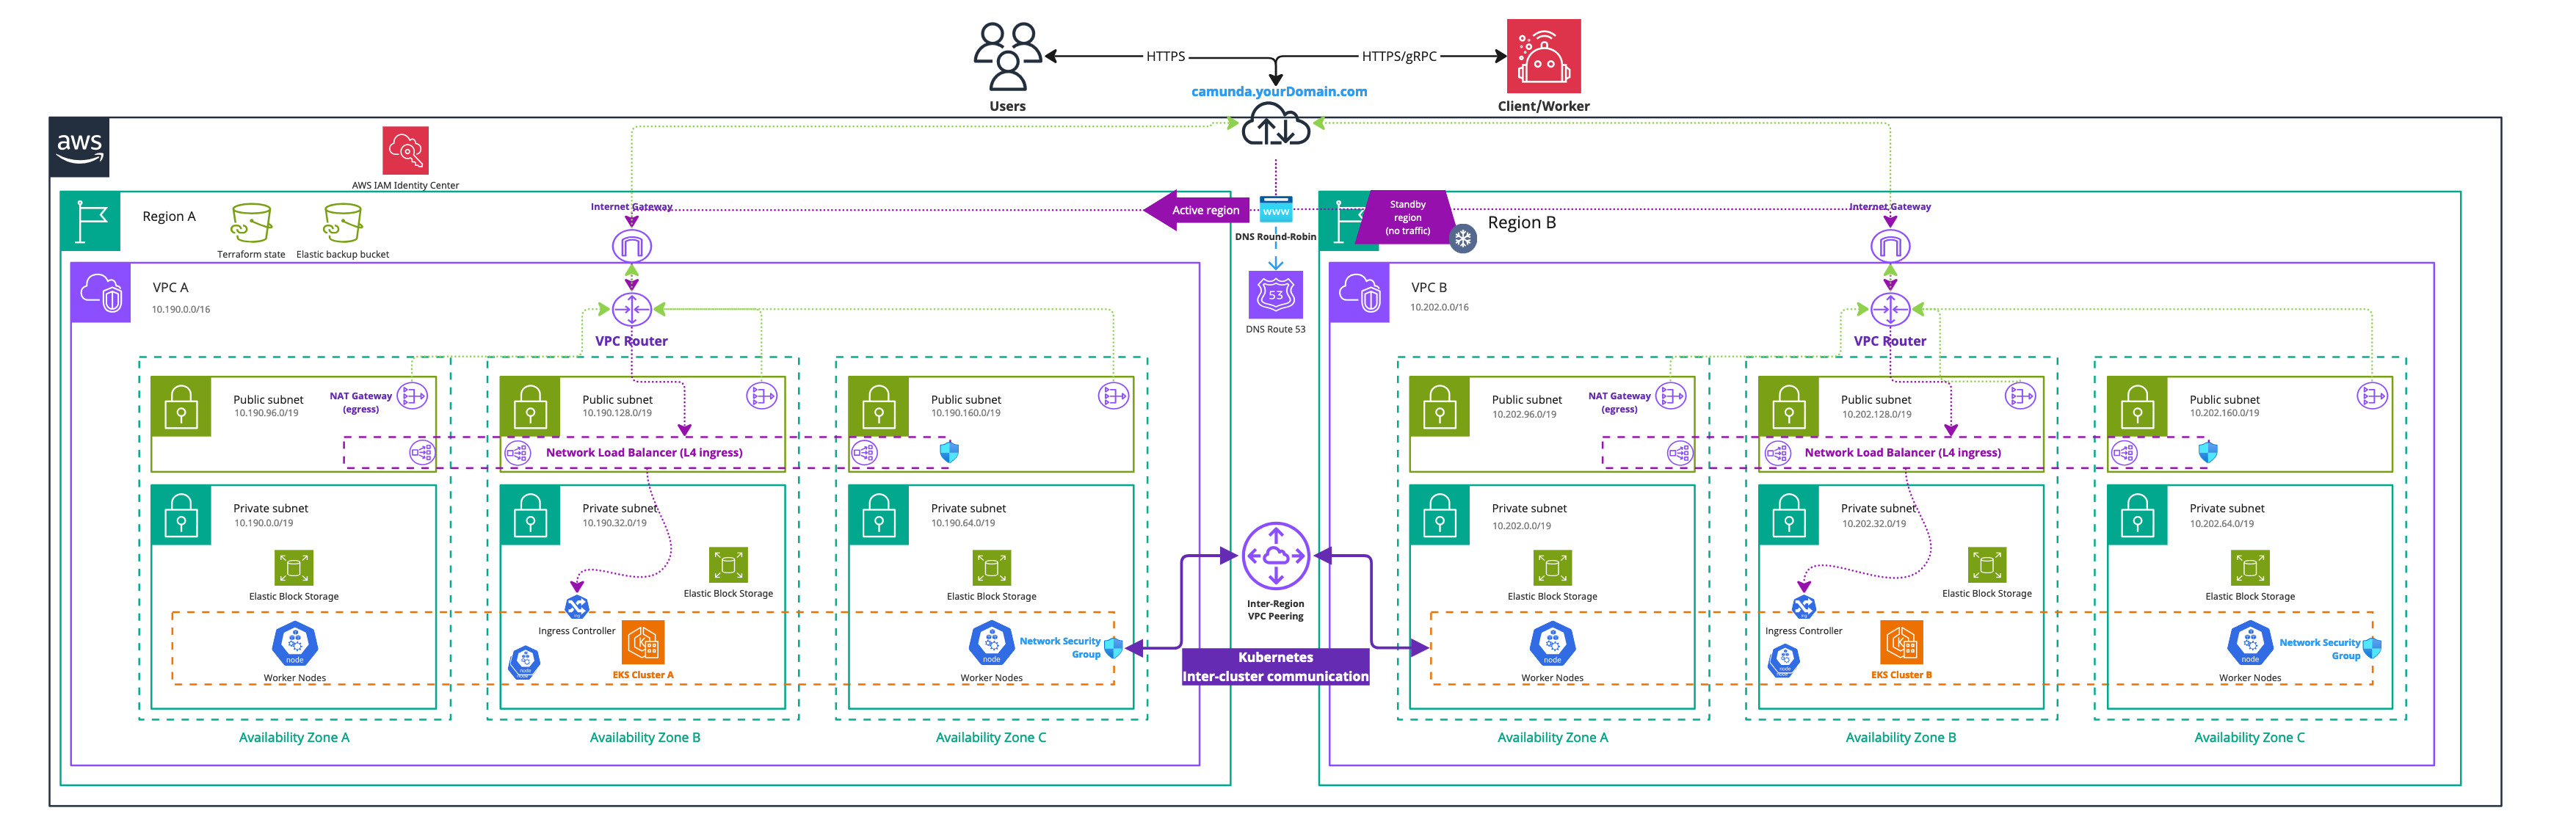
Infrastructure diagram for a dual-region EKS setup (click on the image to open the PDF version)
After completing this guide, you will have:
- Two Amazon EKS Kubernetes clusters in two different geographic regions with each four nodes ready for the Camunda 8 dual-region installation.
- The EBS CSI driver installed and configured, which is used by the Camunda 8 Helm chart to create persistent volumes.
- A VPC peering between the two EKS clusters, allowing cross-cluster communication between different regions.
- An Amazon Simple Storage Service (S3) bucket for Elasticsearch backups.
- The Elastic Cloud on Kubernetes (ECK) operator installed in both clusters for managing Elasticsearch lifecycle.
- ECK-managed Elasticsearch clusters running in both regions.
This guide uses the ECK operator as the preferred approach for managing Elasticsearch. You are not limited to this approach; you can use managed Elasticsearch services or other Elasticsearch instances. If you choose an alternative, you are responsible for adapting the scripts and configuration accordingly.
1. Configure AWS and apply Terraform
Obtain a copy of the reference architecture
The first step is to download a copy of the reference architecture from the GitHub repository. This material will be used throughout the rest of this documentation.
The provided reference architecture repository allows you to directly reuse and extend the existing Terraform example base. This sample implementation is flexible to extend to your own needs without the potential limitations of a Terraform module maintained by a third party.
loading...
With the reference architecture copied, you can proceed with the remaining steps outlined in this documentation. Ensure that you are in the correct directory before continuing with further instructions.
Export environment variables
To streamline the execution of the subsequent commands, it is recommended to export multiple environment variables within your terminal.
There are two regions (REGION_0 and REGION_1), each with its own Kubernetes cluster (CLUSTER_0 and CLUSTER_1). It is recommended to save these changes for future interactions with the dual-region setup.
- Navigate to the
procedurefolder within your cloned repository:
cd aws/kubernetes/eks-dual-region/procedure
- The folder provides a helper script export_environment_prerequisites.sh to export various environment variables to ease the interaction with a dual-region setup. Consider permanently changing this file for future interactions.
- Adjust the environment variable values within the script to your needs.
You have to choose unique namespaces for Camunda 8 installations. The namespace for Camunda 8 installation in the cluster of region 0 (CAMUNDA_NAMESPACE_0), needs to have a different name from the namespace for Camunda 8 installation in the cluster of region 1 (CAMUNDA_NAMESPACE_1). This is required for proper traffic routing between the clusters.
For example, you can install Camunda 8 into CAMUNDA_NAMESPACE_0 in CLUSTER_0, and CAMUNDA_NAMESPACE_1 on the CLUSTER_1, where CAMUNDA_NAMESPACE_0 != CAMUNDA_NAMESPACE_1.
Using the same namespace names on both clusters won't work as CoreDNS won't be able to distinguish between traffic targeted at the local and remote cluster.
- Execute the script via the following command:
. ./export_environment_prerequisites.sh
The dot is required to export those variables to your shell and not a spawned subshell.
loading...
Dual-region EKS cluster module setup
This module provides the foundational configuration for AWS access and Terraform usage.
We use Terraform modules to abstract resources into reusable components and simplify infrastructure management.
The Camunda AWS EKS cluster module is publicly available and serves as a robust starting point for deploying Amazon EKS clusters. Review the module before implementation to understand its structure and capabilities.
The module is locally sourced in your clone. Any changes you make to the module in your repository take effect immediately in your setup.
Terraform files overview
From your cloned repository, navigate to aws/kubernetes/eks-dual-region/terraform/clusters. This contains the Terraform base configuration for the dual-region setup.
config.tf
This file contains the backend and provider configuration, meaning where to store the Terraform state and which providers to use, their versions, and potential credentials.
The important part of config.tf is the initialization of two AWS providers, as you need one per region and this is a limitation by AWS given everything is scoped to a region.
clusters.tf
This file is using Terraform modules, which allows abstracting resources into reusable components.
The Terraform modules of AWS EKS are an example implementation and can be used for development purposes or as a starting reference.
This contains the declaration of the two clusters. One of them has an explicit provider declaration, as otherwise everything is deployed to the default AWS provider, which is limited to a single region.
vpc-peering.tf
For a multi-region setup, you need to have the virtual private cloud (VPC) peered to route traffic between regions using private IPv4 addresses and not publicly route the traffic and expose it. For more information, review the AWS documentation on VPC peering.
For dual- or tri-region setups, VPC peering is preferred over transit gateways as it is simpler to manage and has fewer AWS limitations. Other AWS networking options remain valid - choose what best fits your environment. For a complete comparison, review the AWS documentation.
The previously mentioned Camunda module will automatically create a VPC per cluster.
This file covers the VPC peering between the two VPCs and allow any traffic between those two by adjusting each cluster's security groups.
s3.tf
For Elasticsearch, an S3 bucket is required to allow creating and restoring snapshots. There are alternative ways, but since this is focused on AWS, it makes sense to remain within the same cloud environment.
This file covers the declaration of an S3 bucket to use for the backups. Additionally, a service account with access to use within the Kubernetes cluster to configure Elasticsearch to access the S3 bucket.
output.tf
Terraform outputs allow you to reuse generated values in future steps. For example, the access keys of the service account with S3 access.
variables.tf
This file contains various variable definitions for both local and input types. The difference is that input variables require you to define the value on execution. While local variables are permanently defined, they are namely for code duplication purposes and readability.
Preparation
- Adjust any values in the variables.tf file to your liking. For example, the target regions and their name or CIDR blocks of each cluster.
- Make sure that any adjustments are reflected in your environment variables to ease the cluster configuration.
- Set up the authentication for the
AWSprovider.
The AWS Terraform provider is required to create resources in AWS. You must configure the provider with the proper credentials before using it. You can further change the region and other preferences and explore different authentication methods.
There are several ways to authenticate the AWS provider:
- (Recommended) Use the AWS CLI to configure access. Terraform will automatically default to AWS CLI configuration when present.
- Set environment variables
AWS_ACCESS_KEY_IDandAWS_SECRET_ACCESS_KEY, which can be retrieved from the AWS Console.
Terraform prerequisites
To manage the infrastructure for Camunda 8 on AWS using Terraform, we need to set up Terraform's backend to store the state file remotely in an S3 bucket. This ensures secure and persistent storage of the state file.
Advanced users may want to handle this part differently and use a different backend. The backend setup provided is an example for new users.
Set up AWS authentication
The AWS Terraform provider is required to create resources in AWS. Before you can use the provider, you must authenticate it using your AWS credentials.
A user who creates resources in AWS will always retain administrative access to those resources, including any Kubernetes clusters created. It is recommended to create a dedicated AWS IAM user for Terraform purposes, ensuring that the resources are managed and owned by that user.
You can further change the region and other preferences and explore different authentication methods:
-
For development or testing purposes you can use the AWS CLI. If you have configured your AWS CLI, Terraform will automatically detect and use those credentials. To configure the AWS CLI:
aws configureEnter your
AWS_ACCESS_KEY_ID,AWS_SECRET_ACCESS_KEY, region, and output format. These can be retrieved from the AWS Console. -
For production environments, we recommend the use of a dedicated IAM user. Create access keys for the new IAM user via the console, and export them as
AWS_ACCESS_KEY_IDandAWS_SECRET_ACCESS_KEY.
Create an S3 bucket for Terraform state management
Before setting up Terraform, you need to create an S3 bucket that will store the state file. This is important for collaboration and to prevent issues like state file corruption.
To start, set the region as an environment variable upfront to avoid repeating it in each command:
export AWS_REGION=<your-region>
Replace <your-region> with your chosen AWS region (for example, eu-central-1).
Now, follow these steps to create the S3 bucket with versioning enabled:
-
Open your terminal and ensure the AWS CLI is installed and configured.
-
Run the following command to create an S3 bucket for storing your Terraform state. Make sure to use a unique bucket name and set the
AWS_REGIONenvironment variable beforehand:8.9/aws/common/procedure/s3-bucket/s3-bucket-creation.shloading... -
Enable versioning on the S3 bucket to track changes and protect the state file from accidental deletions or overwrites:
8.9/aws/common/procedure/s3-bucket/s3-bucket-versioning.shloading... -
Secure the bucket by blocking public access:
8.9/aws/common/procedure/s3-bucket/s3-bucket-private.shloading... -
Verify versioning is enabled on the bucket:
8.9/aws/common/procedure/s3-bucket/s3-bucket-verify.shloading...
This S3 bucket will now securely store your Terraform state files with versioning enabled.
Initialize Terraform
Once your authentication is set up, you can initialize your Terraform project. The previous steps configured a dedicated S3 Bucket (S3_TF_BUCKET_NAME) to store your state, and the following creates a bucket key that will be used by your configuration.
Configure the backend and download the necessary provider plugins:
loading...
Terraform will connect to the S3 bucket to manage the state file, ensuring remote and persistent storage.
Create the EKS clusters
We strongly recommend managing sensitive information using a secure secrets management solution like HashiCorp Vault. For details on how to inject secrets directly into Terraform via Vault, see the Terraform Vault Secrets Injection Guide.
-
Open a terminal in the reference folder where
config.tfand other.tffiles are.cd ./aws/kubernetes/eks-dual-region/terraform/clusters/ -
Perform a final initialization for anything changed throughout the guide:
8.9/aws/common/procedure/s3-bucket/s3-bucket-tf-init.shloading... -
Plan the configuration files:
terraform plan -out cluster.plan # describe what will be created -
After reviewing the plan, you can confirm and apply the changes.
terraform apply cluster.plan # apply the creation
Terraform will now create the Amazon EKS clusters with all the necessary configurations. The completion of this process may require approximately 20-30 minutes for each component.
2. Preparation for Camunda 8 installation
Now that you have created two peered Kubernetes clusters with Terraform, you will need to configure various components to make the dual-region setup work.
Access the created EKS clusters
To ease working with two clusters, create or update your local kubeconfig to contain those new contexts. Using an alias for those new clusters allows you to directly use kubectl and Helm with a particular cluster.
Update or create your kubeconfig via the AWS CLI:
# the alias allows for easier context switching in kubectl
aws eks --region $REGION_0 update-kubeconfig --name $CLUSTER_0 --alias $CLUSTER_0
aws eks --region $REGION_1 update-kubeconfig --name $CLUSTER_1 --alias $CLUSTER_1
The region and name must align with the values you have defined in Terraform.
Configure DNS chaining
DNS chaining allows for easier communication between the two clusters by forwarding DNS queries from the region 0 cluster to the region 1 cluster and vice versa.
You are configuring the CoreDNS from the cluster in Region 0 to resolve certain namespaces via Region 1 instead of using the in-cluster DNS server. Camunda applications (e.g. Zeebe brokers) to resolve DNS record names of Camunda applications running in another cluster.
CoreDNS configuration
- Expose
kube-dns, the in-cluster DNS resolver via an internal load-balancer in each cluster:
kubectl --context $CLUSTER_0 apply -f https://raw.githubusercontent.com/camunda/camunda-deployment-references/refs/heads/stable/8.9/aws/kubernetes/eks-dual-region/procedure/manifests/internal-dns-lb.yml
kubectl --context $CLUSTER_1 apply -f https://raw.githubusercontent.com/camunda/camunda-deployment-references/refs/heads/stable/8.9/aws/kubernetes/eks-dual-region/procedure/manifests/internal-dns-lb.yml
- Execute the script generate_core_dns_entry.sh in the folder
aws/kubernetes/eks-dual-region/procedure/of the repository to help you generate the CoreDNS config. Make sure that you have previously exported the environment variables since the script builds on top of it.
./generate_core_dns_entry.sh
- The script will retrieve the IPs of the load balancer via the AWS CLI and return the required config change.
- The script prints the
kubectl editcommands to change the DNS settings of each cluster inline. Copy the statement between the placeholders to edit the CoreDNS configmap in cluster 0 and cluster 1, depending on the placeholder. An alternative to inline editing is to create two copies of the file ./manifests/coredns.yml, one for each cluster. Add the section generated by the script to each file. Apply the changes to each cluster with e.g.kubectl --context cluster-london -n kube-system apply -f file.yml. Replace thecontextparameter with your current values.
Example output
For illustration purposes only. These values will not work in your environment.
./generate_core_dns_entry.sh
Please copy the following between
### Cluster 0 - Start ### and ### Cluster 0 - End ###
and insert it at the end of your CoreDNS configmap in Cluster 0

kubectl --context cluster-london -n kube-system edit configmap coredns

### Cluster 0 - Start ###
    camunda-paris.svc.cluster.local:53 {
        errors
        cache 30
        forward . 10.202.19.54 10.202.53.21 10.202.84.222 {
            force_tcp
        }
    }
### Cluster 0 - End ###

Please copy the following between
### Cluster 1 - Start ### and ### Cluster 1 - End ###
and insert it at the end of your CoreDNS configmap in Cluster 1

kubectl --context cluster-paris -n kube-system edit configmap coredns

### Cluster 1 - Start ###
    camunda-london.svc.cluster.local:53 {
        errors
        cache 30
        forward . 10.192.27.56 10.192.84.117 10.192.36.238 {
            force_tcp
        }
    }
### Cluster 1 - End ###
Full configmap example
cautionFor illustration purposes only. This file will not work in your environment.
coredns-cm-london.ymlapiVersion: v1
kind: ConfigMap
metadata:
labels:
eks.amazonaws.com/component: coredns
k8s-app: kube-dns
name: coredns
namespace: kube-system
data:
Corefile: |
.:53 {
errors
health {
lameduck 5s
}
ready
kubernetes cluster.local in-addr.arpa ip6.arpa {
pods insecure
fallthrough in-addr.arpa ip6.arpa
}
prometheus :9153
forward . /etc/resolv.conf
cache 30
loop
reload
loadbalance
}
camunda-paris.svc.cluster.local:53 {
errors
cache 30
forward . 10.202.19.54 10.202.53.21 10.202.84.222 {
force_tcp
}
}
For illustration purposes only. This file will not work in your environment.
apiVersion: v1
kind: ConfigMap
metadata:
  labels:
    eks.amazonaws.com/component: coredns
    k8s-app: kube-dns
  name: coredns
  namespace: kube-system
data:
  Corefile: |
    .:53 {
        errors
        health {
            lameduck 5s
          }
        ready
        kubernetes cluster.local in-addr.arpa ip6.arpa {
          pods insecure
          fallthrough in-addr.arpa ip6.arpa
        }
        prometheus :9153
        forward . /etc/resolv.conf
        cache 30
        loop
        reload
        loadbalance
    }
    camunda-paris.svc.cluster.local:53 {
        errors
        cache 30
        forward . 10.202.19.54 10.202.53.21 10.202.84.222 {
            force_tcp
        }
    }
- Check that CoreDNS has reloaded for the changes to take effect before continuing. Make sure it contains
Reloading complete:
kubectl --context $CLUSTER_0 logs -f deployment/coredns -n kube-system
kubectl --context $CLUSTER_1 logs -f deployment/coredns -n kube-system
Verify DNS chaining
The script test_dns_chaining.sh within the folder aws/kubernetes/eks-dual-region/procedure/ of the repository will help to test that the DNS chaining is working by using nginx pods and services to ping each other.
- Execute the test_dns_chaining.sh. Make sure you have previously exported the environment variables as the script builds on top of it.
./test_dns_chaining.sh
- Watch how a nginx pod and service will be deployed per cluster. It will wait until the pods are ready and finally ping from nginx in cluster 0 the nginx in cluster 1 and vice versa. If it fails to contact the other nginx five times, it will fail.
Configure a high-performance StorageClass
Camunda 8 requires high IOPS for performance-critical components such as Zeebe. To achieve this, use AWS gp3 volumes instead of the default gp2.
This step defines a custom StorageClass that:
- Uses
gp3EBS volumes with optimized IOPS and throughput. - Sets a
Retainreclaim policy. - Uses
WaitForFirstConsumervolume binding. - Becomes the default
StorageClassfor the cluster.
Apply the StorageClass
Run the following script from the context of the aws/kubernetes/eks-dual-region/procedure/ folder to apply the new storage class and set it as default:
loading...
To verify completion of the operation, run:
loading...
You must apply the custom StorageClass before installing the Camunda Helm chart so that PersistentVolumeClaims (PVCs) are provisioned with the correct performance characteristics.
3. Deploy Camunda 8 via Helm charts
There is currently no dedicated migration procedure for moving from the Bitnami Elasticsearch subchart to the ECK operator in a dual-region setup. If you need to perform this migration, follow the single-region migration procedure and apply it individually to each region.
Deploy Elasticsearch using ECK
Elasticsearch is managed using the Elastic Cloud on Kubernetes (ECK) operator instead of the Camunda Helm chart's built-in Elasticsearch subchart. This provides automated lifecycle management and built-in security with auto-generated credentials.
For more details on ECK-based deployments, see Elasticsearch deployment in the operator-based infrastructure guide.
Create the S3 backup secret for Elasticsearch
Elasticsearch requires an S3 bucket for data backup and restore procedures during regional failback. The ECK operator injects these credentials into the Elasticsearch keystore at startup.
You can pull the data from Terraform since you exposed those via output.tf.
- From the Terraform code location
aws/kubernetes/eks-dual-region/terraform/clusters, execute the following to export the access keys to environment variables:
export AWS_ACCESS_KEY_ES=$(terraform output -raw s3_aws_access_key)
export AWS_SECRET_ACCESS_KEY_ES=$(terraform output -raw s3_aws_secret_access_key)
- From the folder
aws/kubernetes/eks-dual-region/procedureof the repository, execute the script create_elasticsearch_secrets.sh. This creates the ECK-compatibleelasticsearch-env-secretin both regions with the S3 credentials. Those have previously been defined and exported via the environment variables.
./create_elasticsearch_secrets.sh
- Unset environment variables to reduce the risk of potential exposure:
unset AWS_ACCESS_KEY_ES
unset AWS_SECRET_ACCESS_KEY_ES
The Elasticsearch backup bucket is tied to a specific region. If that region becomes unavailable and you want to restore to a different region or S3 services remain disrupted, you must create a new bucket in another region and reconfigure your Elasticsearch cluster to use the new bucket.
Deploy the ECK operator and elasticsearch clusters
Before deploying the Elasticsearch cluster, install the ECK operator and its Custom Resource Definitions (CRDs) in both clusters. The ECK operator manages the lifecycle of Elasticsearch resources in Kubernetes.
Run deploy.sh from generic/kubernetes/operator-based/elasticsearch/:
cd generic/kubernetes/operator-based/elasticsearch
export ELASTICSEARCH_CLUSTER_FILE="elasticsearch-cluster-dual-region.yml"
KUBE_CONTEXT=$CLUSTER_0 ./deploy.sh
KUBE_CONTEXT=$CLUSTER_1 ./deploy.sh
cd -
This performs the following actions:
- Installs the ECK CRDs.
- Deploys the operator to the
elastic-systemnamespace. - Waits for operator readiness.
- Creates the Elasticsearch cluster in both regions using the ECK operator.
Review the Elasticsearch deploy.sh script
loading...
The dual-region Elasticsearch cluster manifest is located at generic/kubernetes/operator-based/elasticsearch/elasticsearch-cluster-dual-region.yml.
Review the Elasticsearch cluster configuration
loading...
For more details on the ECK operator deployment, see the operator-based infrastructure guide.
Synchronize Elasticsearch passwords across regions
Each ECK-managed Elasticsearch cluster auto-generates its own elasticsearch-es-elastic-user secret with a unique password. For Zeebe exporters to authenticate against the remote region's Elasticsearch, each region needs access to the other region's password.
Run sync_elasticsearch_passwords.sh from aws/kubernetes/eks-dual-region/procedure to create cross-region password secrets:
cd aws/kubernetes/eks-dual-region/procedure
./sync_elasticsearch_passwords.sh
cd -
This script reads the ECK-generated passwords and creates region-specific secrets in both regions:
elasticsearch-es-password-region-0: password from region 0's Elasticsearchelasticsearch-es-password-region-1: password from region 1's Elasticsearch
These secrets are referenced by the Zeebe exporter configuration in camunda-values.yml to authenticate against Elasticsearch in each region.
Camunda 8 Helm chart prerequisites
Within the cloned repository, navigate to aws/kubernetes/eks-dual-region/helm-values. This contains a dual-region example setup.
The approach is to work with layered Helm values files:
- Have a base
camunda-values.ymlthat is generally applicable for both Camunda installations - Two overlays that are for region 0 and region 1 installations
camunda-values.yml
This forms the base layer that contains the basic required setup, which applies to both regions.
Key changes of the dual-region setup:
global.multiregion.regions: 2- Indicates the use for two regions
global.security.authentication.method: basic- Uses Basic authentication for inter-component communication since Management Identity (Keycloak) is not deployed in dual-region.
global.identity.auth.enabled: false- Management Identity is not currently supported. For more details, see the limitations section on the dual-region concept page.
identity.enabled: false- Management Identity is currently not supported.
optimize.enabled: false- Optimize is not currently supported and depends on Management Identity.
orchestration.exporters.zeebe.enabled: false- Disables the automatic Elasticsearch Exporter configuration in the Helm chart. This exporter was previously used with Optimize and earlier setups.
orchestration.exporters.camunda.enabled: false- Disables the automatic Camunda Exporter configuration in the Helm chart. Values are supplied manually through environment variables.
orchestration.envCAMUNDA_CLUSTER_INITIALCONTACTPOINTS- These are the contact points for the brokers to know how to form the cluster. Find more information on what the variable means in setting up a cluster.
CAMUNDA_DATA_EXPORTERS_CAMUNDAREGION0_ARGS_CONNECT_URL- The Elasticsearch endpoint for region 0 (the ECK-managed headless service, for example:
elasticsearch-es-mastersfor a cluster namedelasticsearch). The headless service is required because VPN/peering routes pod IPs, not ClusterIPs — so DNS must return individual pod addresses that are routable cross-cluster. You can discover the exact service name withkubectl get svc -n <elasticsearch-namespace>.
- The Elasticsearch endpoint for region 0 (the ECK-managed headless service, for example:
CAMUNDA_DATA_EXPORTERS_CAMUNDAREGION1_ARGS_CONNECT_URL- The Elasticsearch endpoint for region 1 (the ECK-managed headless service, for example:
elasticsearch-es-mastersfor a cluster namedelasticsearch).
- The Elasticsearch endpoint for region 1 (the ECK-managed headless service, for example:
CAMUNDA_DATA_EXPORTERS_CAMUNDAREGION0_CLASSNAMEio.camunda.exporter.CamundaExporterexplicitly creates the new Camunda Exporter.
CAMUNDA_DATA_EXPORTERS_CAMUNDAREGION1_CLASSNAMEio.camunda.exporter.CamundaExporterexplicitly creates the new Camunda Exporter.
CAMUNDA_DATA_EXPORTERS_CAMUNDAREGION0_ARGS_CONNECT_USERNAME/CAMUNDA_DATA_EXPORTERS_CAMUNDAREGION0_ARGS_CONNECT_PASSWORD- Elasticsearch authentication credentials for region 0. The password is sourced from the
elasticsearch-es-password-region-0secret created by the password synchronization step.
- Elasticsearch authentication credentials for region 0. The password is sourced from the
CAMUNDA_DATA_EXPORTERS_CAMUNDAREGION1_ARGS_CONNECT_USERNAME/CAMUNDA_DATA_EXPORTERS_CAMUNDAREGION1_ARGS_CONNECT_PASSWORD- Elasticsearch authentication credentials for region 1. The password is sourced from the
elasticsearch-es-password-region-1secret.
- Elasticsearch authentication credentials for region 1. The password is sourced from the
- A cluster of eight Zeebe brokers (four in each of the regions) is recommended for the dual-region setup
orchestration.clusterSize: 8orchestration.partitionCount: 8orchestration.replicationFactor: 4
- Elasticsearch is managed via the ECK operator and configured through a separate manifest (
elasticsearch-cluster-dual-region.yml), not via the Helm chart's built-in Elasticsearch subchart. The Elasticsearch overlay (camunda-elastic-values.yml) disables the built-in Bitnami subchart and configures the local Elasticsearch connection (URL and authentication) for components that read data (orchestration secondary storage, Optimize). This is distinct from the cross-cluster Elasticsearch exporter URLs configured via environment variables above, which handle writing data across regions.
region0/camunda-values.yml
This overlay contains the multi-region identification for the cluster in region 0.
region1/camunda-values.yml
This overlay contains the multi-region identification for the cluster in region 1.
Configure Zeebe environment variables
You must change the following environment variables for Zeebe. The default values will not work for you and are only for illustration.
The base camunda-values.yml in aws/kubernetes/eks-dual-region/helm-values requires adjustments before installing the Helm chart:
CAMUNDA_CLUSTER_INITIALCONTACTPOINTSCAMUNDA_DATA_EXPORTERS_CAMUNDAREGION0_ARGS_CONNECT_URLCAMUNDA_DATA_EXPORTERS_CAMUNDAREGION1_ARGS_CONNECT_URL
- The bash script generate_zeebe_helm_values.sh in the repository folder
aws/kubernetes/eks-dual-region/procedure/helps generate those values. You only have to copy and replace them within the basecamunda-values.yml. It uses the exported environment variables of the export environment variables section for namespaces and regions. The script derives the number of Zeebe Brokers from your Helm values. For a dual-region setup, the default is8(four brokers per region).
./generate_zeebe_helm_values.sh
Example output
For illustration purposes only. These values will not work in your environment.
./generate_zeebe_helm_values.sh

Use the following to set the environment variable CAMUNDA_CLUSTER_INITIALCONTACTPOINTS in the base Camunda Helm chart values file for Zeebe:

- name: CAMUNDA_CLUSTER_INITIALCONTACTPOINTS
  value: camunda-zeebe.camunda-london.svc.cluster.local:26502,camunda-zeebe.camunda-paris.svc.cluster.local:26502

Use the following to set the environment variable CAMUNDA_DATA_EXPORTERS_CAMUNDAREGION0_ARGS_CONNECT_URL in the base Camunda Helm chart values file for Zeebe:

- name: CAMUNDA_DATA_EXPORTERS_CAMUNDAREGION0_ARGS_CONNECT_URL
  value: http://elasticsearch-es-masters.camunda-london.svc.cluster.local:9200

Use the following to set the environment variable CAMUNDA_DATA_EXPORTERS_CAMUNDAREGION1_ARGS_CONNECT_URL in the base Camunda Helm chart values file for Zeebe.

- name: CAMUNDA_DATA_EXPORTERS_CAMUNDAREGION1_ARGS_CONNECT_URL
  value: http://elasticsearch-es-masters.camunda-paris.svc.cluster.local:9200
- As the script suggests, replace the environment variables within
camunda-values.yml.
The script generates only the environment-specific values (initial contact points and Elasticsearch URLs). The authentication variables (CAMUNDA_DATA_EXPORTERS_*_ARGS_CONNECT_USERNAME / CAMUNDA_DATA_EXPORTERS_*_ARGS_CONNECT_PASSWORD) use the cross-region secrets created in the password synchronization step and do not require modification.
Install Camunda 8 using Helm
From the terminal context of aws/kubernetes/eks-dual-region/helm-values, and ensure you have previously exported the environment variables, execute the following:
helm install $CAMUNDA_RELEASE_NAME $HELM_CHART_REF \
  --version $HELM_CHART_VERSION \
  --kube-context $CLUSTER_0 \
  --namespace $CAMUNDA_NAMESPACE_0 \
  -f camunda-values.yml \
  -f ../../../../generic/kubernetes/operator-based/elasticsearch/camunda-elastic-values.yml \
  -f region0/camunda-values.yml

helm install $CAMUNDA_RELEASE_NAME $HELM_CHART_REF \
  --version $HELM_CHART_VERSION \
  --kube-context $CLUSTER_1 \
  --namespace $CAMUNDA_NAMESPACE_1 \
  -f camunda-values.yml \
  -f ../../../../generic/kubernetes/operator-based/elasticsearch/camunda-elastic-values.yml \
  -f region1/camunda-values.yml
4. Verify connectivity to Camunda 8
Starting from version 8.8, the Orchestration Cluster is configured by default with Admin and is protected by Basic authentication using demo:demo as the default username and password.
- Open a terminal and port-forward the Zeebe Gateway via
kubectlfrom one of your clusters. Zeebe is stretching over both clusters and isactive-active, meaning it doesn't matter which Zeebe Gateway to use to interact with your Zeebe cluster.
kubectl --context "$CLUSTER_0" -n $CAMUNDA_NAMESPACE_0 port-forward services/$CAMUNDA_RELEASE_NAME-zeebe-gateway 8080:8080
- Open another terminal and use e.g.
cURLto print the Zeebe cluster topology:
# authentication may vary depending on your setup, the following is just an example call.
curl -u demo:demo -L -X GET 'http://localhost:8080/v2/topology' \
  -H 'Accept: application/json'
- Make sure that your output contains all eight brokers from the two regions:
Example output
loading...
Next steps
After successfully deploying Camunda 8 in a dual-region setup, consider the following next steps:
- Dual-region operational procedures - Learn how to perform failover and failback operations.