Initial setup
Identity is included by default with any Orchestration cluster. Within an Orchestration cluster, Identity provides unified, cluster-level identity management and authorization.
Identity is available via Helm install and for local development via Camunda 8 Run.
The following guides cover Identity configuration in Self-Managed environments. For information on using and managing Identity, see the user guides.
Initial configuration
Using the default setup for Camunda 8 Run will result in a cluster with:
- Web application login enabled
- API authentication disabled
- Authorizations disabled
- An initial user with username/password:
demo/demo - An
adminrole with full permissions, applied to thedemouser
To modify this initial configuration, define your custom values in application.yaml, and pass this file at startup using the --config flag. See this section for details.
In Helm installations, API authentication and authorization are enabled by default. You can adjust these settings in application.yaml or using environment variables.
Configure initial users
If users are managed within the Orchestration cluster (i.e., without an external Identity Provider), you can create an initial user in two ways:
- Through the web application UI
- Through configuration
Option 1: Create an initial admin user in the UI
If no admin user exists, the Orchestration cluster web applications display a screen for creating the initial user:
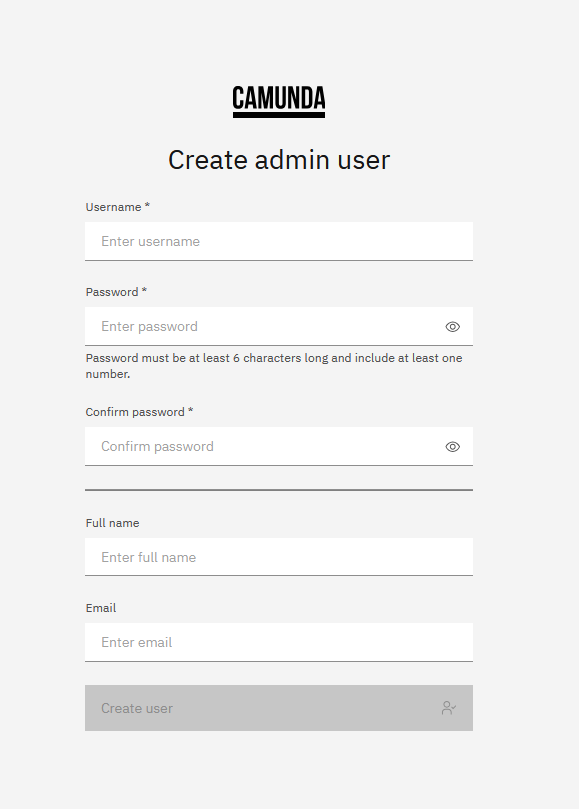
This user will be assigned to the admin role and granted all permissions in the system. Once an admin user exists, this screen is no longer shown.
Option 2: Define initial users via configuration
To configure initial users programmatically, include the relevant definitions in your application.yaml or environment variables.
- Helm properties
- Environment variables
camunda:
  security:
    initialization:
      users:
        - username: <Your chosen username>
          password: <Your chosen password>
          name: <The name of the first user>
          email: <The email address of the first user>
        # add more users to this list as desired
CAMUNDA_SECURITY_INITIALIZATION_USERS_0_USERNAME=<Your chosen username>
CAMUNDA_SECURITY_INITIALIZATION_USERS_0_PASSWORD=<Your chosen password>
CAMUNDA_SECURITY_INITIALIZATION_USERS_0_NAME=<The name of the first user>
CAMUNDA_SECURITY_INITIALIZATION_USERS_0_EMAIL=<The email address of the first user>

# add more users as desired by repeating the variables with an incremented index,
# like CAMUNDA_SECURITY_INITIALIZATION_USERS_1_USERNAME
By default, a user is not assigned to any roles and therefore has no permissions. See the next section to learn how to assign a user to a role via configuration.
Assign users, clients, groups, or mapping rules to roles via configuration
The Orchestration cluster provides a number of built-in roles with predefined permissions for easier setup.
To assign users, clients, groups, or mapping rules to roles, add the appropriate properties to your application.yaml or set them as environment variables.
- Helm properties
- Environment variables
camunda:
  security:
    initialization:
      defaultRoles:
        <role>:
          users:
            - <username>
            # add more users to this list as desired
          clients:
            - <client id>
            # add more clients to this list as desired
          groups:
            - <group id>
            # add more groups to this list as desired
          mappings:
            - <mapping id>
            # add more mappings to this list as desired
CAMUNDA_SECURITY_INITIALIZATION_DEFAULTROLES_<role>_USERS_0=<username>
CAMUNDA_SECURITY_INITIALIZATION_DEFAULTROLES_<role>_CLIENTS_0=<client id>
CAMUNDA_SECURITY_INITIALIZATION_DEFAULTROLES_<role>_GROUPS_0=<group id>
CAMUNDA_SECURITY_INITIALIZATION_DEFAULTROLES_<role>_MAPPINGS_0=<mapping id>

# add more members as desired by repeating the variables with an incremented index,
# like CAMUNDA_SECURITY_INITIALIZATION_DEFAULTROLES_<role>_USERS_1
Replace <role> with the ID of the role you want to configure.
Here is an example how to configure a user demo to become a member of the admin role:
- Helm properties
- Environment variables
camunda:
  security:
    initialization:
      defaultRoles:
        admin:
          users:
            - demo
CAMUNDA_SECURITY_INITIALIZATION_DEFAULTROLES_ADMIN_USERS_0=demo
You can assign a user to multiple roles by listing them in the respective section of each role.
Enable API authentication and authorizations
In Camunda 8 Run installations, basic authentication is enabled on the Camunda web applications, but the API is unprotected, and authorizations are disabled. API protection and authorizations can both be enabled by modifying your application.yaml or environment variables:
- Helm properties
- Environment variables
camunda:
  security:
    authentication:
      unprotected-api: false
    authorizations:
      enabled: true
CAMUNDA_SECURITY_AUTHENTICATION_UNPROTECTED-API=false
CAMUNDA_SECURITY_AUTHORIZATIONS_ENABLED=true
To enable authorizations, API protection must also be enabled.
Basic authentication credentials are then required when making API requests, as in the following:
curl --request POST 'http://localhost:8080/v1/process-definitions/search'  \
  -u demo:demo \
  --header 'Content-Type: application/json' \
  --data-raw '{}'