Deploy an AKS cluster with Terraform (advanced)
This guide provides a detailed tutorial for deploying an Azure Kubernetes Service (AKS) cluster, tailored specifically for deploying Camunda 8 using Terraform, a popular Infrastructure as Code (IaC) tool.
This guide is designed to help you leverage the power of Infrastructure as Code (IaC) to streamline and reproduce your cloud infrastructure setup. By walking through the essentials of setting up an AKS cluster, and provisioning managed Azure resources such as Azure Database for PostgreSQL, this guide demonstrates how to use Terraform with Azure. It makes the process accessible even to those new to Terraform or IaC concepts. It utilizes Azure-managed services where available, offering these as optional components for added convenience and maintainability.
If you are completely new to Terraform and the concept of IaC, consider reading the Terraform IaC documentation and trying the interactive quick start for a basic understanding.
Requirements
- An Azure subscription and the necessary permissions to create any resource within Azure.
- Azure CLI, a CLI tool for creating and managing Azure resources.
- Terraform for provisioning infrastructure as code.
- kubectl to interact with your AKS cluster.
- jq to parse and manipulate JSON (e.g. Terraform outputs).
- (optional) Custom domain name/DNS zone in Azure DNS. This allows you to expose Camunda 8 endpoints to an external network via the configured ingress.
- Azure service quotas
- Check your quotas for Virtual Networks, vCPU cores, and Storage Accounts in the target region: Azure subscription and service limits.
- If you reach a limit, you can request a quota increase through the Azure portal.
- This guide uses GNU Bash for all shell commands.
For the exact tool versions we’ve tested against, see the .tool-versions file in the repository.
Considerations
This setup provides a basic foundation for getting started with Camunda 8 on AKS, but it is not fully optimized for performance. It serves as a good starting point for building out a production-ready environment by incorporating IaC tooling.
To try out Camunda 8 or for development purposes, consider signing up for our SaaS offering. If you already have an AKS cluster, you can skip ahead to the Helm guide.
To keep this guide simple and focused, certain best practices are referenced via links to additional documentation, allowing you to explore each area in more detail when you're ready.
Reference architectures are not intended to be consumed exactly as described. The examples provided in this guide are not packaged as a reusable Terraform module. It is recommended that you clone the repository and make any necessary modifications locally.
This approach allows you to extend and customize the codebase according to your specific needs. However, note that maintaining the infrastructure is your responsibility. Camunda will continue to update and improve the reference architecture, and these updates may not be backward compatible. You may incorporate updates into your customized codebase as needed.
Following this guide will incur costs on your Azure account, including charges for Azure Kubernetes Service (AKS), the compute (virtual machine instances) for the underlying nodes, Azure Managed Disks for persistent volumes, and Azure DNS zones for domain resolution. For more information, refer to the AKS pricing page and the Azure pricing calculator, as costs depend on region and configuration choices.
Security
The following security considerations were relaxed to streamline adoption and development. These should be reassessed and hardened before deploying to production. The following items were identified using Trivy and can be looked up in the Aqua vulnerability database.
These concessions are intentional in this reference infrastructure to simplify onboarding, allow internal-only access, and minimize friction during evaluation. They are not appropriate for production and must be revisited.
This section explains common security findings in Azure deployments and provides guidance on how to address them.
AVD-AZU-0047 (CRITICAL): Security group rule allows unrestricted ingress from any IP address
Reasoning
This rule permits inbound traffic from 0.0.0.0/0, meaning any external source can reach the AKS subnet. It may expose workloads or future public IPs to unsolicited access, increasing the risk of compromise—especially if internal services are misconfigured.
Potential resolution
- Restrict incoming traffic to specific IP addresses or CIDR ranges that need access.
- For management access, limit SSH/RDP to your company's IP ranges.
- Use just-in-time access for administrative purposes.
- Implement a bastion host/jump box for secure access.
- Consider using Azure Private Link for private connectivity.
Note: This doesn't affect the AKS control plane directly, but still weakens the overall network boundary.
AVD-AZU-0041 (CRITICAL): Cluster does not limit API access to specific IP addresses
Reasoning
This finding shows that your Kubernetes cluster's API server is accessible from any IP address. The API server is the control plane for Kubernetes and unrestricted access increases the risk of unauthorized access and potential attacks.
Potential resolution
- Configure
authorized_ip_rangesinapi_server_access_profileto restrict API server access. (Review the related documentation). - Enable private cluster mode with
private_cluster_enabled = true. (Review the related documentation). - Create an
azurerm_private_endpointfor the AKS Private Link service. (Review the related documentation). - Enable Azure AD–based RBAC via
role_based_access_control { azure_active_directory { ... } }. (Review the related documentation). - Use
azurerm_network_security_groupandazurerm_network_security_ruleto restrict access to the control-plane subnet. (NSG, rule).
Note: While open API access simplifies testing and development, production clusters should always restrict API server access to known IP ranges.
AVD-AZU-0013 (CRITICAL): Vault network ACL does not block access by default
Reasoning
This finding indicates that your Azure Key Vault network access controls are not configured to deny access by default. This means that unless specifically restricted, traffic can reach your Key Vault from any source.
Potential resolution
- Enable the "Deny" default action for network ACLs.
- Allow specific IP ranges or virtual networks.
- Use a Private Endpoint for Key Vault access.
- Use service endpoints to limit Azure service access.
- Enable Soft Delete and Purge Protection for recovery and data safety.
Note: Default deny configurations provide better security posture but may complicate initial setup and testing. For automated testing environments, clearly document these exceptions.
AVD-AZU-0040 (MEDIUM): Cluster does not have logging enabled via OMS Agent
Reasoning
This finding indicates that comprehensive logging is not enabled on your Kubernetes cluster using the OMS (Operations Management Suite) Agent. Without proper logging, you have limited visibility into cluster operations, making it difficult to detect and respond to security incidents.
Potential resolution
- Enable Azure Monitor for containers on your AKS cluster.
- Configure the OMS Agent to collect container logs and metrics.
- Set up a Log Analytics workspace for centralized log storage.
- Create custom queries and alerts based on collected logs.
- Consider implementing Microsoft Defender for Cloud (formerly Azure Security Center) for enhanced monitoring and threat detection.
Note: While disabling logging simplifies testing environments and reduces costs, production environments should always have comprehensive logging enabled. For testing purposes, consider using a shared Log Analytics workspace with appropriate retention policies.
Outcome
Infrastructure diagram for a single-region AKS setup (click on the image to open the PDF version)
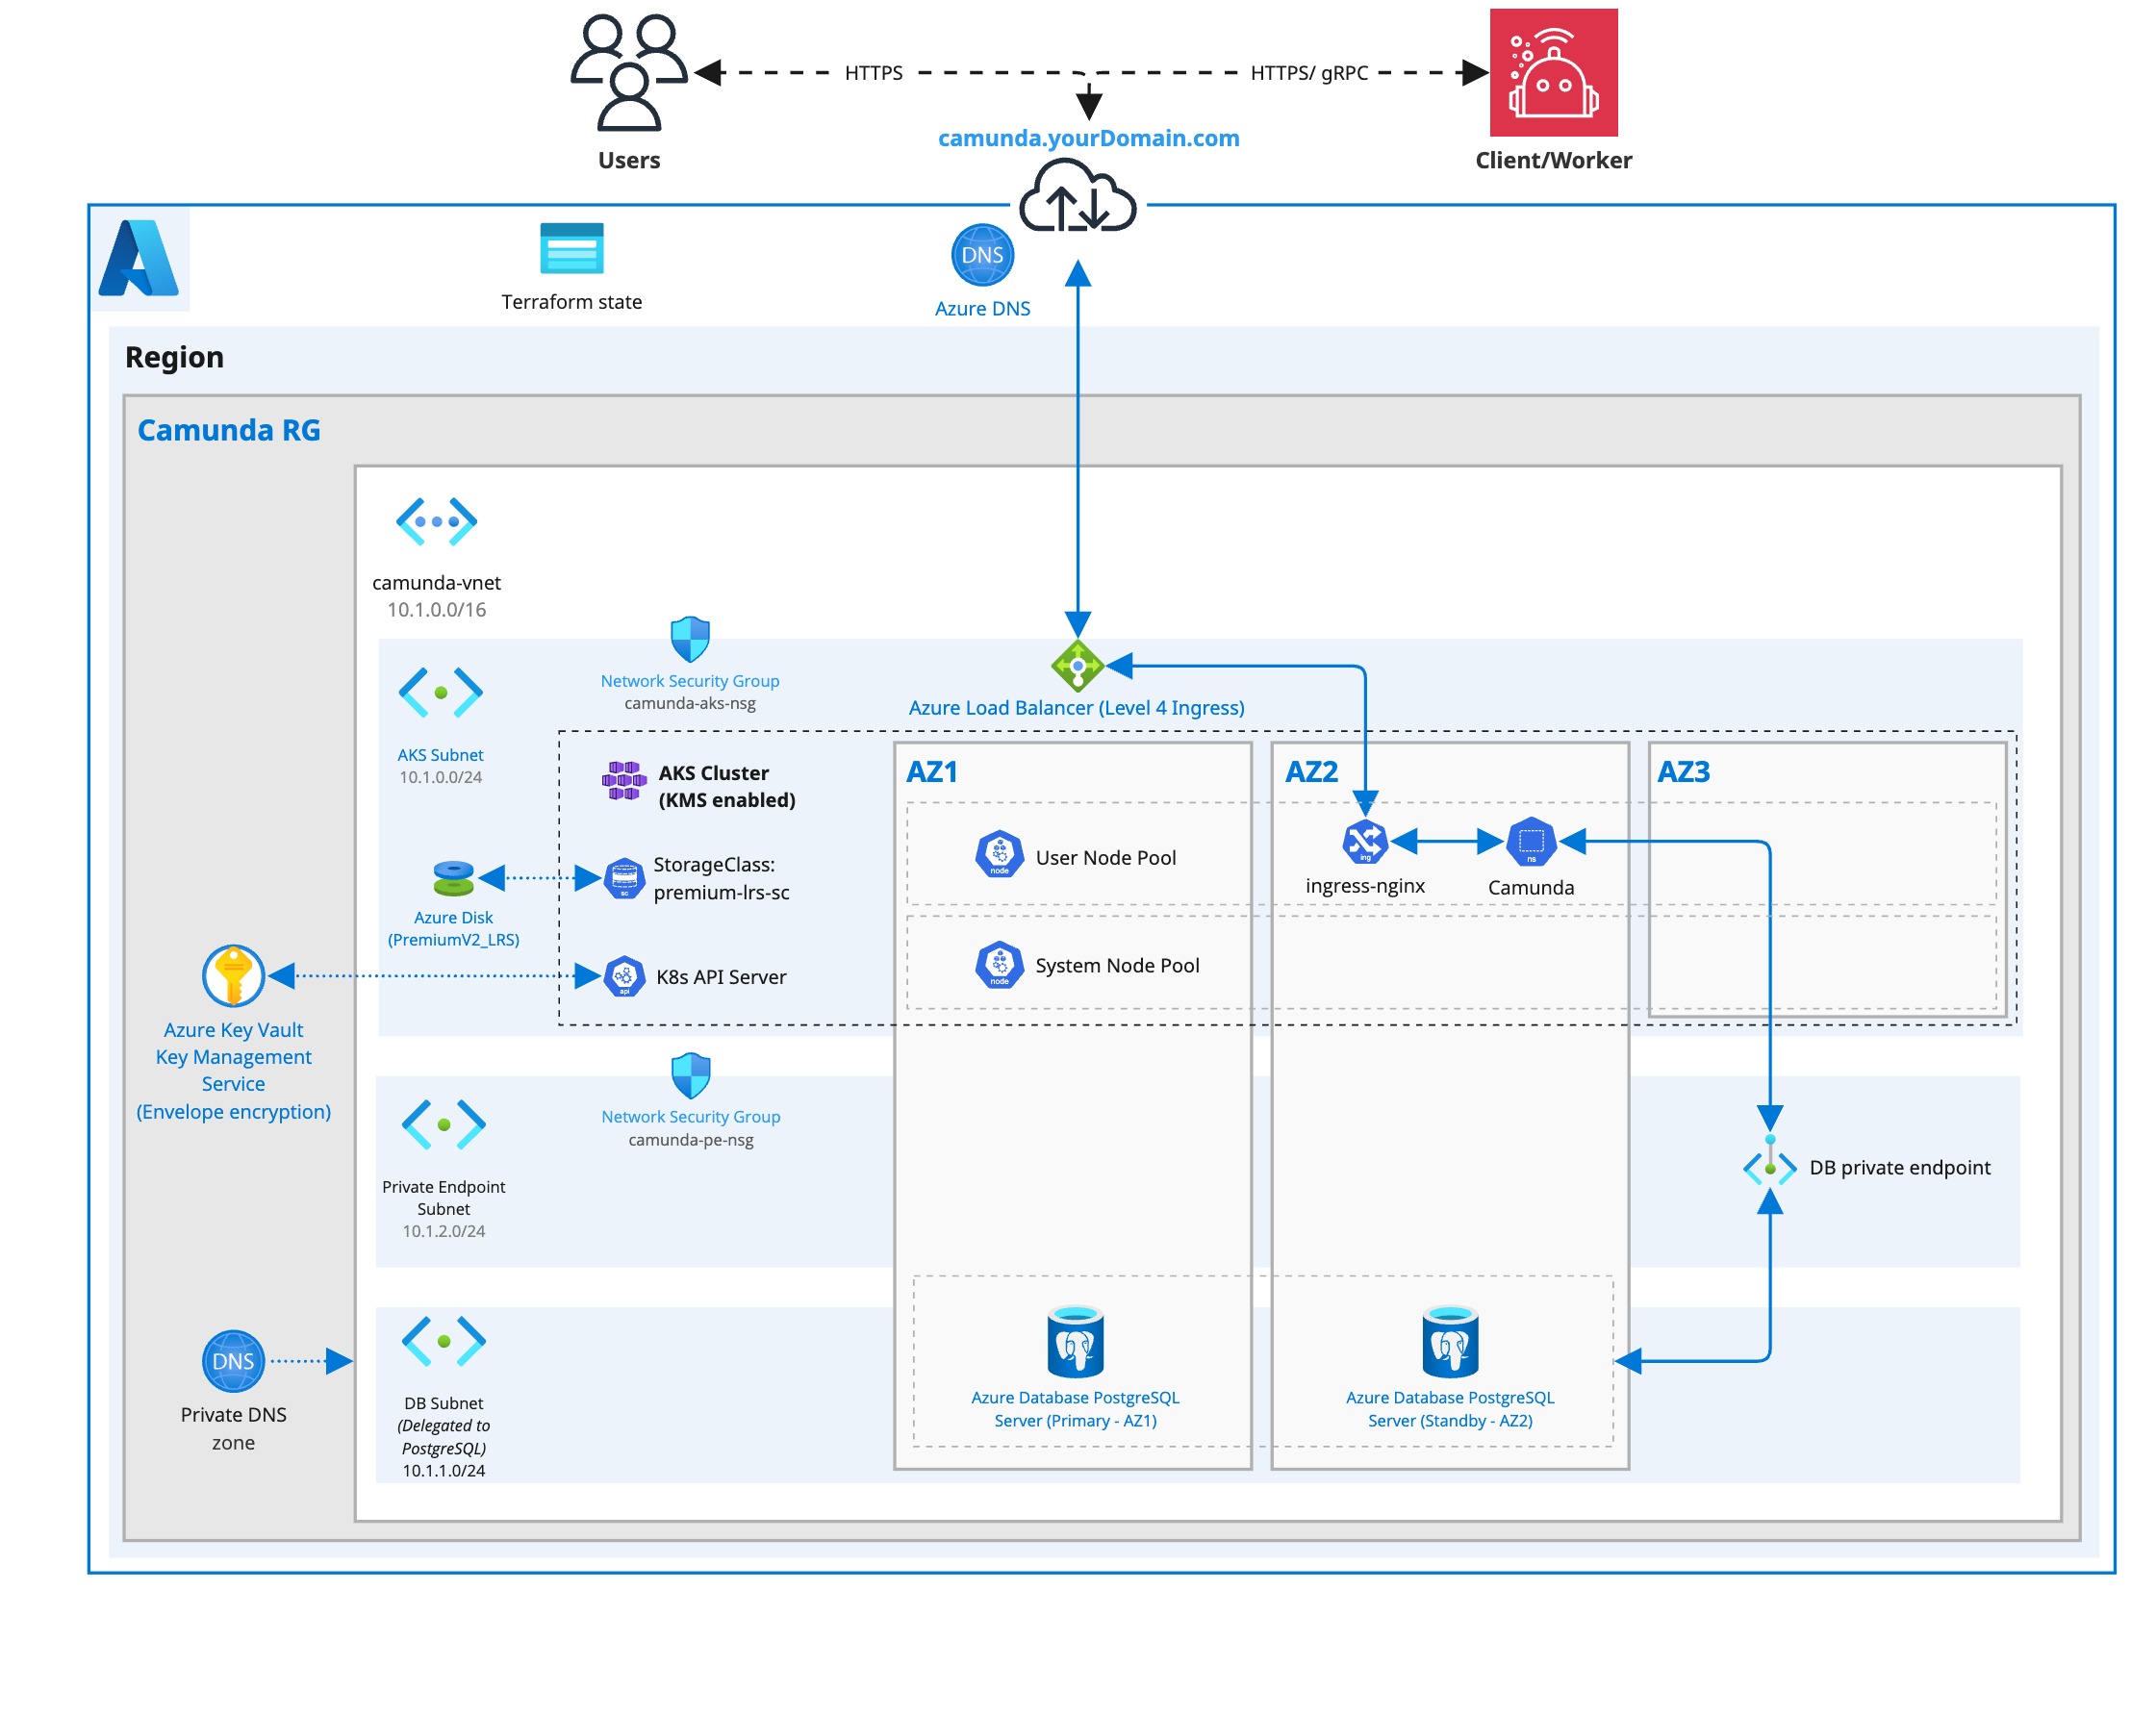
The vnet and the subnets are sized according to standard Azure recommendations by default. Due to Azure CNI, every pod will get assigned a real internal IP. While the defaults are more than sufficient for this guide, if you expect a large number of pods in a single subnet, consider using a larger subnet for AKS like /23 or /22.
1. Configure Azure and initialize Terraform
Obtain a copy of the reference architecture
The first step is to download a copy of the reference architecture of the GitHub repository. This material will be used throughout the rest of this documentation. The reference architectures are versioned using the same Camunda versions (stable/8.x).
The provided reference architecture repository allows you to directly reuse and extend the existing Terraform example base. This sample implementation is flexible to extend to your own needs without the potential limitations of a Terraform module maintained by a third party.
loading...
With the reference architecture copied, you can proceed with the remaining steps outlined in this documentation. Ensure that you are in the correct directory before continuing with further instructions.
Terraform prerequisites
To manage the infrastructure for Camunda 8 on Azure using Terraform, we need to set up Terraform's backend to store the state file remotely in an Azure Storage Account. This ensures secure and persistent storage of the state file.
Advanced users may want to handle this part differently and use a different backend. The backend setup provided is an example for new users.
Set up Azure authentication
The Azure Terraform provider requires authentication using Azure credentials before it can create resources.
For all environments, create a dedicated Azure AD service principal and assign only the necessary permissions. You can create and assign roles via the Azure Portal or with the Azure CLI.
- Existing SP
- New SP
To log in using an existing Azure Service Principal, you need the appId and tenant values associated with the Service Principal. These credentials allow Terraform to authenticate and provision resources in your Azure subscription.
If you need help finding your tenant ID, refer to Find your Azure subscription tenant ID.
Use the following command to log in (you will be prompted for the password):
az login --service-principal \
  -u <appId> \
  --tenant <tenant-id>
Replace <appId>, <password>, and <tenant-id> with the actual values of your Service Principal.
Also, ensure that you export the <appId> by running the below command after logging in as the SP, as it will be needed in the next step.
export AZURE_SP_ID=$(az account show --query user.name -o tsv)
To create a new service principal and assign it the required permissions:
Feel free to change the example name.
az ad sp create-for-rbac \
  --name "camunda-tf-sp" \
  --role Contributor \
  --scopes /subscriptions/<your-subscription-id>
This will return a JSON object with appId, password, and tenant. These values are required for login using the service principal:
az login --service-principal \
  -u <appId> \
  --tenant <tenant-id>
You will be prompted to enter the password interactively.
Replace <appId>, <password>, and <tenant-id> with the actual values of your Service Principal.
Also, ensure that you export the <appId> by running the below command after logging in as the SP, as it will be needed in the next step.
export AZURE_SP_ID=$(az account show --query user.name -o tsv)
Creating terraform.tfvars
To configure your deployment, create a terraform.tfvars file in the root of the aks-single-region folder. This file defines critical environment-specific settings like your Azure subscription and the Service Principal used for authentication.
Follow the below guide for getting the necessary values:
- With domain
- Without domain
First, set the following environment variables:
# The domain name that your Azure DNS zone manages
export TLD=<yourdomain.com>
# The resource group that your Azure DNS zone belongs to
export AZURE_DNS_RESOURCE_GROUP=<your-dns-resource-group>
Then, run the following script to create the terraform.tfvars file:
loading...
subscription_id
This value specifies the Azure Subscription ID in which all infrastructure will be deployed, including the AKS cluster, PostgreSQL Flexible Server, and Key Vault. To retrieve your current subscription ID, you can run the following command:
terraform_sp_app_id
This is the Application (client) ID of the Azure Service Principal that Terraform uses to configure Role-Based Access Control (RBAC). By providing this ID, Terraform ensures that the Service Principal has the necessary access rights to manage and provision resources within your Azure subscription.
dns_zone_id
This value specifies the full Azure resource ID of the DNS Zone used for managing your custom domain.
It is required if you are deploying Camunda 8 with a domain name. Terraform uses this value to grant the necessary role-based access control (RBAC) permissions to the external-dns Kubernetes add-on, allowing it to create and update DNS records dynamically within your Azure DNS Zone.
If this value is missing or incorrect, external-dns will not have permission to manage records, and DNS entries for your Camunda 8 endpoints will not be created.
Run the following script to create the terraform.tfvars file:
loading...
subscription_id
This value specifies the Azure Subscription ID in which all infrastructure will be deployed, including the AKS cluster, PostgreSQL Flexible Server, and Key Vault. To retrieve your current subscription ID, you can run the following command:
terraform_sp_app_id
This is the Application (client) ID of the Azure Service Principal that Terraform uses to configure Role-Based Access Control (RBAC). By providing this ID, Terraform ensures that the Service Principal has the necessary access rights to manage and provision resources within your Azure subscription.
Create an Azure Storage Account for Terraform state management
Before setting up Terraform, you should create an Azure Storage Account and container to store the state file. This is important for collaboration and to prevent issues like state file corruption. This should be in a separate resource group from the main infrastructure.
To start, set the required values as environment variables upfront to avoid repeating them in each command:
loading...
Define the value for AZURE_LOCATION with your chosen Azure region (for example, westeurope).
For production deployments, always use custom names for your Azure Storage Account and related resources. Storage Account names must be globally unique across all Azure subscriptions. The provided example (export AZURE_STORAGE_ACCOUNT_NAME="camundatfstate") is for demonstration only and may not be available. Choose a name that is unique and follows your organization's naming conventions to avoid deployment failures.
Now, follow these steps to create the storage account with versioning enabled:
-
Run the following script to create a storage account and container for storing your Terraform state. Make sure that you have chosen a globally unique name for the storage account before:
azure/common/procedure/storage-account/storage-account-creation.shloading... -
Enable blob versioning to track changes and protect the state file from accidental deletions or overwrites:
azure/common/procedure/storage-account/storage-account-versioning.shloading... -
Verify versioning is enabled on the blob container:
azure/common/procedure/storage-account/storage-account-verify.shloading...
This Azure Storage Account will now securely store your Terraform state files with versioning enabled.
Initialize Terraform
Once your authentication is set up, you can initialize your Terraform project. The previous steps configured a dedicated Azure Storage Account and container (AZURE_STORAGE_ACCOUNT_NAME, AZURE_STORAGE_CONTAINER_NAME) to store your state.
Configure the backend and download the necessary provider plugins:
loading...
Terraform will connect to the Azure storage container to manage the state file, ensuring remote and persistent storage.
Terraform setup
This reference architecture uses Terraform modules to deploy all required Azure infrastructure for running Camunda 8 in a production-grade AKS environment. It includes:
- A Virtual Network (VNet) and three subnets (AKS, database, private endpoint)
- Network Security Group (NSG) for AKS
- Azure Kubernetes Service (AKS) cluster with system and user node pools across 3 AZs
- Azure PostgreSQL Flexible Server with high availability and private endpoint
- Azure Key Vault with encryption key and a user-assigned managed identity for AKS secrets (KMS)
1. Main configuration
The main deployment logic is defined in main.tf. It instantiates all modules and exposes several customizable values via the locals block:
loading...
Azure Key Vault names must be globally unique across all Azure subscriptions. In the linked script, you are prompted to provide a resource prefix, and the Key Vault will be created as resource_prefix-kv. Be sure to choose a prefix that results in a unique Key Vault name, or override it in the KMS module to avoid deployment failures.
The modules deployed are:
network(network.tf): Virtual network, AKS subnet, DB subnet, and private endpoint subnetkms(kms.tf): Key Vault, encryption key, and UAMI for AKS secret encryptionaks(aks.tf): Cluster deployment with system and user node pools across AZspostgres_db(db.tf): High-availability PostgreSQL Flexible Server, private DNS, and endpoint
2. AKS module
This module exposes a customisable kubernetes_version value via the locals block:
loading...
3. PostgreSQL module
This module exposes several customizable values via the locals block:
loading...
These values control database user setup, naming, and passwords. Sensitive values are used by downstream provisioning jobs and Helm secrets.
This module is enabled by default. To opt out, you must:
- Remove the
db.tffile from the root - Manually provide credentials and PostgreSQL endpoints for the Helm chart
Execution
We strongly recommend managing sensitive information such as the PostgreSQL username and password using a secure secrets management solution like HashiCorp Vault. For details on how to inject secrets directly into Terraform via Vault, see the Terraform Vault Secrets Injection Guide.
-
Open a terminal in the chosen reference folder where
config.tfand other.tffiles are located. -
Plan the configuration files:
terraform plan -out cluster.plan # describe what will be created
- After reviewing the plan, you can confirm and apply the changes:
terraform apply cluster.plan # apply the creation
Terraform will now create the AKS cluster with all the necessary configurations. The completion of this process may require approximately 20–30 minutes.
2. Preparation for Camunda 8 installation
Access the created AKS cluster
You can gain access to the AKS cluster using the Azure CLI with the following command:
# Extract values from terraform output
RESOURCE_GROUP=$(terraform output -raw resource_group_name)
CLUSTER_NAME=$(terraform output -raw aks_cluster_name)

# Echo the values to verify they are not empty
echo "RESOURCE_GROUP: $RESOURCE_GROUP"
echo "CLUSTER_NAME: $CLUSTER_NAME"

# Get credentials using Azure CLI
az aks get-credentials \
  --resource-group "$RESOURCE_GROUP" \
  --name "$CLUSTER_NAME" \
  --overwrite-existing
After updating the kubeconfig, you can verify your connection to the cluster with kubectl:
kubectl get nodes
Create a namespace for Camunda:
export CAMUNDA_NAMESPACE="camunda"
kubectl create namespace "$CAMUNDA_NAMESPACE"
In the remainder of the guide, we reference the camunda namespace to create some required resources in the Kubernetes cluster, such as secrets or one-time setup jobs.
Configure a high-performance StorageClass
Camunda 8 requires high IOPS for performance-critical components like Zeebe, so it is important to use Azure PremiumV2 disks rather than the default Standard_LRS.
This step defines a custom StorageClass that:
- Uses PremiumV2_LRS Azure Managed Disks
- Sets a
Retainreclaim policy - Uses
WaitForFirstConsumervolume binding - Becomes the default StorageClass for the cluster
Apply the StorageClass
Run the following script to apply the new storage class and set it as default:
loading...
To verify completion of the operation, run:
./procedure/storageclass-verify.sh
Show script procedure/storageclass-verify.sh
loading...
This must be applied before installing the Camunda Helm chart so that PersistentVolumeClaims (PVCs) are provisioned with the correct performance characteristics.
Configure the database and associated access
As you now have a database, you need to create dedicated databases for each Camunda component and an associated user that has configured access. Follow these steps to create the database users and configure access.
Due to the tight NSG rules in this example, the only way to access the database is through the AKS cluster.
- In your terminal, set the necessary environment variables that will be substituted in the setup manifest:
loading...
A Kubernetes job will connect to the database and create the necessary users with the required privileges. The script installs the necessary dependencies and runs SQL commands to create the users and assign them the correct roles and privileges.
- Create a secret that references the environment variables:
loading...
This command creates a secret named setup-db-secret and dynamically populates it with the values from your environment variables.
After running the above command, you can verify that the secret was created successfully by using:
kubectl get secret setup-db-secret -o yaml --namespace "$CAMUNDA_NAMESPACE"
This should display the secret with the base64 encoded values.
- Apply the following manifest to set up the DB:
kubectl apply -f ./manifests/setup-postgres-create-db.yml --namespace "$CAMUNDA_NAMESPACE"
Show manifest setup-postgres-create-db.yml
loading...
Once the secret is created, the Job manifest from the previous step can consume this secret to securely access the database credentials.
- Once the job is created, monitor its progress using:
kubectl get job/create-setup-user-db --namespace "$CAMUNDA_NAMESPACE" --watch
Once the job shows as Completed, the users and databases will have been successfully created.
- View the logs of the job to confirm that the users were created and privileges were granted successfully:
kubectl logs job/create-setup-user-db --namespace "$CAMUNDA_NAMESPACE"
- Clean up the resources:
kubectl delete job create-setup-user-db --namespace "$CAMUNDA_NAMESPACE"
kubectl delete secret setup-db-secret --namespace "$CAMUNDA_NAMESPACE"
Running these commands cleans up both the job and the secret, ensuring that no unnecessary resources remain in the cluster.
2. Install Camunda 8 using the Helm chart
Now that you've exported the necessary values, you can proceed with installing Camunda 8 using Helm charts. Follow the guide Camunda 8 on Kubernetes for detailed instructions on deploying the platform to your Kubernetes cluster.