Deploy required dependencies with Kubernetes operators
This guide explains how to deploy Camunda 8 infrastructure components using official Kubernetes operators as an alternative to the Bitnami subcharts. This approach provides production-grade, officially maintained deployment solutions for PostgreSQL, Elasticsearch, and Keycloak.
Overview
Starting with Camunda 8.8, we continue to strengthen our commitment to robust, production-ready deployments based on solid foundations.
As outlined in our strategy, Camunda reinforces building deployments on solid foundations—primarily managed PostgreSQL and Elasticsearch services, along with external OIDC providers. However, we understand that managed infrastructure components aren't always available in your organization's service catalog.
This guide demonstrates how to integrate these infrastructure components using official Kubernetes operators that don't depend on Bitnami subcharts. These operators are the recommended way to deploy and manage these services in production environments.
PostgreSQL, Elasticsearch, and Keycloak are external dependencies — they are not Camunda products, regardless of the deployment method used.
- Camunda support scope: Camunda supports the integration and configuration of these components with the Camunda Helm chart. Camunda does not provide operational support for the infrastructure components themselves.
- Operator support: For operational support on infrastructure components, engage the respective project teams or community support channels directly (CloudNativePG, Elastic, Keycloak), or use managed services.
Bitnami subcharts are removed in Camunda 8.10 (Helm chart 15.x). On Camunda 8.9 and earlier you could continue using them via Bitnami enterprise images; migrate to operators or managed services before upgrading to 8.10.
If you have an existing Camunda deployment using Bitnami subcharts, see the migration guide for step-by-step instructions and automated tooling to migrate your data to Kubernetes operators or managed services with minimal downtime.
Why use Kubernetes operators?
Using official Kubernetes operators provides several advantages over traditional subcharts:
- Vendor maintenance: Each deployment method is maintained by the respective project team (Elastic, CloudNativePG community, Keycloak team) with dedicated engineering resources
- Production-grade features: Built-in management, monitoring, and scaling capabilities designed for enterprise environments
- Vendor support channels: Official support channels, dedicated vendor support teams, and comprehensive documentation available directly from each project
- Security-focused: Regular updates and CVE patches from upstream maintainers with specialized security teams
- Advanced lifecycle management: Automated upgrades, failover, and disaster recovery capabilities
- Best practices implementation: Following upstream recommended deployment patterns established by vendor experts
- Vendor expertise: Access to specialized knowledge and troubleshooting from the teams that build these technologies (through vendor support channels)
- Future-proof architecture: Replaces the Bitnami subcharts, removed in Camunda 8.10, with images you choose and update on your own cadence. Each operator still ships its own vendor images, so this changes which supply chain you depend on rather than removing third-party images altogether.
Prerequisites
Before proceeding with this guide, ensure you have:
- Kubernetes cluster: A functioning cluster with
kubectlaccess and block-storage persistent volumes - Cluster admin privileges: Required to install Custom Resource Definitions (CRDs) and operators
- Command-line tools:
kubectlconfigured to access your clusterhelmCLI for deploying Camunda using the Helm chartopensslfor generating random passwordsenvsubstcommand (part ofgettextpackage) for environment variable substitution
Architecture overview
This deployment approach separates infrastructure management from application deployment:
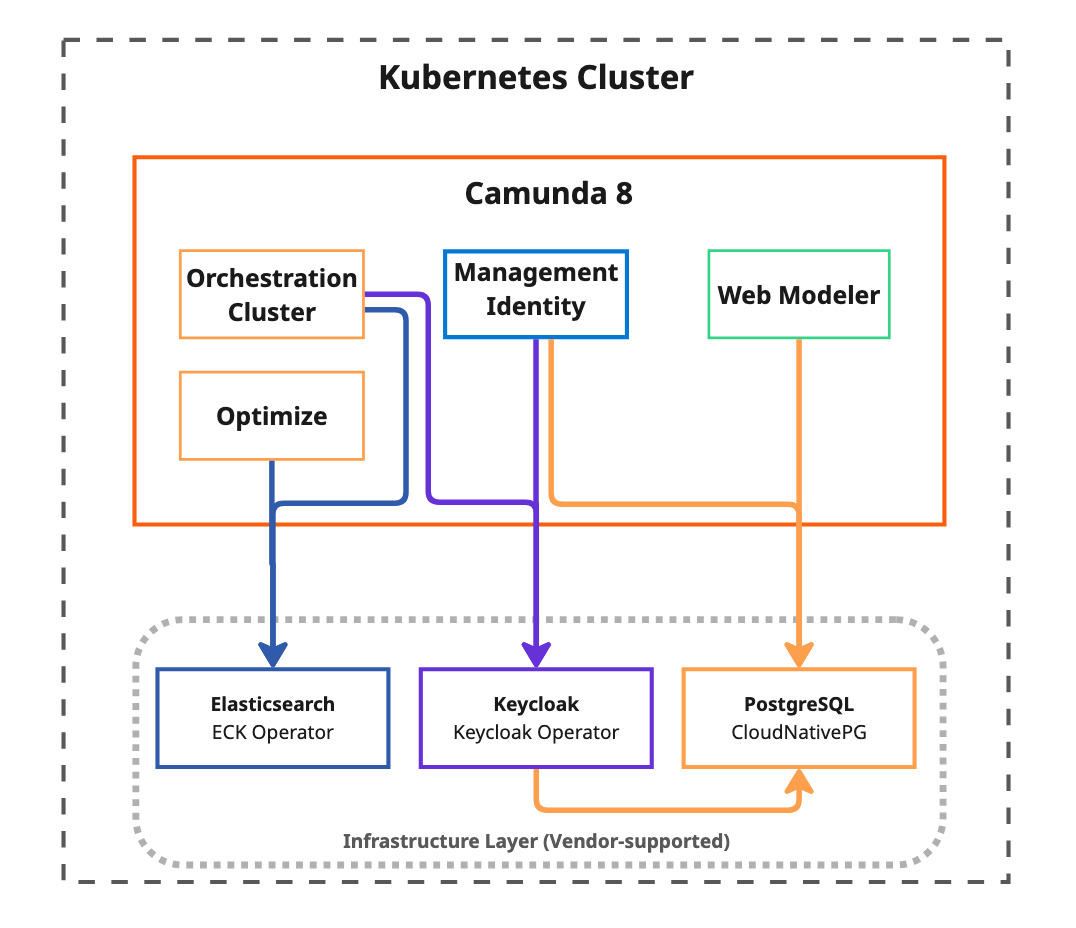
Infrastructure components
This approach uses three operator-managed infrastructure components, each maintained by their respective project teams:
| Component | Purpose | Official Documentation |
|---|---|---|
| PostgreSQL with CloudNativePG | Production-grade PostgreSQL clusters for Keycloak, Management Identity, and Camunda Hub databases | CloudNativePG Documentation |
| Elasticsearch with ECK | Official Elasticsearch deployment for Zeebe records, Operate, Tasklist, and Optimize data storage | ECK Guide |
| Keycloak with Keycloak Operator | Automated OIDC authentication provider for Management Identity | Keycloak Operator Documentation |
Quick start
Step 1: Get deployment resources
All configuration files, deployment scripts, and automation tools referenced in this guide are available in the Camunda deployment references repository:
Repository: camunda-deployment-references
Quick deployment commands
loading...
Then execute:
# Set up environment (required for all deployments)
source ./0-set-environment.sh

# Review and deploy infrastructure components in order
# PostgreSQL deployment
cd postgresql/
cat deploy.sh  # Review the deployment script
./deploy.sh

# Elasticsearch deployment
cd ../elasticsearch/
cat deploy.sh  # Review the deployment script
./deploy.sh

# Keycloak deployment
cd ../keycloak/
cat deploy.sh  # Review the deployment script
./deploy.sh
The deployment scripts (deploy.sh) contain all the necessary steps to install each component. You can either execute them directly or use them as reference for manual deployment or GitOps integration.
Step 2: Environment setup
All deployment scripts require environment variables to be set. This is a prerequisite for all subsequent steps:
loading...
Ensure you source this environment setup before running any deployment scripts in the following sections.
Step 3: Deployment overview
Each infrastructure component should be deployed individually in the following order:
| Order | Component | Dependencies | Purpose |
|---|---|---|---|
| 1 | PostgreSQL | None | Database clusters for Keycloak, Management Identity, and Camunda Hub |
| 2 | Elasticsearch | None | Secondary storage for orchestration cluster components |
| 3 | Keycloak | PostgreSQL | Authentication and identity management |
| 4 | Camunda | All above | Deploy using Helm with operator-managed infrastructure |
While this guide demonstrates manual deployment using command-line tools, these same configurations can be automated using GitOps solutions like ArgoCD, Flux, or other Kubernetes deployment pipelines. All configuration files referenced in this guide are designed to work seamlessly with declarative deployment approaches.
PostgreSQL deployment
Overview
CloudNativePG is a CNCF project that provides the official Kubernetes deployment method for PostgreSQL. It's designed specifically for cloud-native environments with enterprise-grade features including automated backups, point-in-time recovery, and rolling updates.
Official documentation: CloudNativePG Documentation
Architecture
Our setup provisions three separate PostgreSQL clusters for different Camunda components. Use the latest PostgreSQL version listed in our supported environments matrix that is compatible across the required components:
- pg-identity: Database for Camunda Identity component
- pg-keycloak: Database for Keycloak identity service
- pg-hub: Database for Camunda Hub
If you don't plan to use certain components (for example, Camunda Hub), you can simply remove the corresponding cluster definition from the configuration before deployment. This allows you to deploy only the PostgreSQL clusters you actually need, reducing resource consumption.
High availability and node maintenance
Each PostgreSQL cluster runs two instances and stores its write-ahead log (WAL) on a dedicated volume. Both defaults exist for operational reasons, not for performance.
Two instances keep your Kubernetes nodes drainable. CloudNativePG protects a running database from a node drain: when the node hosting the primary is drained, the operator performs a switchover first and then lets the eviction proceed. A single-instance cluster has nowhere to switch over to, so the operator refuses the eviction and kubectl drain retries until it times out:
error when evicting pods/"pg-identity-1" -n "camunda": Cannot evict pod as it would violate the pod's disruption budget.
A Kubernetes version upgrade drains one node at a time, so a single-instance cluster stalls that upgrade on the node holding the database. CloudNativePG describes this behavior in Kubernetes upgrade and maintenance and recommends always running more than one instance.
A dedicated WAL volume keeps replication from filling the data directory. A standby holds a replication slot on the primary, so a standby that is down or lagging makes the primary retain WAL segments. When pg_wal shares a volume with PGDATA, that retention grows into the same space as your data. A dedicated volume confines it to its own disk. The 5Gi default covers the 1 GB max_wal_size checkpoint target plus the 512 MB CloudNativePG keeps in wal_keep_size, with room for a standby that stays down for a while. See Volume for WAL.
Both settings are one-way. The CloudNativePG validating webhook rejects removing walStorage from an existing cluster, and rejects lowering storage.size. Decide on the WAL volume and the data volume size before you deploy. Growing storage.size later is supported when your storage class sets allowVolumeExpansion: true.
kubectl get pdb reports ALLOWED DISRUPTIONS: 0 for the primary whether you run one instance or two, because that budget only ever covers the primary. A second instance does not change the budget. It gives the operator a switchover target, so the drain can proceed. Verify the behavior with a drain rather than with the budget.
If you already run the single-instance shape from an earlier release, follow Migrate an existing single-instance deployment.
Run a single instance on constrained environments
Two instances only help when your cluster has two schedulable nodes. The reference manifests set podAntiAffinityType: required, so the two instances of a cluster never share a node. CloudNativePG defaults to preferred, which lets the scheduler put both instances on one node when resources are tight, and a drain then has no switchover target.
The trade-off is that a cluster with fewer schedulable nodes than instances leaves the extra pod Pending rather than dropping to a single node. On such a cluster, reduce the instance count rather than relaxing the affinity.
For local development (Kind, minikube) or any environment where a second instance is not affordable, pass PG_INSTANCES=1 to deploy.sh:
PG_INSTANCES=1 ./deploy.sh
This applies instances: 1 and enablePDB: false to every cluster it deploys. Disabling the PodDisruptionBudget keeps the node drainable with a single instance, and CloudNativePG documents this configuration for development clusters. The database is unavailable while its pod is rescheduled.
Installation
Prerequisites: Ensure environment variables are sourced (see Environment setup)
The PostgreSQL deployment follows these steps, automated via the postgresql/deploy.sh script:
loading...
Deployment steps performed by the script:
- Auto-detect OpenShift and apply Security Context Constraints (SCC) patches if needed
- Install CloudNativePG operator to
cnpg-systemnamespace - Generate PostgreSQL authentication secrets using
./set-secrets.sh - Deploy PostgreSQL clusters from
postgresql-clusters.yml(optionally filtered viaCLUSTER_FILTERenvironment variable) - Wait for readiness validation of all deployed clusters
Operator Custom Resources
- PostgreSQL Clusters
This configuration creates three dedicated PostgreSQL clusters, each optimized for its specific use case.
Save as postgresql-clusters.yml:
loading...
Use cases:
pg-keycloak: Database for Keycloak authenticationpg-identity: Database for Management Identity componentpg-hub: Database for Camunda Hub
Execution
- Navigate to PostgreSQL directory:
cd postgresql/ - Review deployment script:
cat deploy.shto understand the deployment steps - Review cluster configuration:
cat postgresql-clusters.ymlto verify PostgreSQL cluster settings - Adapt configuration if needed: Modify
postgresql-clusters.ymlfor your specific requirements (resource limits, storage, etc.) - Execute deployment:
./deploy.sh
The deploy.sh script automatically detects OpenShift environments and applies the necessary Security Context Constraints (SCC) patches for CloudNativePG compatibility. No separate script is required.
Camunda Helm configuration
The following configuration files integrate PostgreSQL clusters with Camunda components.
Save these files locally and include them in your Helm installation command.
- Management Identity
- Camunda Hub
Configure Camunda Identity to use the PostgreSQL cluster.
Save as camunda-identity-values.yml:
loading...
Installation: Add -f camunda-identity-values.yml to your Helm install command.
Configure Camunda Hub to use the PostgreSQL cluster.
Save as camunda-hub-values.yml:
loading...
Installation: Add -f camunda-hub-values.yml to your Helm install command.
Elasticsearch deployment
Overview
Elastic Cloud on Kubernetes (ECK) is the official Kubernetes deployment method for Elasticsearch, maintained by Elastic. ECK provides the vendor-recommended approach for deploying Elasticsearch in Kubernetes environments, automatically handling cluster deployment, scaling, upgrades, and security configuration.
Use the latest Elasticsearch version listed in our supported environments matrix and verify compatibility there before deploying.
Official documentation: ECK Guide
Architecture
The ECK deployment creates an Elasticsearch cluster with:
- Three multi-role nodes: Each node is master-eligible and also serves data, ingest, and coordinating roles (no separate master-only tier)
- Security configuration: TLS disabled for internal communication (can be enabled for production)
- Anti-affinity rules: Ensures nodes are distributed across different Kubernetes nodes
- Resource optimization: Configured for Camunda's specific requirements
This topology is an opinionated minimal baseline. Adjust node count/roles (e.g., add dedicated ingest, coordinating, or hot/warm tiers), JVM heap, storage class/size, security (TLS & auth), and other settings to match your workload characteristics, retention, and compliance requirements.
Elasticsearch as the secondary storage for Camunda 8:
Elasticsearch serves as the secondary storage for Camunda 8 orchestration cluster components, providing persistent storage and search capabilities.
Learn more about the secondary storage and how it supports advanced features like web applications, search APIs, process monitoring, task management, and analytics.
Installation
Prerequisites: Ensure environment variables are sourced (see Environment setup)
The Elasticsearch deployment follows these steps, automated via the elasticsearch/deploy.sh script:
loading...
Deployment steps performed by the script:
- Install ECK Custom Resource Definition
- Deploy ECK operator to
elastic-systemnamespace - Create Elasticsearch cluster from
elasticsearch-cluster.yml - Wait for cluster health validation
Operator Custom Resources
- Elasticsearch Cluster
This configuration creates a production-ready Elasticsearch cluster with security enabled.
Save as elasticsearch-cluster.yml:
loading...
Execution
- Navigate to Elasticsearch directory:
cd ../elasticsearch/ - Review deployment script:
cat deploy.shto understand the deployment steps - Review cluster configuration:
cat elasticsearch-cluster.ymlto verify Elasticsearch cluster settings - Adapt configuration if needed: Modify
elasticsearch-cluster.ymlfor your specific requirements (node count, resources, security settings, etc.) - Execute deployment:
./deploy.sh
Camunda Helm configuration
The following configuration integrates ECK-managed Elasticsearch with Camunda components.
Save this file locally and include it in your Helm installation command.
- Elasticsearch Integration
Configure Camunda components to use the ECK-managed Elasticsearch.
Save as camunda-elastic-values.yml:
loading...
Use case: External Elasticsearch connection for all orchestration cluster components (Zeebe, Operate, Tasklist, Optimize).
Installation: Add -f camunda-elastic-values.yml to your Helm install command.
Keycloak deployment
Overview
The Keycloak Operator provides the official operator-based way to deploy and manage Keycloak instances on Kubernetes. Maintained by the Keycloak team, it provides the recommended approach for automated deployment, configuration, and lifecycle management.
Use the latest Keycloak version listed in our supported environments matrix.
We use the Camunda-maintained quay-optimized Keycloak image camunda/keycloak:quay-optimized-version as it bundles the Camunda Identity login theme, the /auth base path, the AWS JDBC wrapper, and pre-baked configuration.
Official documentation: Keycloak Operator Documentation
Architecture
The Keycloak deployment provides:
- Database integration: Connects to CloudNativePG-managed PostgreSQL cluster
- Authentication path: Configured to serve under
/authpath prefix - Flexible domain support: Options for local development, Contour, or OpenShift routes
- Resource optimization: Sized appropriately for typical Camunda authentication loads
- Custom Ingress management: Uses dedicated Ingress manifests integrated within the operator configuration for subpath management constraints
Ingress management
Due to subpath management constraints, the Keycloak operator's built-in Ingress configuration is disabled in favor of dedicated Ingress manifests. This approach provides better control over path routing and TLS certificate management when serving Keycloak under the /auth path prefix.
The dedicated Ingress configuration is integrated directly within the operator manifest to ensure proper deployment coordination and resource management.
Installation
Prerequisites:
- Ensure environment variables are sourced (see Environment setup)
- PostgreSQL must be deployed first (Keycloak requires database)
The Keycloak deployment follows these steps, automated via the keycloak/deploy.sh script:
loading...
Deployment steps performed by the script:
- Install Keycloak Custom Resource Definitions
- Deploy Keycloak operator to the target namespace
- Create Keycloak instance from the selected configuration file
- Wait for Keycloak readiness validation
Operator Custom Resources
- Local deployment
- Contour
- OpenShift Route
Basic Keycloak instance for local development.
Save as keycloak-instance-no-domain.yml:
loading...
Use case: Local development and testing without external domain.
In certain setups, Keycloak is configured to use its service name as the hostname, which may result in redirections. For local deployments, you need to add the Keycloak service name to your local hosts file (/etc/hosts on Linux and macOS) by adding the entry 127.0.0.1 keycloak-service and use this hostname to access Keycloak.
Production Keycloak instance with Contour.
Save as keycloak-instance-domain-contour.yml:
loading...
Use case: Production deployment with external domain using the Contour Ingress controller.
Keycloak instance configured for OpenShift Routes.
Save as keycloak-instance-domain-openshift.yml:
loading...
Use case: OpenShift deployment using native Route resources.
Execution
- Navigate to Keycloak directory:
cd ../keycloak/ - Review deployment script:
cat deploy.shto understand the deployment steps - Review instance configuration:
cat keycloak-instance-no-domain.ymlto verify Keycloak instance settings - Adapt configuration if needed: Choose appropriate instance configuration for your setup:
keycloak-instance-no-domain.ymlfor local developmentkeycloak-instance-domain-contour.ymlfor Contourkeycloak-instance-domain-openshift.ymlfor OpenShift Routes
- Execute deployment:
./deploy.sh
Camunda Helm configuration
The following configurations integrate Keycloak with Camunda Identity.
Save the appropriate file locally based on your deployment setup and include it in your Helm installation command.
- Local setup
- Production setup
Configure Camunda to use Keycloak for local development.
Save as camunda-keycloak-no-domain-values.yml:
loading...
Use case: Local development setup with port-forwarding access.
Installation: Add -f camunda-keycloak-no-domain-values.yml to your Helm install command.
Configure Camunda to use Keycloak with external domain.
Save as camunda-keycloak-domain-values.yml:
loading...
This configuration file contains ${CAMUNDA_DOMAIN} placeholder variables that must be replaced with your actual domain before deployment.
Options for domain injection:
- Automatic substitution: Use
envsubst < camunda-keycloak-domain-values.yml > camunda-keycloak-domain-values-final.yml(requiresCAMUNDA_DOMAINenvironment variable) - Manual replacement: Replace all instances of
${CAMUNDA_DOMAIN}with your actual domain name incamunda-keycloak-domain-values.yml
Use case: Production setup with external domain and proper OIDC configuration.
Installation: Add -f camunda-keycloak-domain-values.yml to your Helm install command.
Camunda deployment
With all infrastructure components deployed and configured, you can now deploy Camunda using the helm chart.
Prerequisites
Prerequisites:
- Ensure environment variables are sourced (see Environment setup)
- All infrastructure components (PostgreSQL, Elasticsearch, Keycloak) must be deployed first
- Save all configuration files from previous sections locally
Configuration files summary
Before deploying Camunda, ensure you have saved all required configuration files locally. The files are organized by deployment phase:
Infrastructure deployment files (Custom Resources)
| Component | File Name | Purpose | Required for |
|---|---|---|---|
| PostgreSQL | postgresql-clusters.yml | PostgreSQL cluster definitions | Infrastructure deployment |
| Elasticsearch | elasticsearch-cluster.yml | Elasticsearch cluster definition | Infrastructure deployment |
| Keycloak (Local) | keycloak-instance-no-domain.yml | Local Keycloak instance | Infrastructure deployment |
| Keycloak (Contour) | keycloak-instance-domain-contour.yml | Production Keycloak with Contour | Infrastructure deployment |
| Keycloak (OpenShift) | keycloak-instance-domain-openshift.yml | OpenShift Keycloak instance | Infrastructure deployment |
Camunda integration files (Helm values)
| Component | File Name | Purpose | Required for |
|---|---|---|---|
| Elasticsearch | camunda-elastic-values.yml | Connects to ECK-managed Elasticsearch | Camunda deployment |
| PostgreSQL (Identity) | camunda-identity-values.yml | Connects Identity to PostgreSQL cluster | Camunda deployment |
| PostgreSQL (Camunda Hub) | camunda-hub-values.yml | Connects Camunda Hub to PostgreSQL cluster | Camunda deployment |
| Keycloak (Local) | camunda-keycloak-no-domain-values.yml | Local development OIDC configuration | Camunda deployment |
| Keycloak (Production) | camunda-keycloak-domain-values.yml | Production OIDC configuration | Camunda deployment |
Pre-deployment checklist
Before deploying Camunda, ensure you have completed the following:
- All infrastructure components deployed (PostgreSQL, Elasticsearch, Keycloak)
- Configuration files saved locally from previous sections
- Authentication secrets generated (previous section)
Helm deployment
First, source the environment setup script to set HELM_CHART_VERSION and other required variables. See the Helm chart version matrix to choose the appropriate chart version for your deployment:
loading...
Then, deploy Camunda using the infrastructure configuration files you saved from previous sections.
For end-to-end configuration patterns (OIDC-enabled "Full Cluster" including Optimize, Web Modeler, Console, and Identity), see the Full Cluster section of our Helm installation guide.
- With external domain
- Local development
Deploy Camunda with external domain configuration:
helm install "$CAMUNDA_RELEASE_NAME" camunda/camunda-platform \
  --version $HELM_CHART_VERSION \
  -f camunda-elastic-values.yml \
  -f camunda-identity-values.yml \
  -f camunda-hub-values.yml \
  -f camunda-keycloak-domain-values.yml \
  -n "$CAMUNDA_NAMESPACE"
Deploy Camunda for local development:
helm install "$CAMUNDA_RELEASE_NAME" camunda/camunda-platform \
  --version $HELM_CHART_VERSION \
  -f camunda-elastic-values.yml \
  -f camunda-identity-values.yml \
  -f camunda-hub-values.yml \
  -f camunda-keycloak-no-domain-values.yml \
  -n "$CAMUNDA_NAMESPACE"
Order & precedence: The order of -f flags matters—later files override earlier ones, so place the most specific/override files (e.g. secrets, domain-specific settings) last.
File origin: Every -f file corresponds to a configuration you saved in previous sections (Elasticsearch integration, PostgreSQL clusters, Keycloak, Identity secrets). Make sure they're present locally and reflect any custom adjustments before running the command.
Component flexibility: Drop files for components you don't deploy (for example, remove camunda-hub-values.yml if you're not using Camunda Hub) to reduce footprint.
Verification and troubleshooting
Verify infrastructure deployment
Check that all infrastructure components are running correctly:
- PostgreSQL
- Elasticsearch
- Keycloak
# Check PostgreSQL clusters
kubectl get clusters -n $CAMUNDA_NAMESPACE

# Verify services
kubectl get svc -n $CAMUNDA_NAMESPACE | grep "pg-"

# Check cluster status
kubectl describe cluster pg-identity -n $CAMUNDA_NAMESPACE
# Check Elasticsearch cluster
kubectl get elasticsearch -n $CAMUNDA_NAMESPACE

# Verify services
kubectl get svc -n $CAMUNDA_NAMESPACE | grep "elasticsearch"

# Check cluster health
kubectl get elasticsearch elasticsearch -n $CAMUNDA_NAMESPACE -o jsonpath='{.status.health}'
# Check Keycloak instance
kubectl get keycloak -n $CAMUNDA_NAMESPACE

# Verify services
kubectl get svc -n $CAMUNDA_NAMESPACE | grep keycloak

# Check readiness
kubectl get keycloak keycloak -n $CAMUNDA_NAMESPACE -o jsonpath='{.status.conditions[?(@.type=="Ready")].status}'
Common issues and solutions
PostgreSQL cluster not starting
Symptoms: PostgreSQL pods stuck in pending or crash loop
Solutions:
- Verify persistent volume claims are bound:
kubectl get pvc -n $CAMUNDA_NAMESPACE - Check node resources and storage availability
- Review CloudNativePG operator logs:
kubectl logs -n cnpg-system deployment/cnpg-controller-manager
Reference: CloudNativePG Troubleshooting
Elasticsearch cluster yellow/red status
Symptoms: Elasticsearch cluster health is not green
Solutions:
- Check disk space and memory allocation
- Verify all nodes are running:
kubectl get pods -n $CAMUNDA_NAMESPACE -l elasticsearch.k8s.elastic.co/cluster-name=elasticsearch - Review ECK operator logs:
kubectl logs -n elastic-system statefulset/elastic-operator
Reference: ECK Troubleshooting Guide
Keycloak authentication errors
Symptoms: Camunda components cannot authenticate with Keycloak
Solutions:
-
Verify Keycloak is accessible:
kubectl port-forward svc/keycloak-service 18080:18080 -n $CAMUNDA_NAMESPACEnoteThis uses
keycloak-service(the service name created by the Keycloak Operator) and port18080(configured viahttpPortin the Keycloak CR for local deployments). This differs from Helm chart deployments which usecamunda-keycloakservice name and port80. -
Check client configurations in Keycloak admin console
-
Verify redirect URLs match your deployment setup
Reference: Keycloak Operator Documentation
Keycloak pod crashes on HTTP/2 cleartext (h2c) requests
Symptoms: The Keycloak pod exits or enters CrashLoopBackOff when it receives an HTTP/2 cleartext (h2c) request, such as a client sending an Upgrade: h2c header over a plain-HTTP port-forward. Clients receive an empty reply, and the Keycloak logs show a java.lang.NoSuchMethodError originating from Vert.x and Netty.
Cause: camunda/keycloak:quay-optimized-* image tags older than quay-optimized-26.6.4 bundle a conflicting Netty HTTP/2 codec under /opt/keycloak/providers, pulled in transitively by the AWS Advanced JDBC Wrapper. It shadows the Netty version shipped with Keycloak and breaks h2c handling.
Solutions:
-
Upgrade the Keycloak image to
camunda/keycloak:quay-optimized-26.6.4or later, where the conflicting Netty libraries are removed. Update theimagefield in your Keycloak custom resource (keycloak-instance-*.yml). This is the recommended fix. -
If you cannot upgrade, disable HTTP/2 so Keycloak falls back to HTTP/1.1. Set the
QUARKUS_HTTP_HTTP2environment variable tofalsein the Keycloak custom resource:spec:
unsupported:
podTemplate:
spec:
containers:
- env:
- name: QUARKUS_HTTP_HTTP2
value: "false"
Reference: camunda/keycloak HTTP/2 cleartext crash issue
Production considerations
Security
- Network policies: Implement network policies to restrict traffic between components. See required network traffic.
- TLS encryption: Enable TLS for all inter-component communication
- Secret management: Use external secret management systems in production
- RBAC: Configure proper role-based access control for infrastructure and applications
Backup and disaster recovery
- Elasticsearch: Perform backups using Camunda for Elastic (see Camunda backup guide).
- PostgreSQL: Configure automated backups using CloudNativePG's backup capabilities
- Keycloak: Configure regular exports of realm and user data
- Configuration: Store all configuration files in version control
Monitoring and observability
- Metrics: Enable Prometheus monitoring for all infrastructure components
- Logging: Aggregate logs from infrastructure and application components
- Alerting: Set up alerts for critical infrastructure events
Resource planning
- CPU and memory: Size clusters based on expected workload
- Storage: Plan for data growth and I/O requirements
- Network: Consider bandwidth requirements between components
Migrate an existing single-instance deployment
Deployments created before the high availability defaults run one instance per PostgreSQL cluster, with pg_wal inside the data volume. Moving them to the current defaults is an in-place change: CloudNativePG clones a second instance from the running primary and relocates pg_wal onto its new volume by itself. You do not dump, restore, or recreate anything.
Plan for one short interruption per cluster. CloudNativePG applies the new pod specification as a rolling update: replicas first, the primary last. With the default primaryUpdateMethod: restart, the primary restarts in place, which interrupts open connections to that cluster for a few seconds. The clusters migrate independently, so the interruptions do not have to happen at the same time.
Before you start
| Check | Why it matters |
|---|---|
| Two schedulable nodes | The second instance is only useful on another node, and the drain you are enabling needs somewhere to move the primary. |
| Free storage | The existing instance gains a WAL volume and a second instance is created with both. With the defaults, that is 25 Gi more per cluster. |
| A current backup | The migration is in place and keeps your volume, so an unrelated failure during it has no second copy to fall back on. |
| Cluster is healthy | Run kubectl get cluster -n $CAMUNDA_NAMESPACE and confirm the phase is Cluster in healthy state before changing anything. |
Run the migration
-
Add the following settings to each cluster you already have, keeping their existing names, databases, owners, and secrets. Do not replace your manifests with the current reference ones to perform this migration: the 8.10 reference manifests also rename the Web Modeler cluster to
pg-hub, and applying that rename creates a new empty cluster next to your existingpg-webmodelerrather than migrating it.spec:
instances: 2
affinity:
enablePodAntiAffinity: true
topologyKey: kubernetes.io/hostname
podAntiAffinityType: required
walStorage:
size: 5Gi -
Apply the change.
deploy.shapplies the standard clusters and waits for each cluster to be fully ready:./deploy.shIf you deploy the orchestration database, run the script for
pg-camundaas well:CLUSTER_FILTER=pg-camunda ./deploy.shTo apply the manifests directly instead, remember the orchestration cluster lives in its own file. Applying only the first manifest leaves
pg-camundaon the single-instance shape:kubectl apply --server-side -f postgresql-clusters.yml -n "$CAMUNDA_NAMESPACE"
# only if you deploy the orchestration database (RDBMS secondary storage)
kubectl apply --server-side -f postgresql-orchestration-cluster.yml -n "$CAMUNDA_NAMESPACE" -
Watch the operator converge. It clones the new instance, then restarts the primary to attach its WAL volume:
kubectl get cluster -n "$CAMUNDA_NAMESPACE" -wThe phase moves through
Creating a new replica,Waiting for the instances to become active, andPrimary instance is being restarted without a switchoverbefore returning toCluster in healthy state. -
Confirm every cluster reports both instances ready:
kubectl get cluster -n "$CAMUNDA_NAMESPACE"NAME AGE INSTANCES READY STATUS PRIMARY
pg-identity 10m 2 2 Cluster in healthy state pg-identity-1
pg-keycloak 10m 2 2 Cluster in healthy state pg-keycloak-1
pg-webmodeler 10m 2 2 Cluster in healthy state pg-webmodeler-1A cluster stuck at
1ready usually has its second podPending, because the required anti-affinity found no second schedulable node. -
Confirm the instances of each cluster sit on different nodes:
kubectl get pods -n "$CAMUNDA_NAMESPACE" -l cnpg.io/podRole=instance -o wide -
Confirm
pg_walmoved onto the dedicated volume on every instance of every cluster. It becomes a symbolic link, and the original directory content is moved for you:for pod in $(kubectl get pods -n "$CAMUNDA_NAMESPACE" -l cnpg.io/podRole=instance -o name); do
echo "$pod"
kubectl exec -n "$CAMUNDA_NAMESPACE" "${pod#pod/}" -c postgres -- ls -ld /var/lib/postgresql/data/pgdata/pg_wal
donelrwxrwxrwx 1 postgres tape 30 ... /var/lib/postgresql/data/pgdata/pg_wal -> /var/lib/postgresql/wal/pg_wal -
Confirm the standby of each cluster is streaming before you rely on the new instance. The cluster reports a healthy state as soon as both pods are ready, which happens slightly before the standby re-establishes replication after the primary restart:
for cluster in $(kubectl get cluster -n "$CAMUNDA_NAMESPACE" -o jsonpath='{.items[*].metadata.name}'); do
  primary=$(kubectl get pod -n "$CAMUNDA_NAMESPACE" -l "cnpg.io/cluster=$cluster,cnpg.io/instanceRole=primary" -o jsonpath='{.items[0].metadata.name}')
  echo -n "$cluster: "
  kubectl exec -n "$CAMUNDA_NAMESPACE" "$primary" -c postgres -- psql -U postgres -tAc "SELECT state FROM pg_stat_replication;"
done
pg-identity: streaming
pg-keycloak: streaming
pg-webmodeler: streamingUntil a cluster reports
streaming, its standby is not a switchover candidate, and a drain started early stalls withCurrent primary is running on unschedulable node, but there are no valid candidatesin the operator log. -
Verify the result by draining the node that hosts the primary, which is the operation that failed before the migration:
kubectl drain <node> --ignore-daemonsets --delete-emptydir-dataThe first eviction attempt is still refused while the pod is the primary. CloudNativePG then switches over and the retry succeeds:
evicting pod camunda/pg-identity-1
error when evicting pods/"pg-identity-1" -n "camunda" (will retry after 5s): Cannot evict pod as it would violate the pod's disruption budget.
evicting pod camunda/pg-identity-1
pod/pg-identity-1 evicted
node/<node> drained
Run
kubectl uncordon <node>afterward, and the cluster returns to two ready instances.
Keep a single instance instead
If a second instance is not affordable in your environment, do not leave the cluster at instances: 1 with its PodDisruptionBudget enabled, because that is the combination that blocks node drains. Set enablePDB: false alongside it, as described in Run a single instance on constrained environments.
Reclaim the space later
The migration leaves storage.size untouched, so your data volumes keep their existing size. If 15Gi is more than your databases need, note that CloudNativePG rejects lowering storage.size on a live cluster. Reducing it is a supervised procedure that recreates each instance on a smaller volume, described in Volume reduction.
Migration from subcharts
If you're migrating from existing Bitnami sub-chart deployments:
- Export data: Create backups of existing databases and Elasticsearch indices
- Deploy operator-based infrastructure: Install the operator-managed infrastructure alongside existing deployment
- Migrate data: Transfer data to operator-managed services
- Update configuration: Switch Camunda configuration to use new services
- Cleanup: Remove old sub-chart deployments once migration is complete
Additional resources
- CloudNativePG documentation
- Elastic Cloud on Kubernetes guide
- Keycloak Operator documentation
- Camunda 8 Helm chart parameters
- Kubernetes Operator pattern