What's new in Camunda 8.10
Highlights and important changes to consider when upgrading to Camunda 8.10.
Why upgrade to Camunda 8.10?
Upgrading to Camunda 8.10 delivers significant benefits and keeps your installation aligned and ready for future releases.
-
Agentic orchestration: Real-time agent visibility and explainability with live agent state, tool calls, and conversation history, providing production-grade agentic trust with testing, visibility, auditability, and control-plane monitoring.
-
ProcessOS: Discover your existing processes, re-engineer them against defined outcomes, and generate executable Camunda solutions, with a governed process that keeps AI-generated work auditable.
-
Camunda Hub: A new product that replaces Web Modeler and Console as the single place to build, govern, and run process solutions in Camunda. It introduces workspaces to organize your teams' work, along with a catalog of reusable automation assets, a business value dashboard to track process outcomes against targets, and credentials you create once and reuse across processes.
-
Multi-region resilience: Failure-domain-aware partition placement replicates process state synchronously across regions, so losing a region costs no committed data (RPO 0). The RDBMS secondary storage replicates asynchronously and catches up from the engine's event stream.
-
Strong tenant isolation via physical tenants: Enterprise-grade physical isolation with per-tenant APIs, web apps, roles and identity provider selection. Logical multi-tenancy becomes officially supported on SaaS.
For a full summary of what's included in Camunda 8.10, including all breaking changes, deprecations, and supported environment changes, see release announcements and release notes.
Upgrade guides
Ready to upgrade? The following guides offer detailed information on how to upgrade to Camunda 8.10.
| Guide | Description | Who is this guide for? |
| Self-Managed upgrade guide | Evaluate your infrastructure, understand operational changes, and choose the best update strategy for your environment. | Operations and platform administrators of Self-Managed installations. |
| APIs & tools upgrade guide | Plan and execute an upgrade from Camunda 8.9 to 8.10, focusing on API and tools transitions. |
|
Summary of important changes
Important changes in Camunda 8.10 are summarized as follows:
| What's new/changed | Summary |
| Agentic orchestration | Real-time agent visibility and explainability, production-grade agentic trust with testing, visibility, auditability, and control-plane monitoring. |
| ProcessOS | Discover, re-engineer, and generate executable Camunda solutions with a governed, auditable process. |
| Camunda Hub | Build, govern, and run your process solutions. Hub replaces Web Modeler and Console. |
| Catalog | Manage, publish, and reuse vetted automation assets across teams in Hub. |
| Business value dashboard | Track cycle time, automation rate, activity, and agentic adoption against targets in Hub. |
| Hub credentials manager | Create connector credentials once and reuse them wherever you need them in Hub. |
| Environments | Deploy and run processes in named environments assigned to workspaces. |
| Environment connection | Connect the modeler in Hub to an environment to use its credentials and run task tests against it. |
| Multi-region resilience | Multi-region resilience framework for Self-Managed Orchestration Cluster deployments. |
| Strong tenant isolation | Physical Tenants provide strong physical data isolation within a single cluster. |
| Business ID | Business ID is now a first-class, searchable attribute across the Orchestration Cluster. |
| Camunda design system | The new visual design system is introduced for Admin, Hub, and Tasklist. |
| Centralized secret resolution | Reference credentials from customer-managed secret stores. |
| Connector operations | Connectors are now discoverable by the operation you want to perform. |
| Credentials in Desktop Modeler | Select and create reusable credentials on connector tasks in Desktop Modeler. |
| Helm chart deployment | A new Camunda Helm Toolkit helps migrate and validate 8.9-to-8.10 Helm values. |
| Low-code testing | Record, assert, repair, and run low-code tests in Test Studio and in CI/CD with Camunda Process Test. |
| Optimize | Optimize's component-specific authentication configuration keys are deprecated. |
| Unified authentication | Shared authentication implementation based on Orchestration Cluster authentication. |
| Wait states | Operate now shows what an active process instance is waiting for. |
| APIs & Tools | Legacy component APIs, Tasklist V1-dependent features, and Zeebe Process Test are removed. |
| Supported environments | Camunda 8.10 updates platform and environment baselines. |
Agentic orchestration
Important changes and new features for agentic orchestration are available in 8.10:
Real-time agent visibility and monitoring
Monitor and evaluate AI agent behavior in Operate.
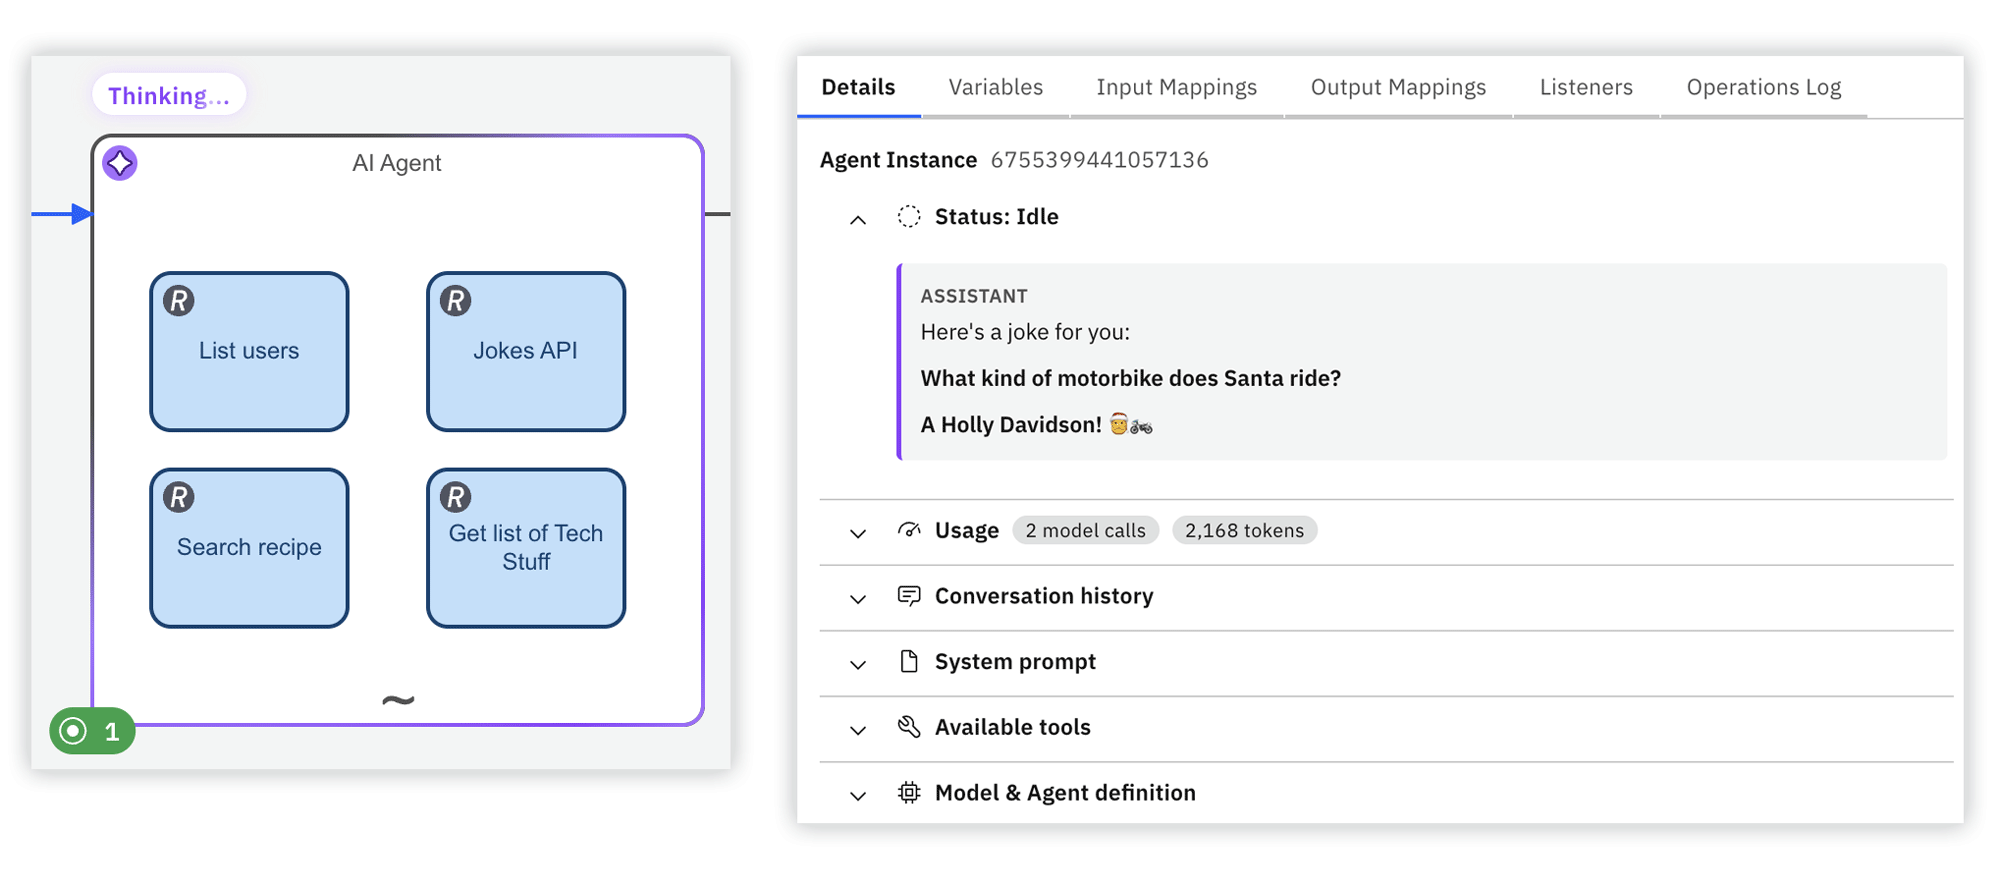
- View each agent's execution state highlighted on the process diagram, as well as its current tool calls, usage metrics, model, and system prompt.
- Trace the full reasoning chain behind AI agent decisions in the conversation history such as user prompts, assistant messages, tools selected with the agent's reasoning, and tool calls with navigation to the corresponding diagram elements, so you can see exactly which messages, inputs, and tool responses informed each of the agent's next steps.
- External agents built with frameworks such as LangGraph or CrewAI get the same visibility through the new Agent Instance API.
Monitor your AI agents with Operate
If you modeled the agent element before Camunda 8.10, you must update its element template to at least v1 (version 13) or v2 to enable this feature.
Agentic control plane
Use the Optimize agentic control plane dashboard to monitor AI agent adoption, token usage, reliability, and performance across your processes in a single view.
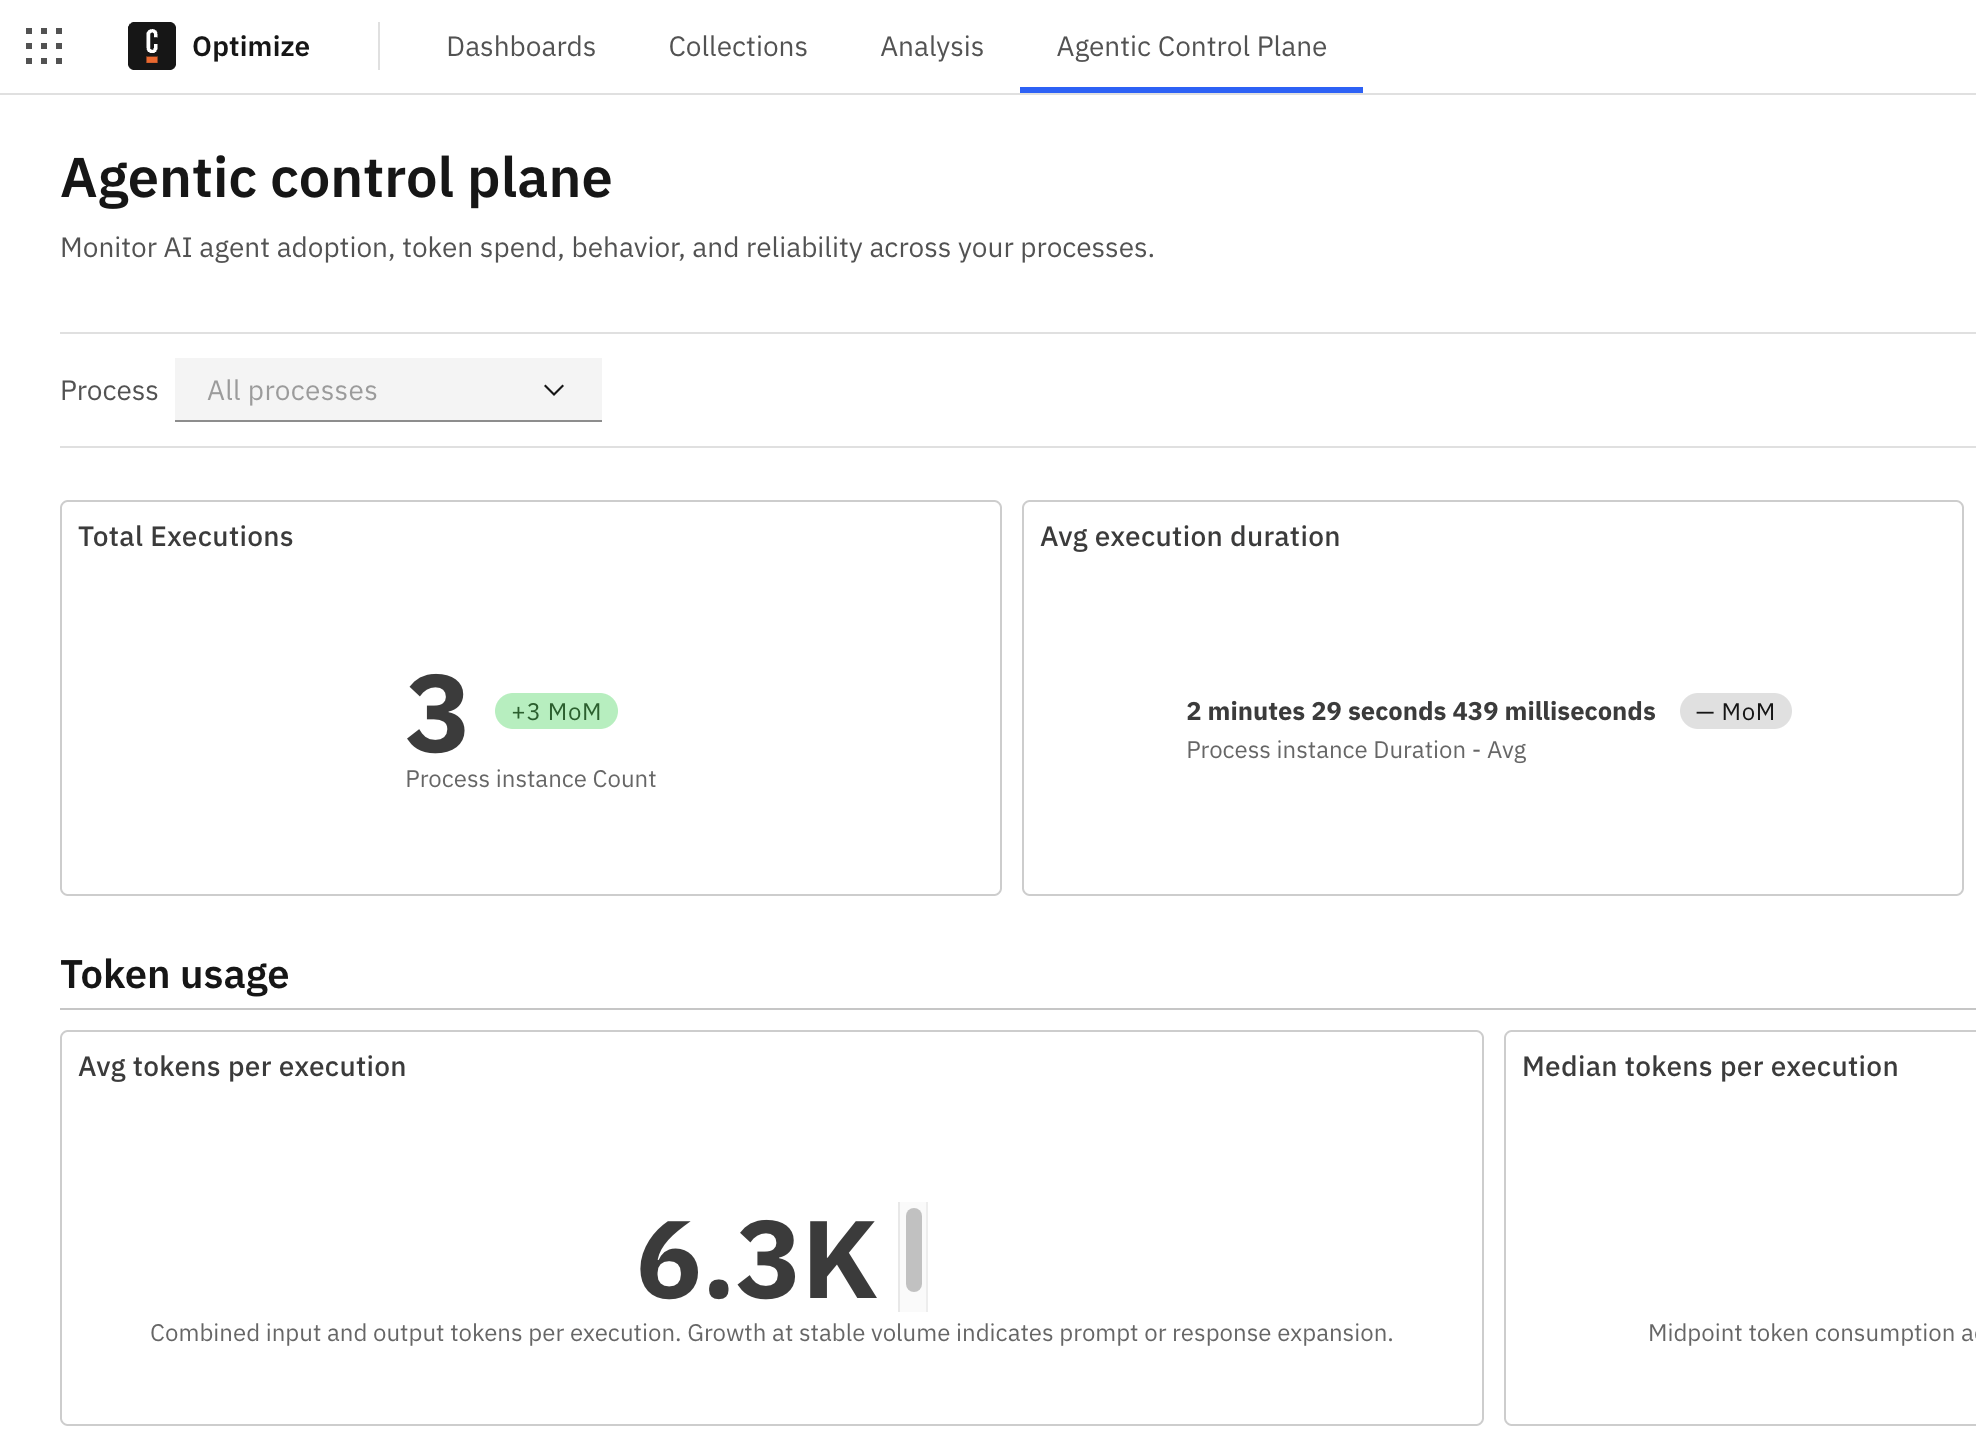
The dashboard is primarily intended to help operators, process owners, and engineering leads who manage AI-agent-powered processes, and need to keep them reliable and cost-effective.
AI Agent connector: New native element templates
The AI Agent Task and AI Agent Sub-process connectors are now available as new, native element templates, running on new job types and giving native access to each LLM provider's own SDK and wire format, including extended thinking and prompt caching configuration where supported.
Provider and backend selection are now decoupled. For example, the Anthropic provider can run through AWS Bedrock Mantle, and the OpenAI provider through Microsoft Foundry (Azure), while keeping each provider's own configuration options. The legacy element templates are deprecated as of Camunda 8.10.
This is a major redesign of the AI Agent connector, available from 8.10 only, and requires manual migration of each element from the current legacy connector.
Upgrade AI Agent element templates
The legacy connector is deprecated in 8.10, but is not removed and continues to work. Adopting the new template is a manual, per-element migration, not an automatic upgrade.
Assisted agent tool configuration
New features help you more easily configure your agent tools when modeling.
-
Fix: Automatically detect and apply a safe fix for an agent misconfiguration. If a
fromAi()key or an output key is detected as invalid, click the Fix button to apply a fix. -
Input from agent, Output to agent: Automatically fill in the
fromAi()inputs or thetoolCallResultoutput configuration of an agent tool contract. -
Lint rule checking: Agent tool configuration lint rule checking helps you avoid agent misconfiguration and errors when modeling. Linting rules identify and highlight malformed
fromAi()inputs, missing or incorrecttoolCallResultoutput mappings, and missing tool descriptions before they cause silent runtime failures.
- Changes are explicit, apply only when the correction is deterministic, and can be undone.
- These configuration features are only available inside an ad-hoc sub-process marked as agentic through either the
io.camunda.agenticai.toolContainerproperty or an out-of-the-box AI Agent element template. It is not available in a plain sub-process. You might need to update your element template to use this new feature.
Assisted agent tool configuration
Camunda-provided LLM for SaaS
You can run AI agents on Camunda 8 SaaS in minutes using the Camunda-provided LLM, without your own LLM credentials.
- Whether you start from a Camunda-provided agentic blueprint or build your own agent from scratch, the required credentials are populated automatically as cluster secrets.
- The included budget is sufficient for hundreds or thousands of agent runs even on a trial account, depending on the model used.
- Enterprise organizations must explicitly enable the Camunda Provided LLM toggle in Camunda Hub, which is separate from the AI-powered features toggle.
Processes MCP Server
AI agents can use the Processes MCP Server to discover and call deployed BPMN processes as Model Context Protocol (MCP) tools.
- When you deploy a process with an MCP start event it is automatically registered as a callable tool.
- MCP clients connect to the
/mcp/processesendpoint and can invoke any registered process, with the Orchestration Cluster starting a new process instance and immediately returning the process instance key. - The server also exposes static tools for inspecting running process instances, so agents can check variables, state, and incidents without switching servers.
Test AI agents with Camunda Process Test
You can now test non-deterministic AI agent behavior in Camunda Process Test with conditional behavior controls and evaluation-based assertions. This helps teams validate agent behavior and output quality with clearer, more reliable test outcomes.
- Define conditional behavior in tests with a
when(condition).then(action)API for activation-based flow control. - Assert output quality with LLM-as-a-judge expectations when exact matching is not enough.
- Assert semantic similarity with embedding-based comparison for responses that vary in phrasing.
- Configure remote or local models through code and properties for both local development and CI/CD pipelines.
Judge assertions in JSON test cases: Define judge assertions using JSON test case instructions. Use a preconfigured judge from camunda-container-runtime.properties or Spring application properties depending on the test execution context.
Standalone evaluation assertions for judge and semantic similarity: Camunda Process Test now exposes judge-based evaluation and semantic similarity evaluation as standalone AssertJ assertions for arbitrary string values, without requiring process-variable assertions. Semantic similarity checks support configurable embedding models and thresholds, and both assertion types reuse the existing CamundaAssert configuration with optional local overrides.
Test your AI agents with Camunda Process Test
ProcessOS
ProcessOS is an AI-powered layer on top of Camunda's agentic orchestration platform. It discovers your existing processes, re-engineers them against defined outcomes, and generates executable Camunda solutions.
ProcessOS has the following key characteristics:
- A governed process: The harness runs your engagement through four phases: scope, discover, transform, and implement. Each phase ends at a milestone, and subject matter expert (SME) review cycles act as gates between milestones.
- Auditable by design: The governance process itself runs on Camunda. Project state lives in Camunda, and every artifact is committed to Git, so AI-generated work stays reviewable at every step.
- Two supported use cases: Legacy migration transforms processes running on a legacy system to Camunda 8. AI transformation turns any process into an automated, AI-native process that runs on Camunda 8.
- Built for builders: ProcessOS targets builders who implement Camunda end to end and direct AI coding agents. SMEs take part as reviewers and approvers.
In this release, each project runs locally with its own private memory. Production deployment, CI/CD integration, and cross-project memory are planned for future releases.
Camunda Hub
Camunda Hub is now the single place where teams build, govern, and run process solutions in Camunda.
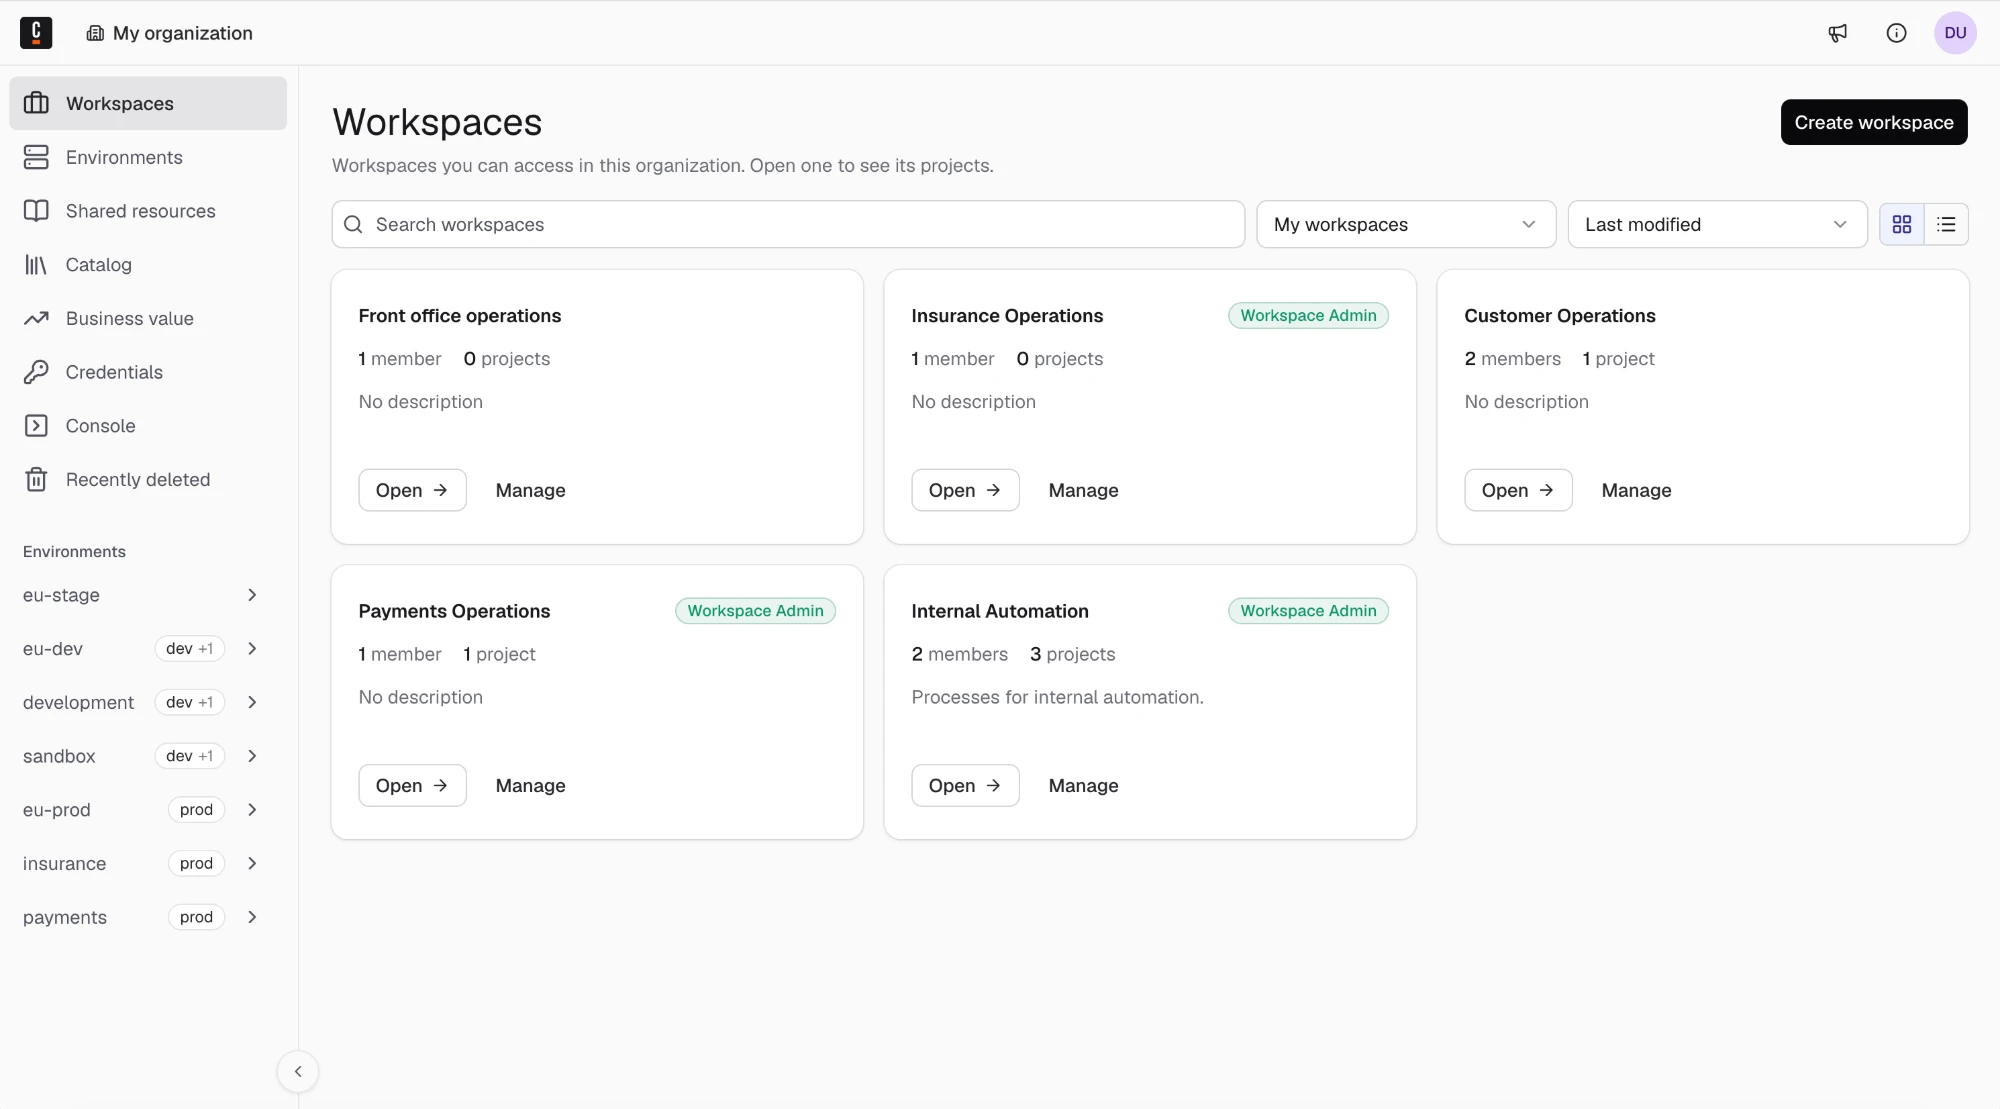
- On SaaS, your organization is migrated to Hub automatically, and you don't need to take any action.
- Hub replaces Web Modeler and Console. It maintains the features of its predecessors and implements new features, all within a unified platform.
- Hub is deployed only once, and serves as the single point of entry for all your environments, connecting to the Orchestration Clusters that host your dev, staging, and production environments.
Hub changes how you and your teams work. Instead of managing separate Web Modeler and Console instances per environment, you now use a single Hub that connects to all your environments. You design once, and manage everything from one place.
In Hub, there is a clear separation of responsibilities:
- Center of excellence teams manage organizational infrastructure, member access, and workspaces, so delivery teams have the environments and tools they need to ship process solutions at scale.
- Delivery teams collaborate in managed workspaces and model, test, and deploy business processes.
Organization-level resource governance and workspace-level project delivery now happen in one product.
Terminology
Camunda Hub introduces changes to many terms and concepts from Web Modeler and Console:
| Web Modeler | Camunda Hub | Description |
|---|---|---|
| Project | Workspace | When upgrading to Hub, your projects automatically migrate to workspaces. Workspaces in Hub are isolated team collaboration spaces. Members can only view workspaces they're invited to. |
| Process application | Project | When upgrading to Hub, your process applications automatically migrate to projects. Projects in Hub can be versioned as a bundle of files or used as a folder for loose files. |
| IDP application | IDP project | When upgrading to Hub, your IDP applications automatically migrate to IDP projects. |
| Collaborator | Member | Workspace members replace project collaborators. Members can be added and managed per workspace. |
| Cluster (as deployment target) | Environment | Environment is a new concept that represents a deployment target. A cluster represents the underlying infrastructure that hosts one or more environments. Organization admins assign environments to workspaces. |
| Project Admin | Workspace Admin | This aligns with the project-to-workspace terminology change. |
Mapping Web Modeler and Console features to Hub
The following table shows how you can access the Hub equivalents for key Web Modeler and Console features.
| Product (8.9) | Feature | Hub documentation |
|---|---|---|
| Console | Organization overview | Console |
| Console | View clusters | View clusters |
| Console | Organization management | Manage organization |
| Web Modeler | View projects | View workspaces |
| Web Modeler | Create a project | Create a workspace |
| Web Modeler | Manage project collaborators | Manage workspace members |
| Web Modeler | Rename/delete project | Manage workspace |
| Web Modeler | Connect clusters to a process application | Assign environments to a workspace |
| Web Modeler | Deploy a process application | Deploy your project |
| Web Modeler | View shared resources | Manage catalog or Shared resources |
| Web Modeler | Recently deleted | Recently deleted |
Key features
Camunda Hub introduces many new features, including the following highlights:
Catalog
Hub introduces the Hub catalog. Center of excellence teams can manage reusable automation assets in a Git repository and publish them to Hub. You can see where assets are being used and which processes are using outdated or deprecated assets.
Delivery teams can trust that catalog assets have been vetted and approved by the center of excellence. They can discover assets in the catalog, read asset documentation, and apply them when modeling.
Business value dashboard
Use the Business Value page in Camunda Hub to track process outcomes using cycle time, automation rate, activity, and agentic adoption metrics, and to set targets for cycle time and automation rate.
- A portfolio view compares every process in the selected Orchestration Cluster and ranks off-target processes by how many targets are missed and by how far.
- A process view shows the metrics and targets for a single process, including a cycle time distribution with P50, average, and P95.
- Every metric is calculated from completed process instances in the selected environment. No changes to your process models are required.
Workspaces and projects
Hub introduces workspaces and projects.
Workspace: A workspace is a collaboration environment within an organization, representing a team or business domain. A workspace is assigned members and projects so all related work happens in one shared space. When you migrate to 8.10, all your Web Modeler projects become workspaces.
Project: A project contains a set of files. You can consider a project as a bundle of related files you can version and deploy together. You can also consider a project as a container of individual files meant to be versioned and deployed independently. When you migrate to 8.10, all your Web Modeler process applications become projects.
Environments
Hub introduces environments as deployment targets where teams run their processes. An environment is hosted on a cluster, and the cluster remains the infrastructure that your administrators operate.
- Organization admins assign environments to workspaces, and projects deploy to the environments of their workspace instead of connecting clusters to deployment stages.
- In Self-Managed, each Physical Tenant of a cluster at version 8.10 or later is an environment. In SaaS, each cluster has one environment.
- When you upgrade, Hub assigns the clusters that your process applications used to their workspaces as environments.
Project snapshots and file versioning
In Web Modeler, a process application and the resources within it were tightly coupled. You could only version and deploy the resources as a single, bundled unit.
Camunda Hub introduces an improved model with more granular control over project and file versions:
- Project snapshots: You can create project snapshots to capture the current state of all project resources.
- File-level versions: You can now create new versions for individual files within a project. Every file maintains its own version history.
- Autosave: All files save their state automatically after edits.
- Decoupled element template versions: Project versions and element template versions are now created independently of each other.
New to projects?
If you're not familiar with projects, the following sections explain how to:
New file structure and requirements
In Camunda 8.9, a project can contain process applications, folders, and files. Camunda 8.10 introduces a new file resource hierarchy in which workspaces only contain projects and IDP projects. Files and folders are always stored inside projects.
When comparing the old and new structures, keep the new Camunda Hub terminology in mind .
For example, if this is what your data looks like in 8.9:
Payments (Project)
├─ main.bpmn
├─ eligibility.dmn
├─ readme.md
├─ Forms (Folder)
│   ├── details.form
│   └── review.form
├─ Archive (Folder)
│   └── Refunds (Process application)
│       ├── refunds.bpmn
│       └── refund-request.form
└─ Onboarding (Process application)
    ├── onboarding.bpmn
    └── kyc-checks.dmn
This is what the data looks like in 8.10:
Payments (Workspace)
├─ Payments - General (Project - TEMPORARY PLACEMENT)
│   ├─ main.bpmn
│   ├─ eligibility.dmn
│   ├─ readme.md
│   ├─ Forms (Folder)
│   │   ├── details.form
│   │   └── review.form
│   └─ Archive (Folder)
├── Refunds (Project - MOVED)
│   ├── refunds.bpmn
│   └── refund-request.form
└─ Onboarding (Project)
    ├── onboarding.bpmn
    └── kyc-checks.dmn
This strict new Workspace > Project > File/folder hierarchy makes resources more discoverable and your projects more scalable.
Hub credentials manager
Before 8.10, you configure a connector's authentication and connection settings directly on each connector task. This doesn't scale well and is hard to maintain. For example, if ten tasks call the same REST API, you configure the same authentication ten times, and you update all ten when something changes.
8.10 introduces credentials. These are authentication and connection configurations you create once and reuse wherever you need them. When you update a credential, that change is applied everywhere the credential is used.
Camunda Hub provides an interface for managing your credentials.
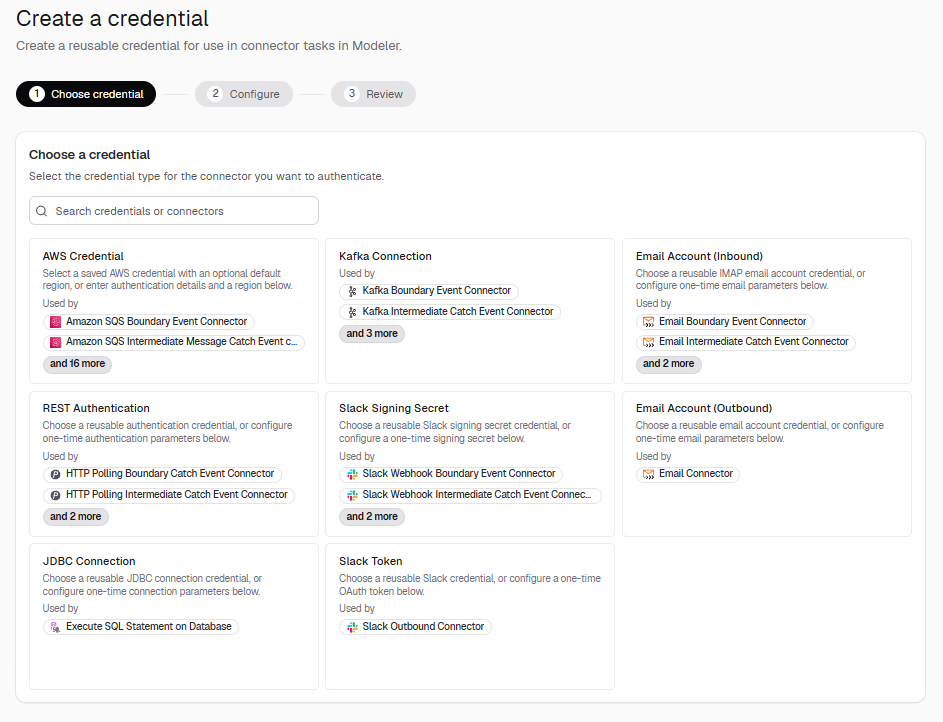
- Center of excellence teams create and manage credentials centrally in Hub, and see them across all environments.
- Delivery teams select a credential from the properties panel of a connector task in the modeler, instead of entering the settings on every task.
- Credentials created outside Hub, for example in Desktop Modeler, can be found by scanning environments and added to Hub for central management.
- Credentials are stored as cluster variables, so connectors and job workers can reference them by name.
Environment connection in Modeler
Connect the modeler in Hub to an environment to model, test, and review against your real runtime, instead of building in isolation.
- View and choose which environment you are connected to from the bottom panel bar of the diagram, in the Implement tab.
- Connector credential names from the connected environment autocomplete in your FEEL expressions and in the properties panel credential picker.
- Task testing, connector credentials, and the Webhook tab follow this connection. Your deploy target doesn't change.
This shortens the build, review, and test cycle, because you validate against the same environment your process runs in. Test Studio doesn't follow this connection. It runs against the environment you select in the Test tab.
Recover deleted resources
When you deleted a resource, such as a file or process application, in Camunda 8.9, the resource was immediately and permanently deleted, along with:
- Their data in process application version history.
- Their child resources if the resource is a container, such as a folder or process application.
Deleted resources could not be recovered.
In Camunda Hub, when you delete a resource, it is moved to Recently deleted. You then have 30 days to restore it before it is permanently deleted.
Roles and permissions
Camunda Hub includes a number of changes to roles and permissions.
SaaS roles and permissions
SaaS organization-level roles and permissions have changed. Prior to 8.10, users in an organization were assigned either a Modeler, Analyst, or Admin role in Console. In 8.10, users in an organization are assigned one of the following roles in Camunda Hub:
| Role | Description |
|---|---|
| Member | Full access to create and collaborate on projects in workspaces they're invited to, plus read-only visibility into the organization. |
| Analyst | Includes everything a Member can do, plus full access to Optimize to build process dashboards and reports. Access to specific dashboards and reports within Optimize is governed separately by Optimize collection roles. |
| Organization Admin | Manages the organization, its members, and its workspaces, with full access to every workspace and project by default. Organization Admins can also assign environments to workspaces. |
| DevOps | Grants cluster create and update, cluster clients, connector secrets, IP allowlisting, secure connectivity, encryption, and the connector-management view, plus Member-level modeling. Cannot manage or view organization members, billing, or organization settings. |
Self-Managed roles and permissions
Self-Managed roles and permissions have changed as follows:
| 8.9 role | 8.10 equivalent | Changes |
|---|---|---|
| Console | DevOps | Gains management access to Hub's cluster pages. |
| Web Modeler Admin | Hub Admin | Gains full access to Hub's cluster pages. |
| Web Modeler | Hub | No change in access. |
| - | Analyst | (New role) Grants Hub modeling access, management access to the catalog's usage and adoption data, and full access to Optimize, without modeler-admin or people/org management access. |
The 8.9 roles are not removed in 8.10, and remain for backward compatibility.
Camunda Hub API
Before Camunda 8.10, you could interact with Web Modeler and Console resources through the following APIs:
| API | Description | Camunda 8.10 status |
|---|---|---|
| Web Modeler API v1 | Programmatically manage Web Modeler resources, like projects, process applications, and collaborators. This API now serves Camunda Hub resources, like workspaces, projects, and members under the hood. | Deprecated. Will be removed in 8.12. |
| Administration API | Retrieve cluster data, including installed apps and usage metrics | Removed for Self-Managed. Still available for SaaS. |
In Camunda 8.10, with Camunda Hub replacing Web Modeler and Console, the new Camunda Hub API succeeds the old Web Modeler API and, for Self-Managed, the Administration API. The Camunda Hub API unifies cluster and workspace management in a single interface. Additionally, it provides new APIs for interacting with Hub-specific features.
Migrate from Web Modeler to the Camunda Hub API
Self-Managed Hub configuration
In 8.10, Console and Web Modeler configurations have been merged to form Camunda Hub properties. Configuration keys have been updated to support feature changes.
For Helm, Console is no longer a standalone deployment. The new camunda/hub image serves both feature sets. The camundaHub key enables and configures Camunda Hub:
# Before (8.9)
console:
  enabled: true
webModeler:
  enabled: true
  restapi:
    resources:
      requests:
        memory: 1Gi

# After (8.10)
camundaHub:
  enabled: true
  restapi:
    resources:
      requests:
        memory: 1Gi
Additionally, when you upgrade, your data is migrated to the new file structure.
Web Modeler data
On 29 August 2026, your SaaS Web Modeler data received three updates to prepare for Hub in 8.10, around Organizational structure, data migration, and the process application versioning model.
Web Modeler data migration details
Data migration
As a Camunda 8 SaaS user, your data was migrated to the new organizational structure automatically during a scheduled maintenance window.
During the migration:
- Any process application nested inside a folder moved to the top level of its project.
- Any files or folders located directly in a project, not inside a process application, were automatically grouped in a new process application, named
YOUR PROJECT NAME - General. You can rename this application, move content out of it, or otherwise reorganize it as with any other process application. - Git sync and cluster settings on existing process applications migrated unchanged along with your data.
During the migration, Web Modeler was briefly unavailable. Clusters and running processes were unaffected and continued executing normally.
Camunda extensively tested the migration process before release and created a backup before the migration to ensure your data was recoverable in its original state if anything went wrong. If you notice anything unexpected after the migration, contact support.
The migration did not affect the following resources:
| Area | Impact |
|---|---|
| Running process instances | Orchestration Clusters, engines, and running process instances were unaffected. Web Modeler and Camunda Hub remained independent of the runtime path. |
| Redeployment | Existing deployments remained on their clusters and continued running. The migration did not require redeployment. |
| Clusters and configuration | Cluster and deployment settings attached to existing process applications migrated with the data and remained unchanged. |
| Files, folders, and version history | All files, folders, versions, and history were preserved. Only their location within the project changed. |
| Git-synced projects | The migration did not modify process applications or their contents. Files connected through Git sync remained in the same repository with the same history. |
| Desktop Modeler | Desktop Modeler was unaffected because it has no direct connection to Web Modeler. Content shared through Git sync was also unaffected. |
If you automate against the Web Modeler API, the migration may affect automation that relies on file or folder locations. Web Modeler API v1 returns files and folders from their new locations. Requests that create an item at a project's root are redirected to the new YOUR PROJECT NAME - General process application, and the response reflects the new location.
Review any automation that relies on file or folder locations. A small number of folder API integrations were affected more directly. If you use the folder API with process applications, contact support to confirm whether your integration needs updates.
Organize the "General" process application
During the migration, any files or folders located directly in a project, not inside a process application, were automatically grouped in a new process application, named "YOUR PROJECT NAME - General". This process application is a temporary container for loose files and folders. Camunda recommends organizing these resources into process applications that reflect their purpose for better long-term discoverability and maintainability.
To move files from the "General" process application, first create a new process application:
- Open your project.
- At the top right of the project view, click Create new > Process application.
- Enter a name and select a development cluster.
- Click Create.
Next, move the files from the "General" process application to the new one:
- Open your "General" process application.
- On the left side of the file list, select all the files you want to move.
- At the top of the file list, click Move.
- Select your new process application.
- Click Move.
Process application versioning model
In addition to the Web Modeler data migration, Camunda is introducing an improved process application versioning model:
- File-level versions — process applications can be versioned as a bundle, as before, but now also at the single-file level.
- Autosave for all files, plus file-level version history for every file.
- Decoupled versioning — process application versions and element template versions are now created independently of each other.
Before the new model, a process application and the resources within it were tightly coupled. You could only version and deploy the resources as a single, bundled unit. With the new model, you have more granular control.
Working with process applications
Learn more about using process applications in the following sections.
Deploy to environments
Before 8.10, you connected clusters to deployment stages in each process application. In 8.10, a project has no deployment stages. It deploys to the environments that are assigned to its workspace. An organization admin assigns environments to the workspace.
Deploy a process application
You can deploy a process application as a bundle from either the process application view or a resource view. In both cases, all resources in the process application are deployed together.
From the process application view:
- Open a process application.
- At the top right of the process application view, click Deploy & run, or select Deploy from the dropdown.
- Confirm the deployment.
From the resource view:
- In your process application, open a resource, such as a BPMN diagram or form.
- At the top right of the modeling interface, click Deploy.
- In the deployment modal, under Resources, select All resources. (This is the default.)
- Confirm the deployment.
Deploy an individual resource
If you don't want to deploy all resources in a process application, you can deploy an individual resource:
- In your process application, open a resource, such as a BPMN diagram or Form.
- At the top right of the modeling interface, click Deploy.
- In the deployment modal, under Resources, select Only this resource.
- Confirm the deployment.
Create a process application snapshot
Use a snapshot to capture all files in a process application at once:
- Open a process application.
- On the right side of the process application view, under Snapshots click Create snapshot.
- Enter a Snapshot tag in the snapshot creation modal.
- Click Create.
Create a resource version
In addition to process application snapshots, you can create versions for individual resources:
- In your process application, open a resource, such as a BPMN diagram or form.
- At the top right of the modeling interface, click Versions.
- Click Create version.
- Enter a Version name in the version creation modal.
- Click Create.
Environments in the SaaS migration
Before 8.10, you connected up to four clusters to a process application, one for each deployment stage. In 8.10, a project has no deployment stages, so Camunda Hub carries these connections forward as environments of the workspace. Camunda Hub assigns the environments in a separate step from the Web Modeler data migration described above.
For each migrated workspace:
- Every cluster that a process application in the workspace connected to any deployment stage becomes an environment assigned to the workspace. This also applies to the cluster of each IDP application. A cluster that several stages or applications used is assigned once.
- If several projects are in the same workspace, the workspace receives the environments of all of them.
- Projects inherit the environments of their workspace. They have no deployment stages or connected clusters anymore, and the migration doesn't set a default environment for a project. You choose the environment when you deploy.
- Workspaces you create after the migration start without environments.
An organization admin can change the assigned environments at any time. See assign environments to a workspace.
Multi-region resilience
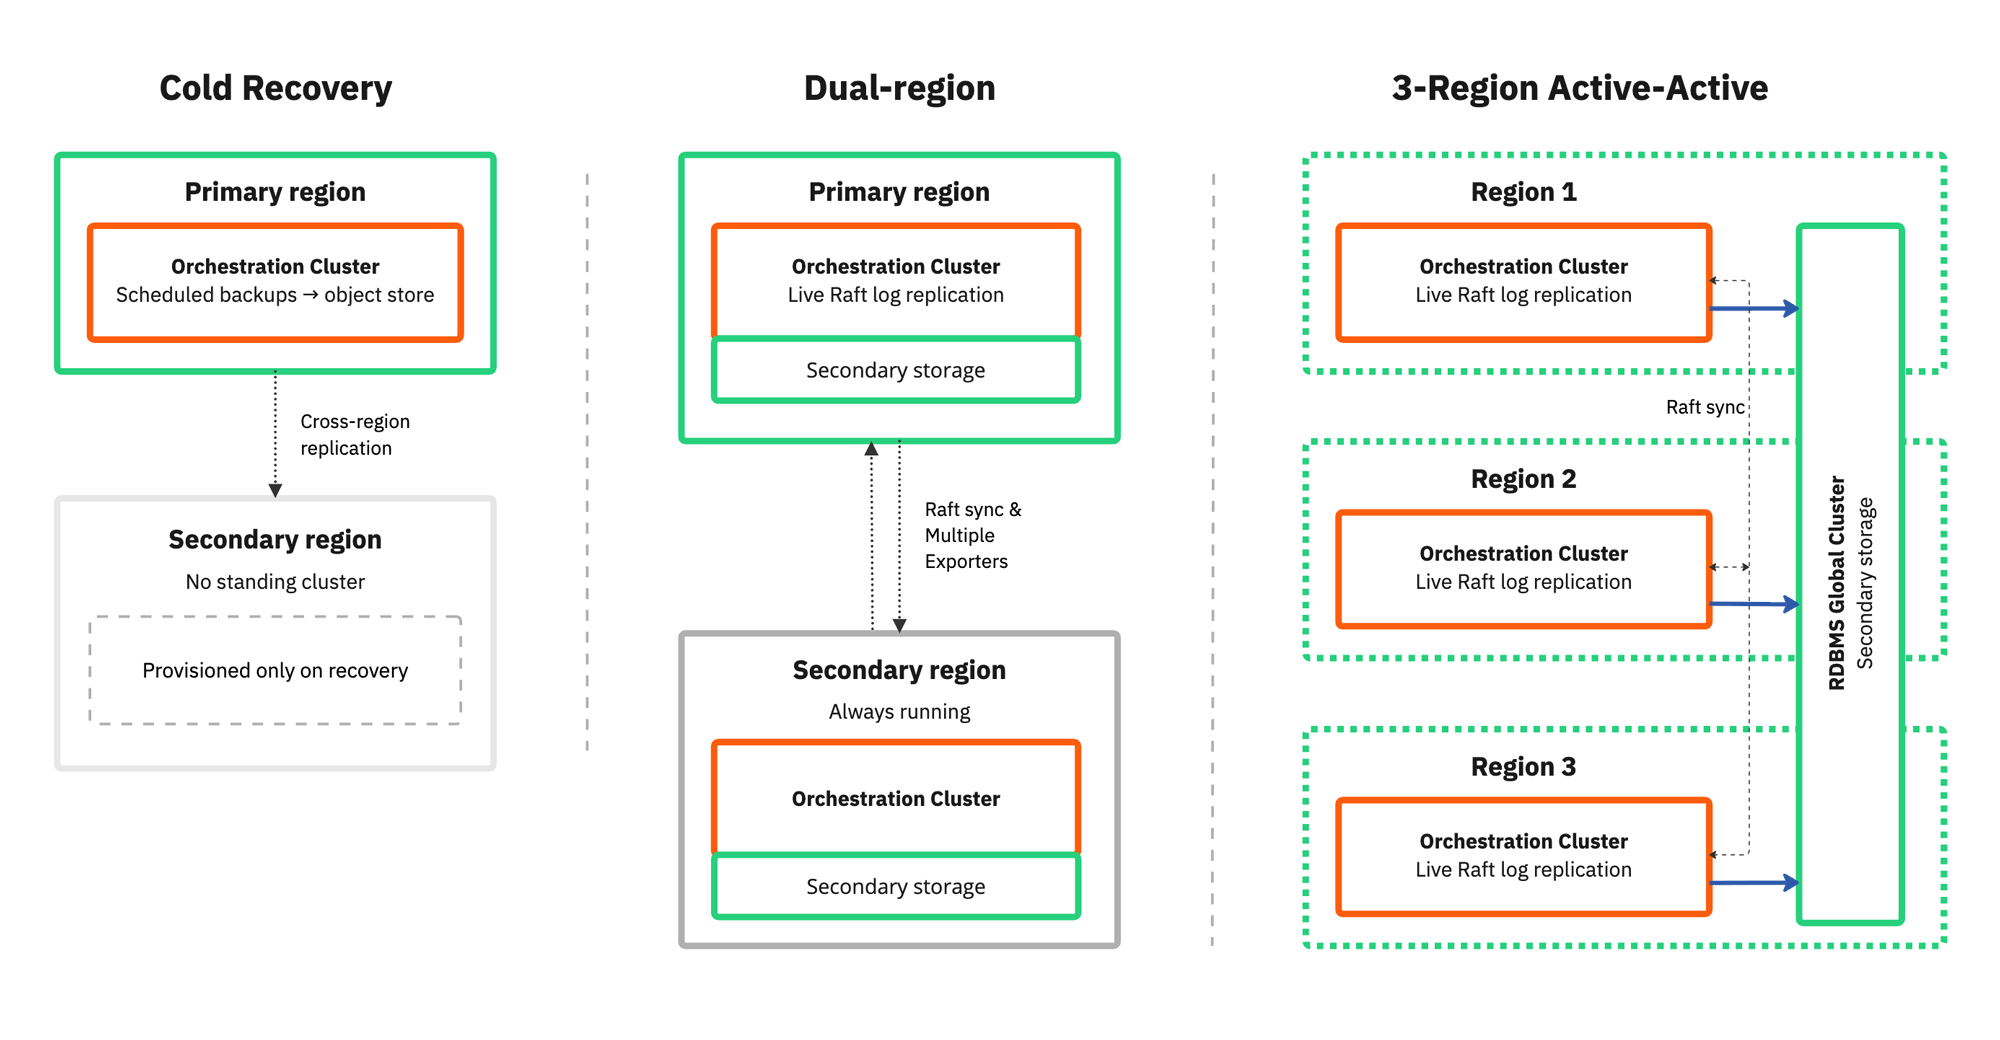
Camunda 8.10 provides a structured multi-region resilience framework for Self-Managed Orchestration Cluster deployments.
-
Cold Recovery: Camunda's lowest-cost multi-region configuration uses scheduled cross-region backups and a manual restore procedure to recover from complete primary-region loss. Recovery measured in hours is operationally acceptable. On SaaS, cross-region cold recovery is also available for AWS and GCP region pairs marked Failover supported.
-
Dual-Region: Dual-region deployment with continuous replication. A full Camunda Orchestration Cluster runs continuously in both a primary and secondary region.
-
Three-region active-active (RDBMS): A three-region Kubernetes deployment with the Orchestration Cluster running active-active across all three regions, backed by a relational database (RDBMS) with cross-region replication as secondary storage. Losing one region requires no operator intervention, because the cluster never loses quorum.
Camunda 8.10 also adds the following capabilities to support multi-region deployments:
- Region-aware partition placement: Operators declare which region each broker belongs to using a topology label. The engine distributes partition replicas across regions so no single region holds a quorum for any partition, and leader election prefers region-local leaders under normal conditions. The same mechanism works for availability zone or datacenter isolation.
- Async replication support for RDBMS secondary storage: Asynchronously replicated relational databases, including AWS Aurora and PostgreSQL, are supported as secondary storage. The exporter pauses automatically when the RDBMS endpoint is unreachable, such as during a failover, and replays missing events from the Zeebe log on reconnection without manual data repair.
Strong tenant isolation via Physical tenants
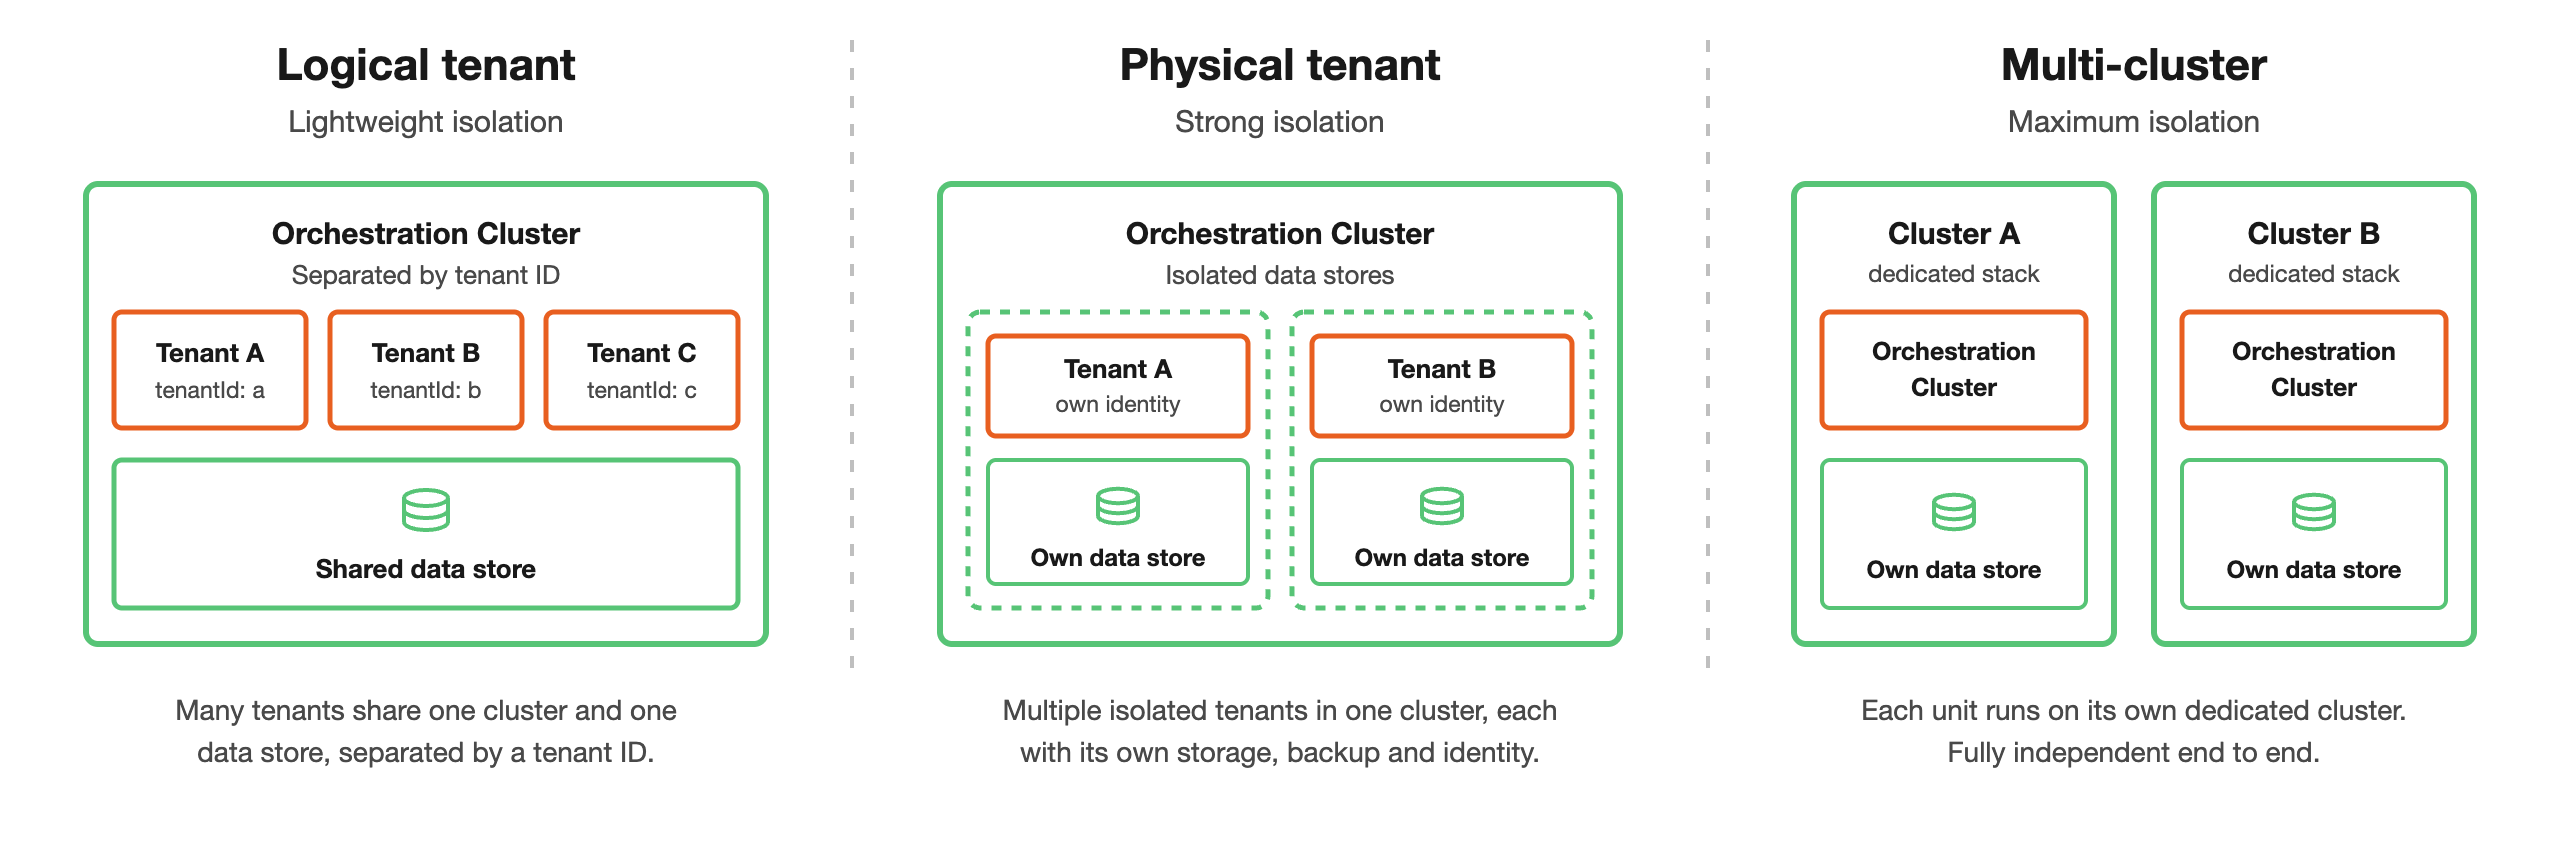
Camunda 8.10 introduces Physical Tenants for strong physical data isolation within a single cluster with separate data storage and independent operations per tenant. Physical Tenants still share cluster compute resources such as CPU and memory, so runtime interference is reduced but not fully eliminated.
-
Physical Tenant isolation is best for multiple teams or organizations needing strong isolation without the cost and complexity of separate clusters.
-
Physical Tenants and Logical Tenants can be used together. Each Physical Tenant can contain its own set of Logical Tenants, providing two independent layers of isolation: physical separation between top-level tenant groups, and logical separation within each group.
-
Per-tenant APIs and web apps: The REST API and gRPC API are exposed per Physical Tenant, and Operate, Tasklist, and Admin are available at
<baseurl>/physical-tenants/<physicalTenantId>/<webapp>. -
Per-tenant authorization: Each Physical Tenant enforces its own roles, mapping rules, and permissions, so a user can have a different role on each Physical Tenant.
-
Identity provider selection: Identity providers are defined at the cluster level, and each Physical Tenant chooses which ones it accepts. Cluster-wide operations such as topology, backups, and restore are protected by a claim-based cluster admin role.
-
Logical multi-tenancy on SaaS: Camunda 8 SaaS officially supports multi-tenancy via tenant identifiers. It is available on clusters running generation 8.8 and later, so you don't need to upgrade to 8.10 to use it.
Physical Tenant isolation model
Business ID
Business ID is now a first-class, searchable attribute across the Orchestration Cluster.
Introduced in 8.9 as an immutable domain-specific identifier, Business ID in 8.10 can be searched and filtered across process instances, decision instances, user tasks, messages, and message subscriptions. Jobs expose the Business ID in the activation response (visible, not searchable).
- Search and filter across entity types using advanced operators (
$eq,$neq,$exists,$likewith*/?wildcards,$in). Operate and Tasklist expose Equals, Contains, and Is one of in their filter UI. - Message correlation: Include a Business ID in published or correlated messages as an additional filter constraint. If both a correlation key and Business ID are supplied, both fields must match the corresponding values stored on the subscription.
- Call Activity propagation: Child instances inherit the parent's Business ID by default. Configure a literal value or FEEL expression on the call activity to override it. Use
camunda.processInstance.businessIdin FEEL expressions to reference the parent's ID. - Start with a Business ID from Camunda Hub or Desktop Modeler.
- Late assignment: Assign a Business ID to a running instance that has none, when uniqueness is disabled. Assignment is forward-only: only artifacts created after the assignment carry it.
Camunda design system
The new visual Camunda design system and navigation are introduced for all components with the 8.10 release in both SaaS and Self-Managed.
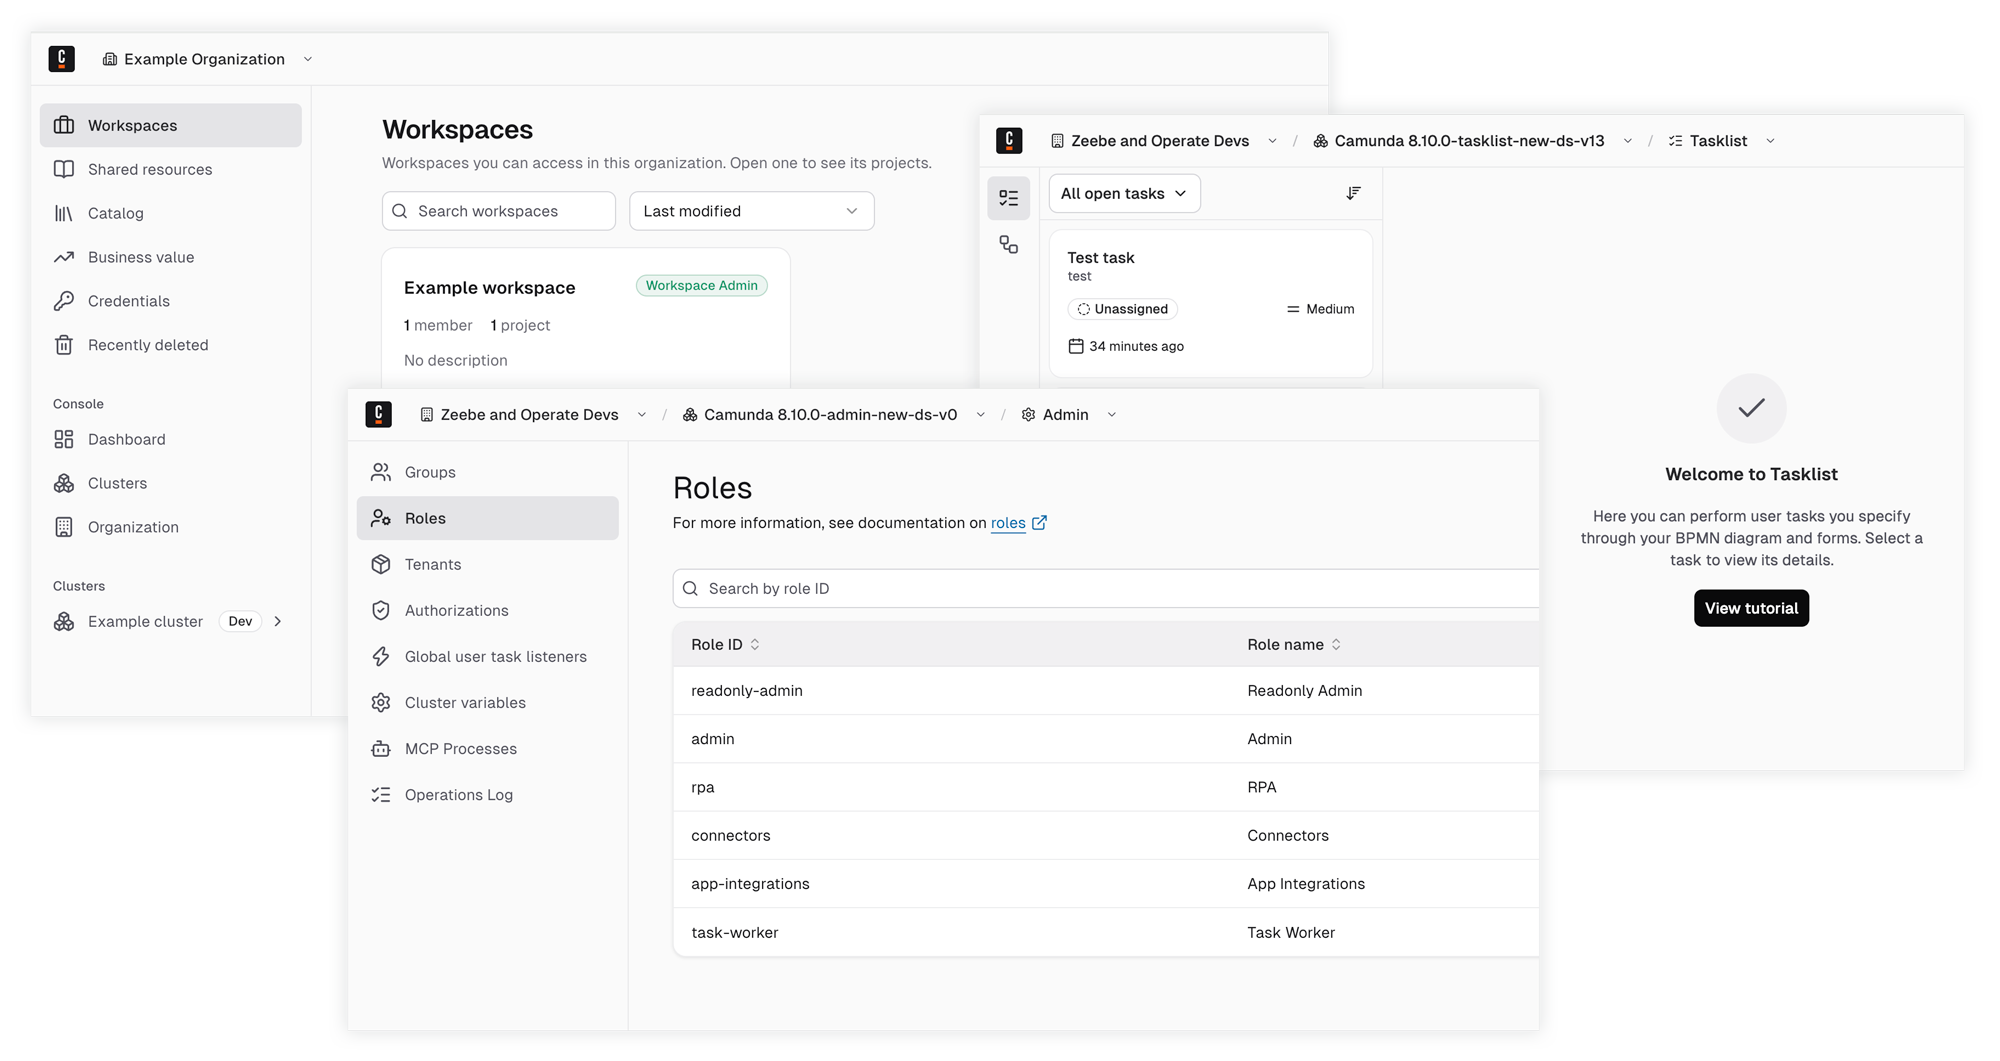
- Updated navigation: A persistent sidebar makes it easy to jump between pages and accomplish tasks.
- Clear context: The top bar shows which organization, workspace, and component you are working in.
- Designed for accessibility: The interface follows accessibility best practices, including keyboard navigation and color contrast.
Centralized secret resolution via Zeebe
Centralized secret resolution through Zeebe is introduced in 8.10.
Use and manage secrets to keep sensitive values such as API keys, passwords, and tokens, out of your process models, job variables, and configuration files. Processes can reference credentials from customer-managed secret stores without persisting secret values in Camunda.
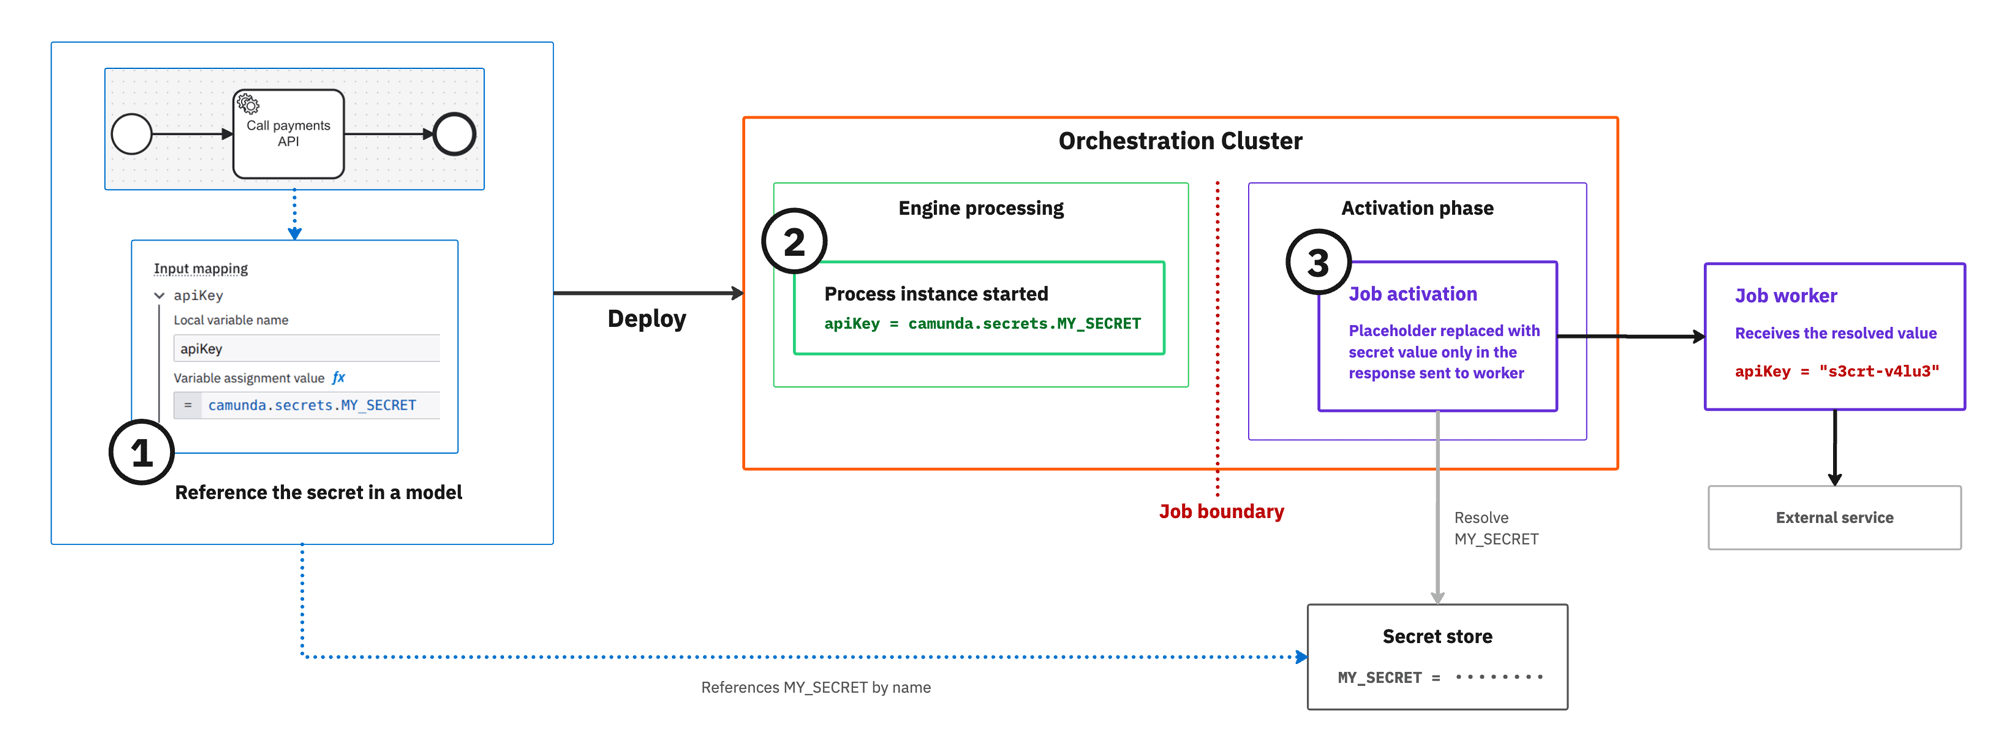
- Reference secrets as
camunda.secrets.NAMEin input mappings, expressions, and output mappings. The legacy{{secrets.NAME}}syntax continues to work. - Secrets are resolved automatically for activated jobs and can also be requested through the Gateway APIs
/v2/secrets/resolveand/v2/secrets/list. - Resolved values are not written to engine state, exports, backups, Operate, Tasklist, or application logs.
- Self-Managed deployments support AWS Secrets Manager and GCP Secret Manager with workload identity authentication. A file-based provider is available for development and testing.
- SaaS requires no configuration and uses Camunda’s managed secret backend.
- Camunda 8 Run uses the file-based provider: create one file per secret (filename = secret name, contents = value), and set
camunda.secrets.stores.file.default.pathto that directory in the Camunda 8 Run application configuration.
Migration: Existing processes continue to work without changes. For new processes, use camunda.secrets.NAME. To migrate hardcoded or connector-specific credentials, store the value in a supported secret store and replace it with a centralized secret reference.
Limitations: This feature does not yet include HashiCorp Vault or Azure Key Vault support, secret access audit logging, per-process secret restrictions, or centralized resolution for Hybrid Connector Runtimes. Cache entries expire after the configured TTL, which is 20 seconds by default.
Connector operations
Connectors are now discoverable by the operation you want to perform, not only by the product they connect to.
When you search in the create, append, or change element menu, the operations of every built-in connector appear as their own entries, so searching for upload object or send email takes you straight to the connectors that can do it. Selecting an operation applies the connector with that operation preselected, and connectors with several operations present them as a nested menu.
Two changes come with this:
- Connectors that provide a single operation are renamed after the operation they perform. Existing process models keep running unchanged.
- Element templates support the
stepsandpresetskeys, so your own templates can offer the same guided operation selection.
Credentials in Desktop Modeler
Desktop Modeler also supports credentials. Select an existing credential on a connector task from the properties panel, or create a new one without leaving it, instead of entering the same authentication and connection settings on every task.
Use credentials in Desktop Modeler
Camunda for Slack
Camunda for Slack joins Camunda for Microsoft Teams as a second chat platform served by the same App Integrations backend. From Slack, you can browse and complete tasks, start a process, switch organization and cluster, and subscribe a channel or direct message to notifications, all through the /camunda slash command and the Camunda direct message. Microsoft Teams and Slack are independent, so you can run either on its own, or both.
Helm chart deployment
Important changes to Helm chart deployment in 8.10 are as follows:
One management plane and one or more execution planes
The 8.10 Helm chart adds global.topology.mode, so each release declares its role in the deployment: combined, hub, orchestration, or optimize. One hub release running Camunda Hub and Management Identity can serve many independently deployed orchestration releases, each with its own lifecycle, scaling, and upgrade schedule.
The new optimize role deploys Optimize alone. Because one Optimize instance reads a single index prefix, this is what lets each Physical Tenant have its own Optimize instance.
combined remains the default, so existing deployments are unchanged by the upgrade. For a new production deployment, the split topology is the baseline.
hub and optimize are 8.10-only roles, because Camunda Hub and its cluster inventory don't exist in the earlier charts. The orchestration role is also available in recent 8.9, 8.8, and 8.7 charts, so one 8.10 Hub can manage clusters on older chart versions. Earlier versions of those charts ignore global.topology.mode and deploy a combined release. For the minimum chart version of each role, see release roles.
Install the deployment topology
Camunda Helm Toolkit
The new Helm migration and validation toolkit can help you upgrade from Camunda 8.9 to 8.10 on Kubernetes with Helm.
Use the toolkit to:
- Read your existing 8.9 Helm values (for example, values.yaml).
- Generate a sample 8.10 values file reflecting the recommended Helm CLI v4, Bitnami sub‑charts removal, Hub‑aware deployment patterns, and simplified application configuration.
- Create a migration report that lists the keys that were migrated automatically, flags keys that require manual decision (for example, infrastructure endpoints, security‑sensitive options), suggests where to find more information in the documentation, and can validate an existing 8.10 values file (for example, one drafted by hand or AI tool) against Camunda’s migration rules.
The CLI is non‑interactive, with clear exit codes and optional JSON output, making it suitable for humans using the command line, CI pipelines, and AI agents (for example, Claude Code, Copilot) that can use it as part of an automated migration workflow.
Prepare Helm upgrades with the Camunda Helm Toolkit
Helm CLI v3 and v4 support
Camunda 8.10 (chart 15.x) supports Helm CLI v3 (3.10 or later) and v4. With Helm CLI v3, the chart shows a warning when you run helm install or helm upgrade.
Camunda recommends Helm CLI v4 and supports it for the full release cycles of Camunda 8.9 and 8.10. Camunda supports Helm CLI v3 (3.10 or later) until February 10, 2027, when upstream support ends. After February 10, 2027, Camunda no longer supports Helm CLI v3. Customers who continue to use Helm CLI v3 after that date do so at their own risk.
Switching CLIs does not require a release-state migration. Helm runs on the client, and both CLIs read and write the same release-storage format. Use Helm CLI v4 for new installations. Switch existing deployments before Helm CLI v3 support ends.
Move from the Helm v3 CLI to v4
Host network support for orchestration cluster pods
The 8.10 Helm chart adds orchestration.hostNetwork (default: false), which lets orchestration cluster pods share the host node's network namespace. This is useful in bare-metal or restricted network environments where pods must be reachable directly via the node IP rather than a cluster overlay network.
Low-code testing
Test Studio in Camunda Hub turns process runs into repeatable tests that you can maintain and run in your CI/CD pipeline.
- Assertions: Run a process instance, then save its input data and assertions as a low-code integration test. Add variable and path assertions, and view pass or fail results in the Test tab.
- Shared schema with Camunda Process Test: Test files use the same schema as Camunda Process Test (CPT). Record a test once, run it in CI/CD through CPT, and load CPT-authored test files into Test Studio to debug them visually.
- Test repair: When you delete, rename, or change the type of a BPMN element, Test Studio shows which steps broke and lets you fix them in place instead of re-recording the run.
- Segment tests: In Play, capture and rerun targeted sections of a process as low-code integration tests. Ad-hoc subprocesses, and therefore AI agent elements, are not supported in test mode. See the limitations.
Optimize
Important changes to Optimize in 8.10 are as follows:
Optimize authentication configuration keys
The component-specific Optimize login and API security keys are deprecated in favor of camunda.security.*. Camunda plans to remove them in a future release, with the component-specific configuration and its optimize.security.csl.enabled=false fallback.
CAMUNDA_OPTIMIZE_IDENTITY_BASE_URL is not deprecated and stays in use for user lookups. See component-specific configuration keys for the full key mapping.
Optimize authentication in Self-Managed
Optimize data filters in Camunda Hub
On SaaS, you can now configure Optimize export filters directly in Hub cluster settings. No Helm values or configuration files required. Use the Data filters section in cluster settings to control which process definitions (by bpmnProcessId) and variable names reach Optimize.
New SaaS clusters include a default business_ variable include filter that limits Optimize to variables whose names start with business_. This reduces Elasticsearch storage and shard usage significantly. Existing clusters are unaffected and can opt in with one click.
Configure Optimize data filters
Unified authentication for Orchestration Cluster and Optimize
With Camunda 8.10, Optimize can be configured with the same camunda.security.authentication.* settings already used by the Orchestration Cluster.
- Optimize continues to accept its 8.9 authentication settings in 8.10, translating the recognized properties to new equivalents at startup, but those 8.9 properties are deprecated and will be removed in a future release.
- User, group, role, tenant, and permission management for Optimize is unchanged in 8.10 and is still handled by Management Identity.
Nothing changes for the Orchestration Cluster as it already uses these settings since Camunda 8.9.
Unified configuration property changes
Camunda 8.10 completes the unified configuration of the Orchestration Cluster that began in 8.8.
- The 8.10 property changes are documented in Property changes in Camunda 8.10, including new properties, removed properties, and changed defaults.
- You can search, sort, and filter the table to show breaking changes, direct mappings, and new properties.
- For more information on each property (including default values), see the property reference.
Property changes in Camunda 8.10
Wait states
Operate now shows what an active process instance is waiting for, so you can tell expected waiting from a stalled instance.
-
When you inspect an active element, you can see the wait state and its details, such as a timer's due date, a receive task's message name and correlation key, a signal name, a condition expression, or a job's type and state.
-
Wait state tracking is enabled by default and writes records to secondary storage. In Camunda 8 Self-Managed, you can disable it if you do not want to track this data.
APIs & Tools
Important changes for APIs & Tools in 8.10 are as follows:
Removal of legacy APIs, Tasklist V1-dependent features, and Zeebe Process Test
In 8.10, Camunda removes the legacy component APIs and related features that were deprecated in 8.8, such as legacy APIs, Tasklist V1-dependent features, and Zeebe Process Test.
C# SDK
Camunda now offers an officially supported C# Client for the Camunda 8 Orchestration Cluster REST API v2.
You can authenticate with your cluster (No Auth for local, Basic authentication, or OIDC access tokens) and use C# methods to deploy resources, start and manage process instances, work with user tasks, and query processes and decisions, complete with pagination helpers and typed responses via generated models.
Go and Rust SDKs
8.10 introduces Technical Previews for Go and Rust language SDKs for the Orchestration Cluster API.
The Go SDK additionally contains support for gRPC job streaming. During 8.10 these SDKs will be stabilized, but there may be changes to their API surface based on user feedback. These SDKs will be fully supported and guaranteed to be stable in a later release.
Supported environments
Camunda 8.10 updates several platform and environment baselines. For complete details, including breaking changes and deprecations, see release announcements and supported environments.
Highlights include:
| Environment | Description |
|---|---|
| Amazon Aurora PostgreSQL | Version 14 removed, version 18 added. Supported versions are now 15, 16, 17, and 18. |
| Elasticsearch | Minimum supported 9.x version raised to 9.4. Supported versions are now 8.19+ and 9.4+. |
| H2 | Version 2.3 no longer supported. Only 2.4 is now supported (dev/test/evaluation only). |
| MariaDB | Version 12.3 LTS now supported. Supported versions are now 10.11, 11.4, 11.8, and 12.3. |
| Microsoft SQL Server | Version 2019 no longer supported. Supported versions are now 2022 and 2025. |
| MySQL | Version 9.7 LTS now supported. Supported versions are now 8.4 and 9.7. |
| OpenSearch | Minimum supported 3.x version raised to 3.6. Supported versions are now 2.19+ and 3.6+. |
| Oracle | Oracle 23ai rebranded as Oracle AI Database 26ai. Supported versions are 19c and 26ai. |
| PostgreSQL | Version 14 no longer supported. Supported versions are now 15, 16, 17, and 18. |