Trigger a process from Databricks with a webhook
Trigger a Camunda process directly from a Databricks notebook with the HTTP Webhook connector, using fraud detection as the example scenario.
Scenario
A Databricks job scores a transaction and sends the result to Camunda through a webhook. Camunda starts a process instance, drafts a review email with the OpenAI connector, and routes the transaction based on its risk score:
- A risk score of 0.75 or higher triggers an AI-drafted email that a fraud analyst reviews and approves before it's sent.
- A risk score below 0.75 ends the process automatically, with no email sent.
This scenario fits a webhook integration well because Databricks controls when the process starts, and the payload maps directly onto a small set of process variables.
Prerequisites
- A Camunda 8 SaaS cluster or a Self-Managed cluster running Camunda 8.7 or later.
- Web Modeler access to build the process, plus permission to deploy it and manage cluster secrets.
- A Databricks workspace with Python notebooks enabled and outbound HTTPS access to your Camunda webhook endpoint.
- An OpenAI API key and a SendGrid API key. The process uses these to draft and send a review email for flagged transactions.
Create the BPMN diagram
- Log in to Camunda Hub, open a workspace, and open a project.
- Click Create new > BPMN diagram.
- In the top navigation, open the menu next to New BPMN diagram, click Rename, and name it
Fraud Detection.
Hub Modeler opens a blank diagram with a default start event.
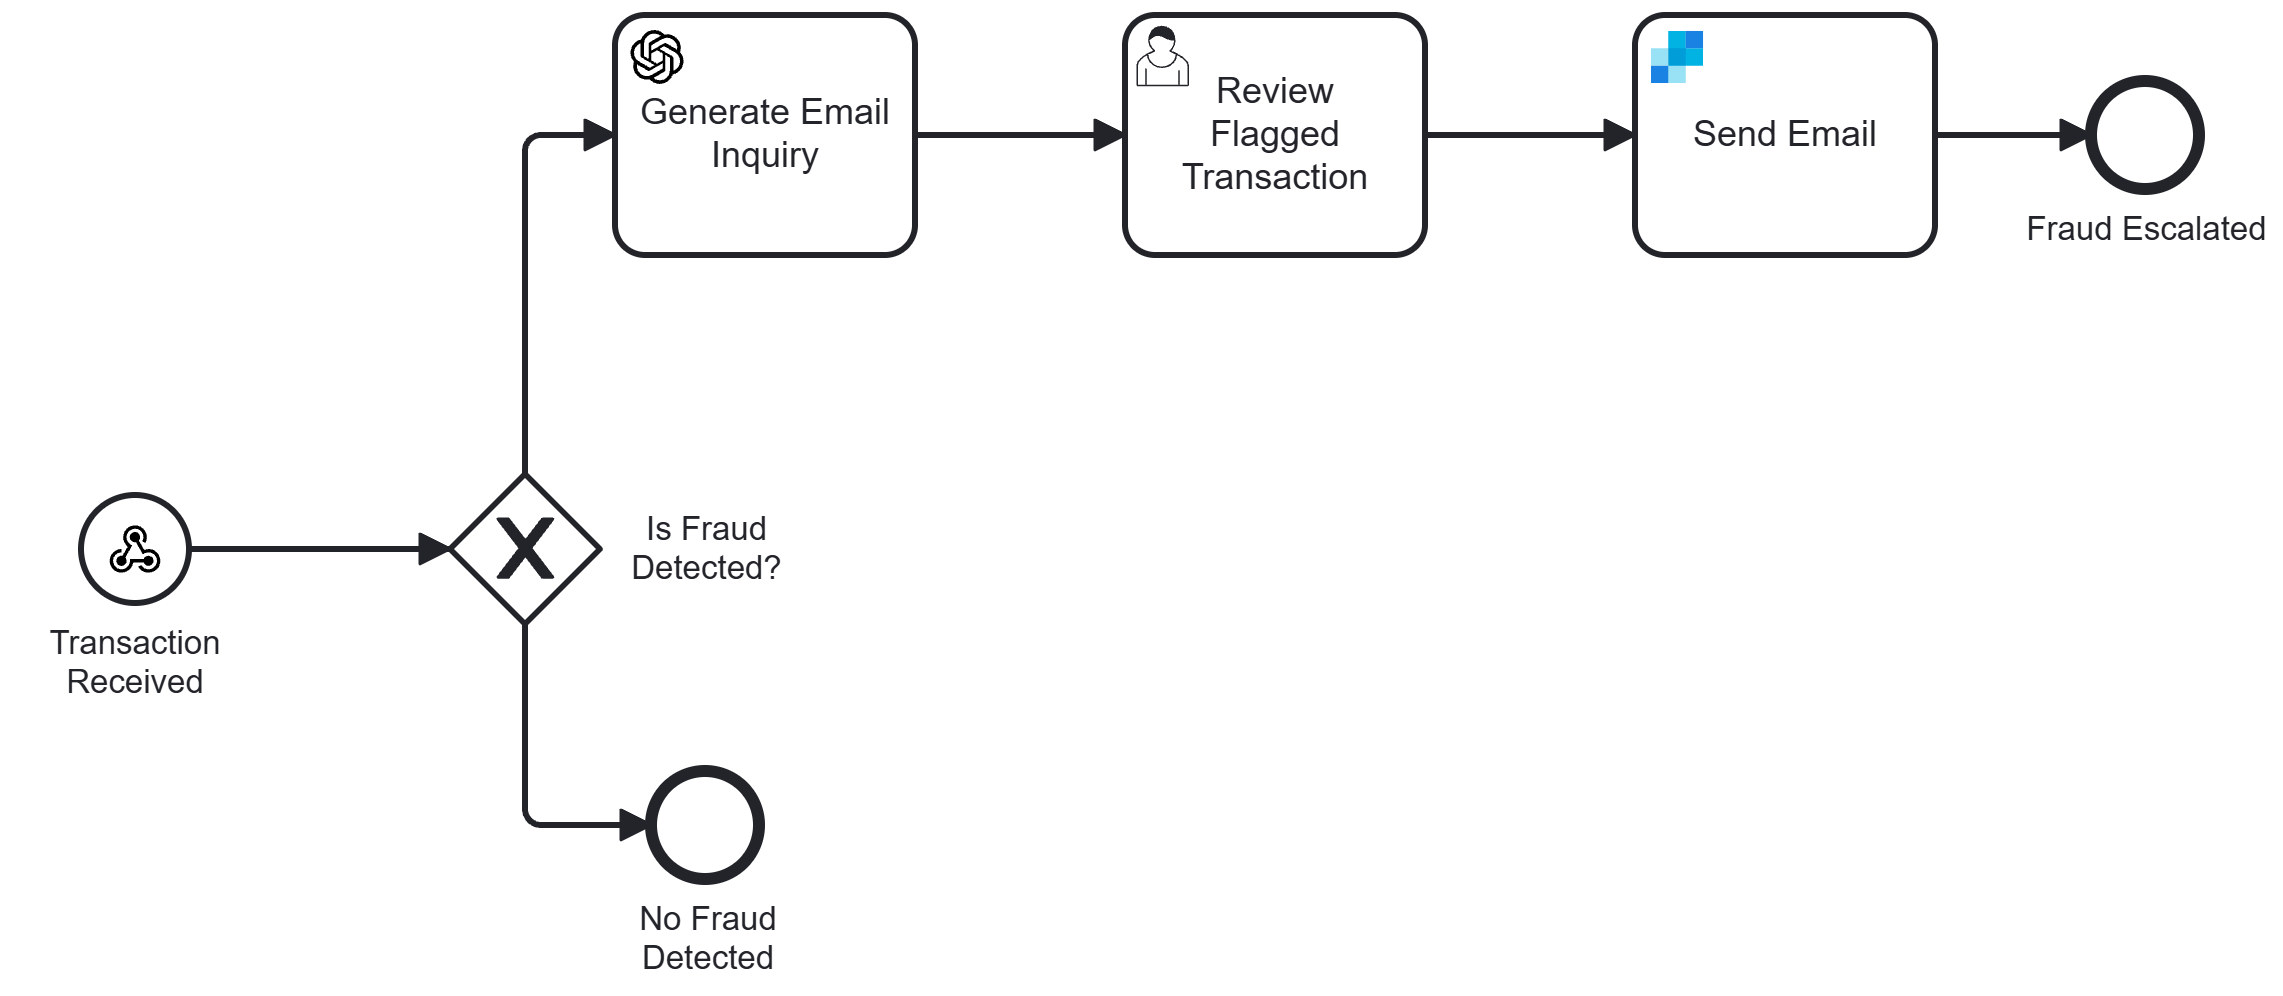
The following diagram shows the completed process structure:
Convert the start event to a webhook
The default start event starts a process instance manually. Change it to start the process from an incoming webhook call instead.
- Click the start event, then click the wrench icon that appears.
- Search for
webhookand select Webhook Start Event Connector.
The start event now shows a webhook icon. Configure it in the properties panel:
| Field | Value | Notes |
|---|---|---|
| Webhook ID | fraud-detection-trigger | Becomes part of the webhook URL. |
| Authorization | API Key | Authenticates incoming webhook calls. |
| API Key | {{secrets.FraudWebhookKey}} | The expected value, referenced from a secret rather than typed directly into the field. |
| API Key locator | =split(request.headers.authorization, " ")[2] | Extracts the key from the Authorization: Bearer <value> header. See how to configure API key authorization. |
The Databricks notebook in this guide sends the key as a Bearer token, so the locator splits the header on the space and takes the second part rather than comparing the raw header value.
To reject payloads without a numeric riskScore at the webhook, set Verification expression to the following. Databricks then gets a 400 response instead of a 200, and the run fails visibly:
=if request.body.riskScore instance of number
then null
else {"body": {"error": "riskScore must be a number"}, "statusCode": 400}
In Variable Mapping, set Result expression to map the incoming JSON body onto process variables:
= {
  caseId: request.body.caseId,
  customerId: request.body.customerId,
  emailAddress: request.body.emailAddress,
  transactionAmount: request.body.transactionAmount,
  riskScore: request.body.riskScore,
  modelVersion: request.body.modelVersion,
  timestamp: request.body.timestamp
}
Route on the risk score
Add an exclusive gateway named Is Fraud Detected? after the start event, with two outgoing paths:
| Path | Condition | Next step |
|---|---|---|
| High risk | Default flow | Continues into the OpenAI, review, and SendGrid tasks below. |
| Low risk | =riskScore < 0.75 | An end event named No Fraud Detected. No email is sent on this path. |
Mark the high-risk path as the default flow, so a transaction goes to manual review if the low-risk condition can't be evaluated. Without a default flow, a missing or non-numeric riskScore matches no path and raises an incident at the gateway.
The rest of this guide builds the high-risk path.
Draft a review email with OpenAI
On the high-risk path, add a service task after the gateway named Generate Email Inquiry, and change its type to the OpenAI connector.
| Setting | Value |
|---|---|
| OpenAI API key | {{secrets.OpenAI}} |
| Operation | Chat |
| Model | Select a chat model available to your OpenAI account. |
Set the prompt as a FEEL expression so the process variables are substituted at runtime:
="Review this transaction for possible fraud and draft a short customer email if follow-up is needed. Amount: " + string(transactionAmount) + ", customer ID: " + customerId + ", ML risk score: " + string(riskScore) + "."
Map the response to a variable with a result expression:
= {emailBody: response.body.choices[1].message.content}
Review the drafted email
Add a user task after the OpenAI task, named Review Flagged Transaction. This gives a fraud analyst a chance to validate the AI's assessment and edit the drafted email before it reaches the customer.
Link a Camunda Form to the task with a Text area field:
| Setting | Value |
|---|---|
| Field label | Email content |
| Key | emailBody |
Binding the field's Key to emailBody prefills the text area with the AI-drafted email. When the analyst completes the task, any edits they make overwrite the emailBody process variable.
Send the email with SendGrid
After the review task, add a service task named Send Email, and change its type to the SendGrid connector. This sends the analyst-approved version of emailBody.
| Setting | Value |
|---|---|
| SendGrid API Key | {{secrets.SendGrid}} |
| Sender Name | Your organization's name, for example Fraud Detection Team. |
| Sender Email | Your verified sender address, for example community@camunda.com. |
| Receiver Name | Leave blank, or provide a display name if you map one from the webhook payload. |
| Receiver Email | =emailAddress |
| Subject | Need more information about your transaction |
| Content Type | text/plain |
| Body | =emailBody |
Add an end event named Fraud Escalated after this task to close the high-risk path.
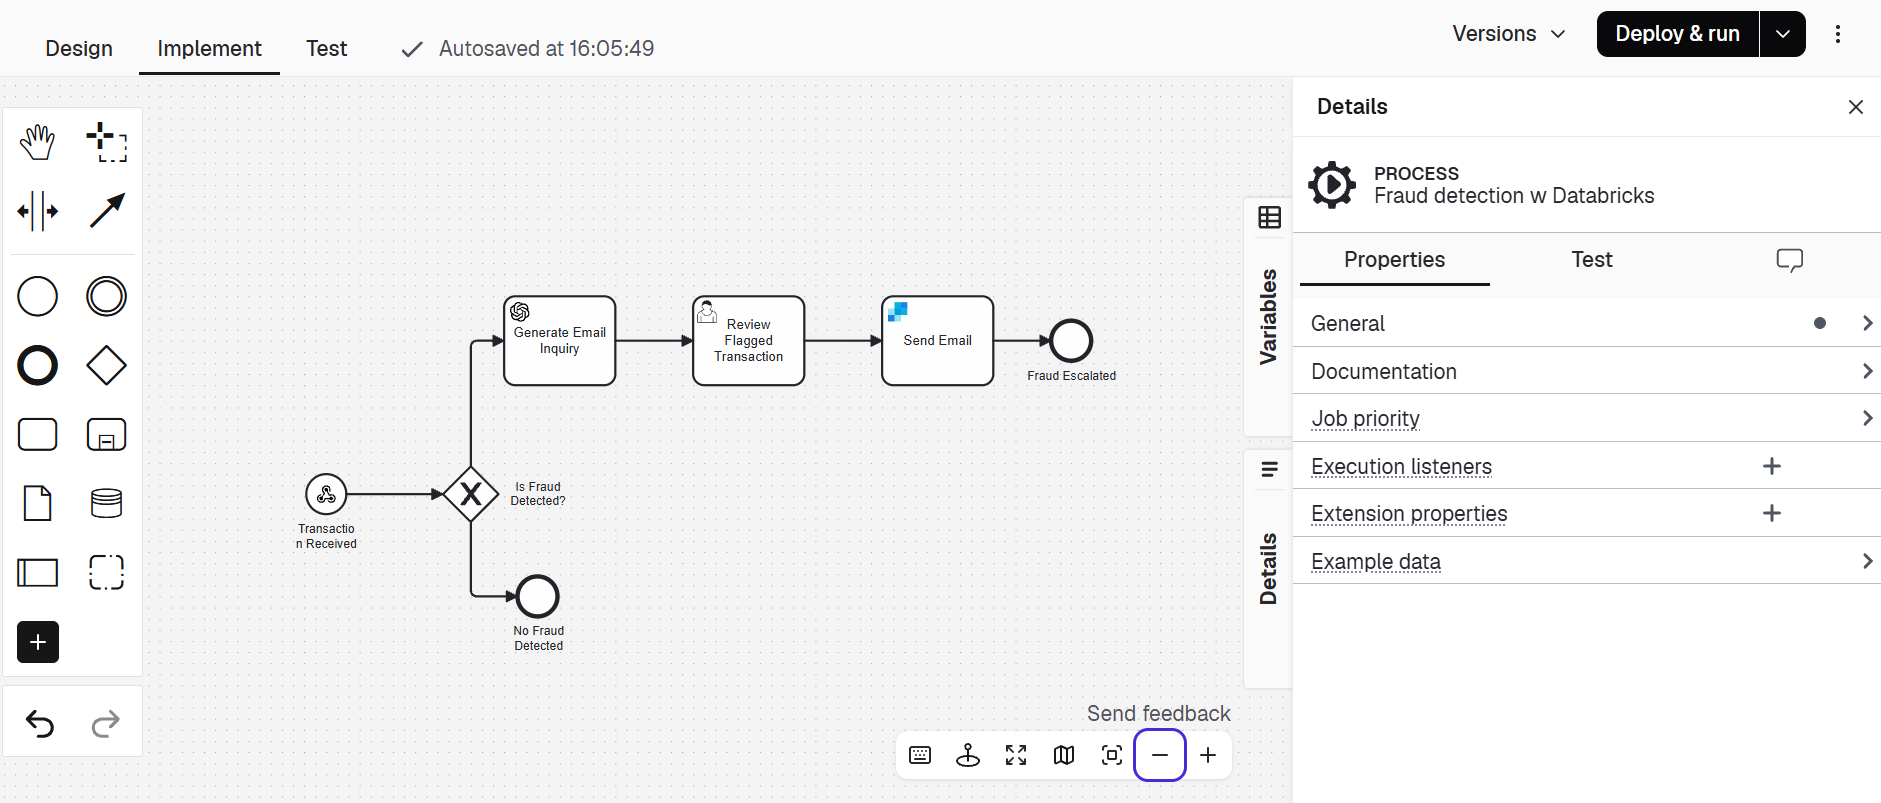
Here's what your completed diagram should look like in Web Modeler:
Store your API credentials as secrets
Store the webhook credential and the OpenAI and SendGrid API keys as secrets before you deploy the process. Create three secrets:
| Key | Value |
|---|---|
FraudWebhookKey | The credential Databricks sends to the webhook, for example fraud-webhook-test-abc123xyz. |
OpenAI | Your OpenAI API key. |
SendGrid | Your SendGrid API key. |
How you create them depends on where your cluster runs:
- SaaS: In Camunda Hub, under Console in the left navigation, click Clusters, select your cluster, and open the Cluster secrets tab. Click Create new secret for each key in the table.
- Self-Managed: Secrets aren't managed in the UI. Ask an operator to add these keys as described in connector secrets configuration.
Reference the secrets from Connector fields so their values aren't stored as plain text in the BPMN model. Reference them from a connector task as {{secrets.FraudWebhookKey}}, {{secrets.OpenAI}}, or {{secrets.SendGrid}}.
On Camunda 8.10 and later, you can also reference these secrets as =camunda.secrets.FraudWebhookKey, =camunda.secrets.OpenAI, and =camunda.secrets.SendGrid. See reference connector secrets as camunda.secrets.<name>.
Deploy the process and copy the webhook URL
In the top right corner of the modeling interface, click the dropdown next to Deploy & run, click Deploy, select a stage and the resources to deploy, then click Deploy again.
How you get the webhook URL depends on where your cluster runs:
- SaaS: Click the start event, open the Webhook tab in the properties panel, and copy the webhook URL. This tab is only available for Camunda 8 SaaS.
- Self-Managed: The Webhook tab isn't available. Build the URL yourself as
http(s)://<base URL>/<contextPath>/inbound/fraud-detection-trigger, using your Connectors runtime's base URL and, if configured, its Helm chart context path. See activate the HTTP Webhook connector for the full URL format.
Save the webhook URL, along with the FraudWebhookKey secret value from Store your API credentials as secrets. You need both to call the webhook from Databricks.
Trigger the process from a Databricks notebook
Create the notebook
- In Databricks, open Workspace, then Create > Notebook.
- Name it
Fraud_Detection_Triggerand set the language to Python.
Add the trigger code
Paste the following into the first cell. In production, transaction would come from your ML model or a data pipeline; this example uses a hardcoded sample transaction so you can test the integration end to end.
CAMUNDA_WEBHOOK_SECRET is hardcoded here for testing only. Don't commit a real webhook credential as plain text. In a production notebook, retrieve it from a Databricks secret scope instead, for example dbutils.secrets.get(scope="camunda", key="webhook-key").
import requests
from datetime import datetime, timezone

CAMUNDA_WEBHOOK_URL = "https://example-webhook-url.com/"
CAMUNDA_WEBHOOK_SECRET = "fraud-webhook-test-abc123xyz"  # Test value only; use a secret scope in production

transaction = {
    "caseId": "FRAUD-2026-001",
    "customerId": "CUST-98765",
    "emailAddress": "customer@example.com",
    "transactionAmount": 15000.00,
    "riskScore": 0.87,
    "modelVersion": "fraud-detection-v2",
    "timestamp": datetime.now(timezone.utc).isoformat(),
}

headers = {
    "Content-Type": "application/json",
    "Authorization": f"Bearer {CAMUNDA_WEBHOOK_SECRET}",
}

response = requests.post(
    CAMUNDA_WEBHOOK_URL, json=transaction, headers=headers, timeout=30
)

if response.status_code in (200, 201):
    print(f"Process instance started (status {response.status_code}).")
else:
    print(f"Webhook call failed (status {response.status_code}): {response.text}")
Replace CAMUNDA_WEBHOOK_URL and CAMUNDA_WEBHOOK_SECRET with the values you copied in Deploy the process and copy the webhook URL.
Run the notebook and confirm the process started
- Click the code cell and press
Ctrl+Enterto run it. - Confirm the cell prints
Process instance started. - Open Operate, find the
Fraud Detectionprocess, and open the running instance.
The sample transaction has riskScore: 0.87, which is above the 0.75 threshold, so the instance should have already run the OpenAI task and be waiting at the Review Flagged Transaction user task. The SendGrid task runs only after the analyst completes the review. In Operate, you can see the process variables from the webhook payload (caseId, riskScore, emailBody, and so on), the current execution state, and any incidents, such as a missing secret.
If the instance isn't waiting at Review Flagged Transaction, check for an incident on the OpenAI task first; a missing or misspelled secret reference is the most common cause.
If the webhook call fails with a 401 status, check that CAMUNDA_WEBHOOK_SECRET matches the FraudWebhookKey secret value you set in Store your API credentials as secrets. If it fails with a 400 status, the payload's riskScore is missing or isn't a number.
Next steps
- Replace the hardcoded sample transaction with your actual model output to trigger the process from a production Databricks job.
- Add inbound connector deduplication if your Databricks job might send the same transaction more than once.
- Read the Databricks connector reference if you also want Camunda to call Databricks directly, for example to look up additional transaction history before routing.