Automation Anywhere connector
The Automation Anywhere connector allows you to orchestrate an Automation Anywhere queue from your BPMN process with Automation Anywhere RPA to add work items to the queue and obtain work item results.
To start using the connector, you need an instance with a license we configured via an API service. Refer to the official documentation page to learn more about installing and configuring the Automation Anywhere API service.
You also need a user account with the AAE_Queue Admin role to query and manage workload queues and work items in a Control Room. Read more about roles in the official documentation.
Create an Automation Anywhere connector task
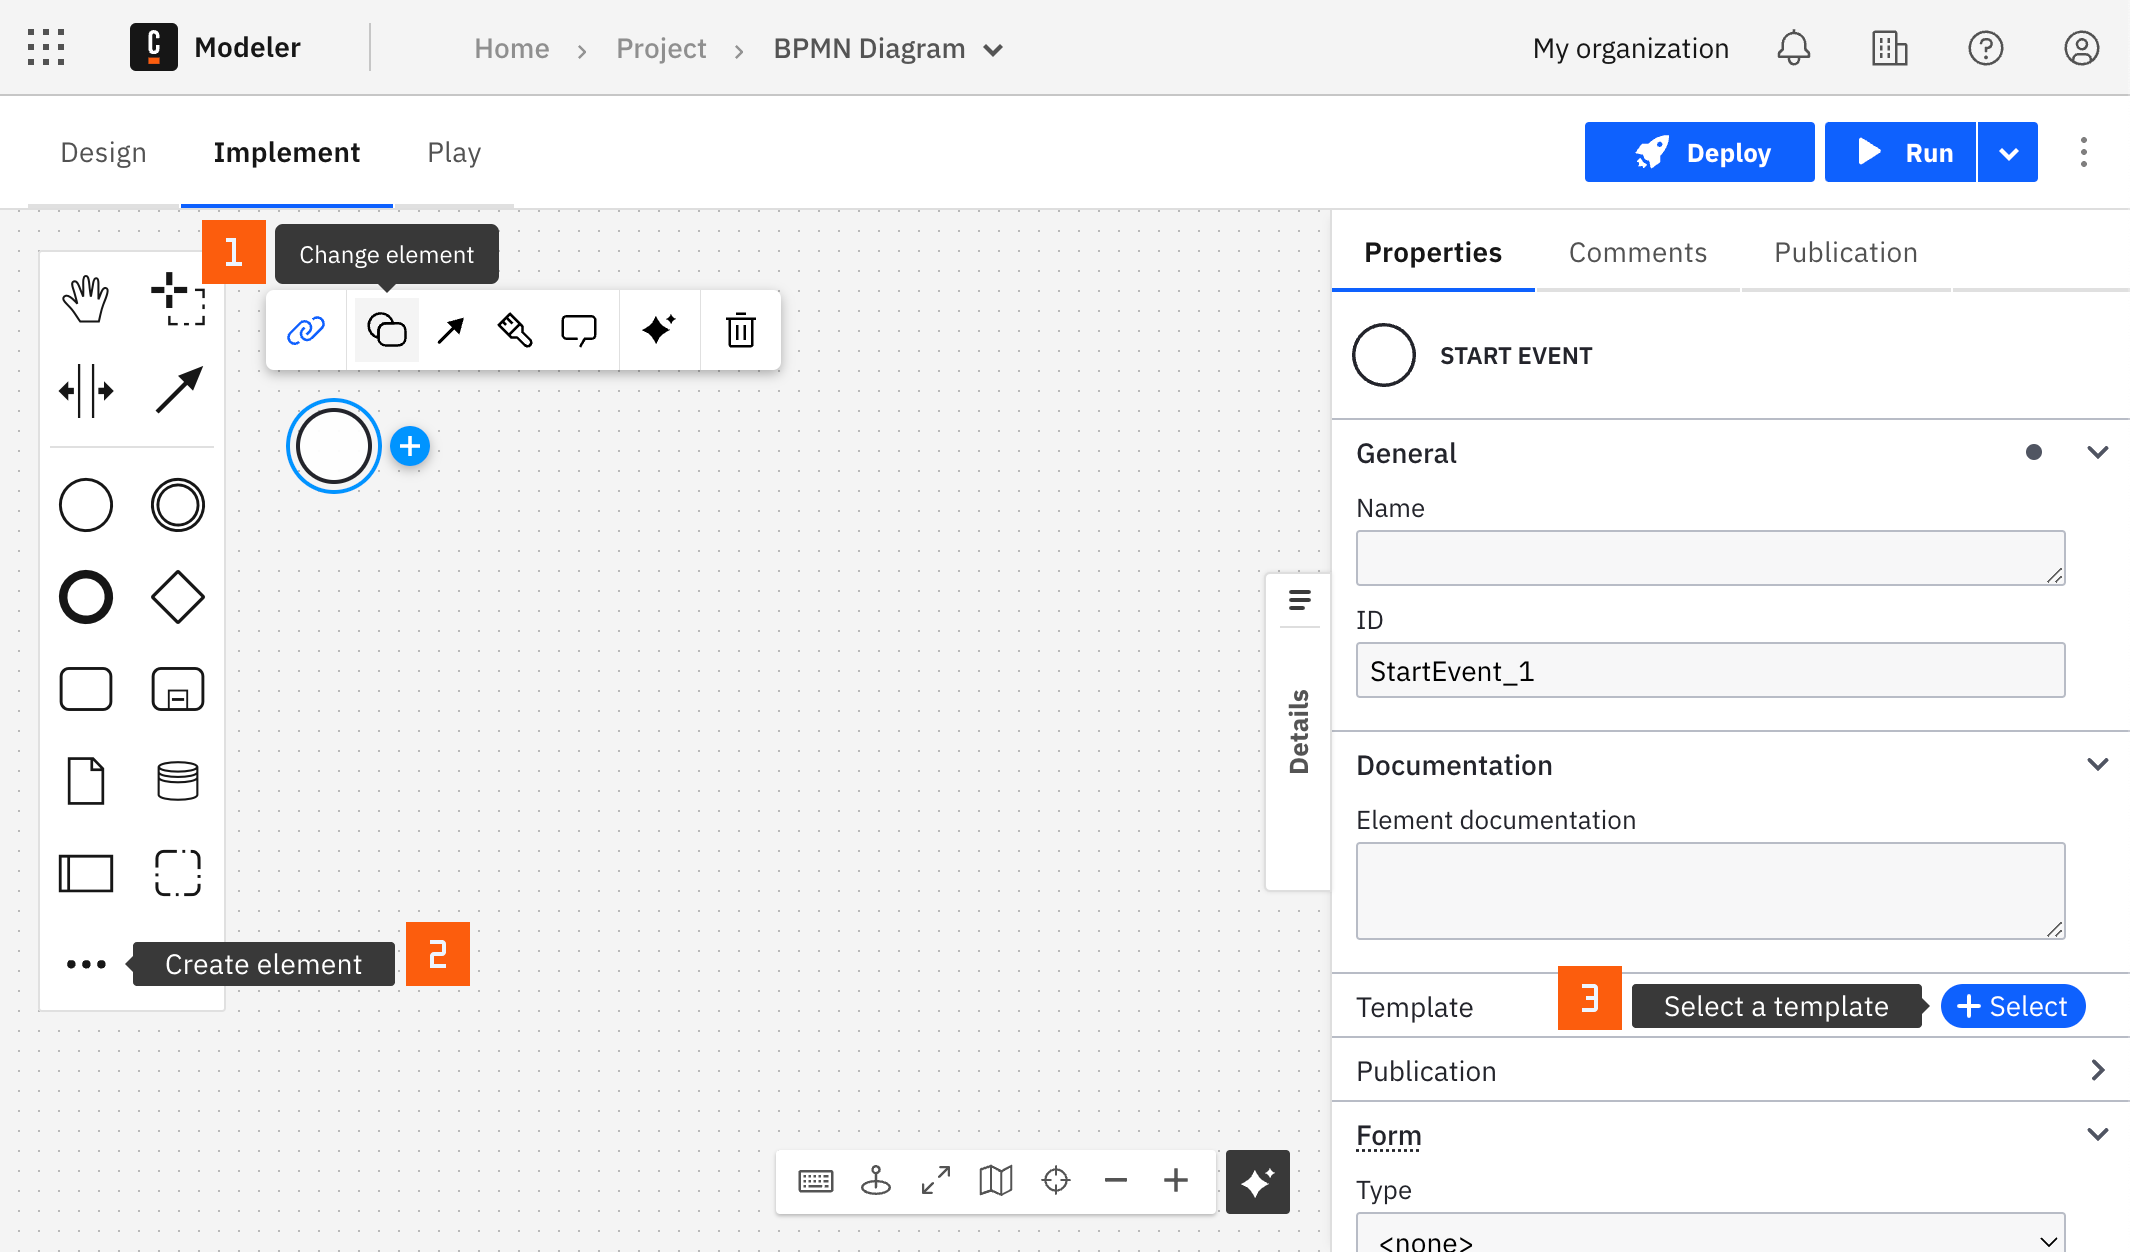
You can apply a connector to a task or event via the append menu. For example:
- From the canvas: Select an element and click the Change element icon to change an existing element, or use the append feature to add a new element to the diagram.
- From the properties panel: Navigate to the Template section and click Select.
- From the side palette: Click the Create element icon.
After you have applied a connector to your element, follow the configuration steps or see using connectors to learn more.
Make your Automation Anywhere connector executable
To work with Automation Anywhere, choose the required operation type in the Operation section and authentication type in the Authentication section and complete the mandatory fields highlighted in red in the connector properties panel on the right side of the screen.
All the mandatory and non-mandatory fields depending on the authentication and operation selections you choose are covered in the upcoming sections.
Authentication
You can choose among the available Automation Anywhere connector authentication types according to your authentication requirements.
We advise you to keep your authentications and secrets data safe and avoid exposing it in the BPMN XML file by creating a secret:
- Follow our guide for creating secrets.
- Name your secret (i.e
AUTOMATION_ANYWHERE_PASSWORD) so you can reference it later in the connector.
Authenticate (username and password) authentication
Select the Automation Anywhere connector and fill out the following properties under the Authentication section:
- Select Authenticate (username and password) in the Authentication section.
- Set Password to
Passwordto the secret you created (i.e.{{secrets.AUTOMATION_ANYWHERE_PASSWORD}}). - Set Username to
Usernameto the secret you created (i.e.{{secrets.AUTOMATION_ANYWHERE_UESRNAME}}). - Select needed Multiple login type. If this value is set to
true, you will be allowed multiple API sessions. For more information on multi-login, refer to multi-login user.
Authenticate (username and API key) authentication
Select the Automation Anywhere connector and fill out the following properties under the Authentication section:
- Select Authenticate (username and API key) in the Authentication section.
- Set Password to
Passwordto the secret you created (i.e.{{secrets.AUTOMATION_ANYWHERE_PASSWORD}}). - Set API key as
API keyto the secret you created (i.e.{{secrets.AUTOMATION_ANYWHERE_API_KEY}}). The API-Key is a 40-character string generated in the Control Room. Refer to create and assign API key generation role documentation to learn more.
Authentication (refresh) token authentication
Select the Automation Anywhere connector and fill out the following properties under the Authentication section:
- Select Authentication (refresh) token in the Authentication section.
- Set Token to
Tokento the secret you created (i.e.{{secrets.AUTOMATION_ANYWHERE_TOKEN}}). It can be an authentication or refresh token. Refer to authentication API documentation to learn how to generate an authentication token or observe the refresh token API documentation to learn how to generate a refresh token.
Configuration
Control Room URL
- Set Control Room URL to
Control Room URL. The Control Room URL is the URL you use to access the Automation Anywhere Control Room. The Control Room URL is typically provided by the Automation Anywhere administrator and is specific to the organization's instance of the platform (i.e.https://domainname.myautomationanywhere.digital).
Operation types
The Automation Anywhere connector currently supports two operation types in the Operation type dropdown list: Add work item to the queue and Get work item result from queue by ID.
Add work item to the queue
This operation provides the ability to add a work queue item in the specified queue.
It corresponds directly to the respective Automation Anywhere API - Add Work Items to the queue API.
Usage
- Select Add work item to the queue from the Operation type dropdown in the Operation section.
- Populate Authentication section as described in the respective section.
- In the Configuration section, set the Control Room URL field as described in the respective section.
- In the Input section, set Work queue ID. This is the identifier of a queue, where an item will be fetched from.
- In the Input section, set Work Item json Data that you want to pass together with the item. The Data has to comply with the Automation Anywhere API, and must contain the following semantics:
{
  "coll_name": "your value",
  "last_name": "Doe",
  "email": "jane.doe@example.com"
}
Add work item to the queue response
The operation Add work item to the queue returns information about the newly created item in the queue.
You can use an output mapping to map the response:
- Use Result Variable to store the response in a process variable. For example,
myResultVariable. - Use Result Expression to map fields from the response into process variables. It comes with a pre-filled value of
={itemId:response.body.list[1].id}. To use operation Get work item result from queue by ID, you need anitemId. This expression will add it to the context for you. Learn more in get work item result from queue by ID.
Response example:
{
  "list": [
    {
      "id": "40957",
      "createdBy": "25",
      "createdOn": "2021-11-24T01:53:10.175335900Z",
      "updatedBy": "25",
      "updatedOn": "2021-11-24T01:53:10.175335900Z",
      "version": "0",
      "json": {
        "TRN_ID": "A11",
        "DATA": "mydata"
      },
      "result": "",
      "deviceId": "0",
      "status": "NEW",
      "col1": "A11",
      "col2": "",
      "deviceUserId": "0",
      "queueId": "0",
      "comment": "",
      "automationId": "0",
      "totalPausedTime": "0",
      "error": "",
      "col6": "",
      "jobExecutionId": ""
    }
  ]
}
Get work item result from queue by ID
This operation provides the ability to return the details of the specified work item from the work queue.
It corresponds directly to the respective Automation Anywhere API - List Work Items in queue with filter by work item ID.
Usage
- Select Get work item result from queue by ID from the Operation type dropdown in the Operation section.
- Populate Authentication section as described in the respective section.
- In the Configuration section, set the Control Room URL field as described in the respective section.
- In the Input section, set Work queue ID. This is the identifier of a queue, where an item will be fetched from.
- In the Input section, set Work item ID. This is the identifier of the item to be fetched.
Get work item result from queue by ID response
Given you have a queue work item ID previously added to a queue, the operation Get work item result from queue by ID returns information about a certain work item.
You can use an output mapping to map the response:
- Use Result Variable to store the response in a process variable. For example,
myResultVariable. - Use Result Expression to map fields from the response into process variables. It comes with a pre-filled value of
={itemState:response.body.list[1].status}. You will observe theitemStatein the process variables. Its value will let you know if the item was processed or not.
Response example:
{
  "page": {
    "offset": 0,
    "total": 5,
    "totalFilter": 1
  },
  "list": [
    {
      "id": "11804",
      "createdBy": "24",
      "createdOn": "2020-05-26T10:19:34.786711300Z",
      "updatedBy": "24",
      "updatedOn": "2020-05-26T10:19:34.786711300Z",
      "version": "1",
      "json": {},
      "result": "",
      "deviceId": "0",
      "status": "NEW",
      "col1": "Brian",
      "col2": "Matthews",
      "col3": "bmatthews0@example.com",
      "deviceUserId": "0",
      "queueId": "20",
      "comment": "",
      "automationId": "0",
      "totalPausedTime": "0",
      "error": "",
      "col6": "",
      "col10": ""
    }
  ]
}
Using Automation Anywhere connector best practice
There is no guarantee a queue item will be processed right away. In that case, we suggest building your BPMN diagram to periodically retry polling. To learn more, refer to an entry Solution with Timer and Loop on the Camunda BPMN examples page.
To avoid performance issues, it is recommended to limit the number of loop retries.