REST connector
If you use the REST connector, ensure you do not have any process variable named in the list below:
body,url,method,headers,authentication,queryParameters,connectionTimeoutInSeconds,readTimeoutInSeconds
The REST connector is an outbound protocol connector that allows you to make a request to a REST API and use the response in the next steps of your process.
Create a REST connector task
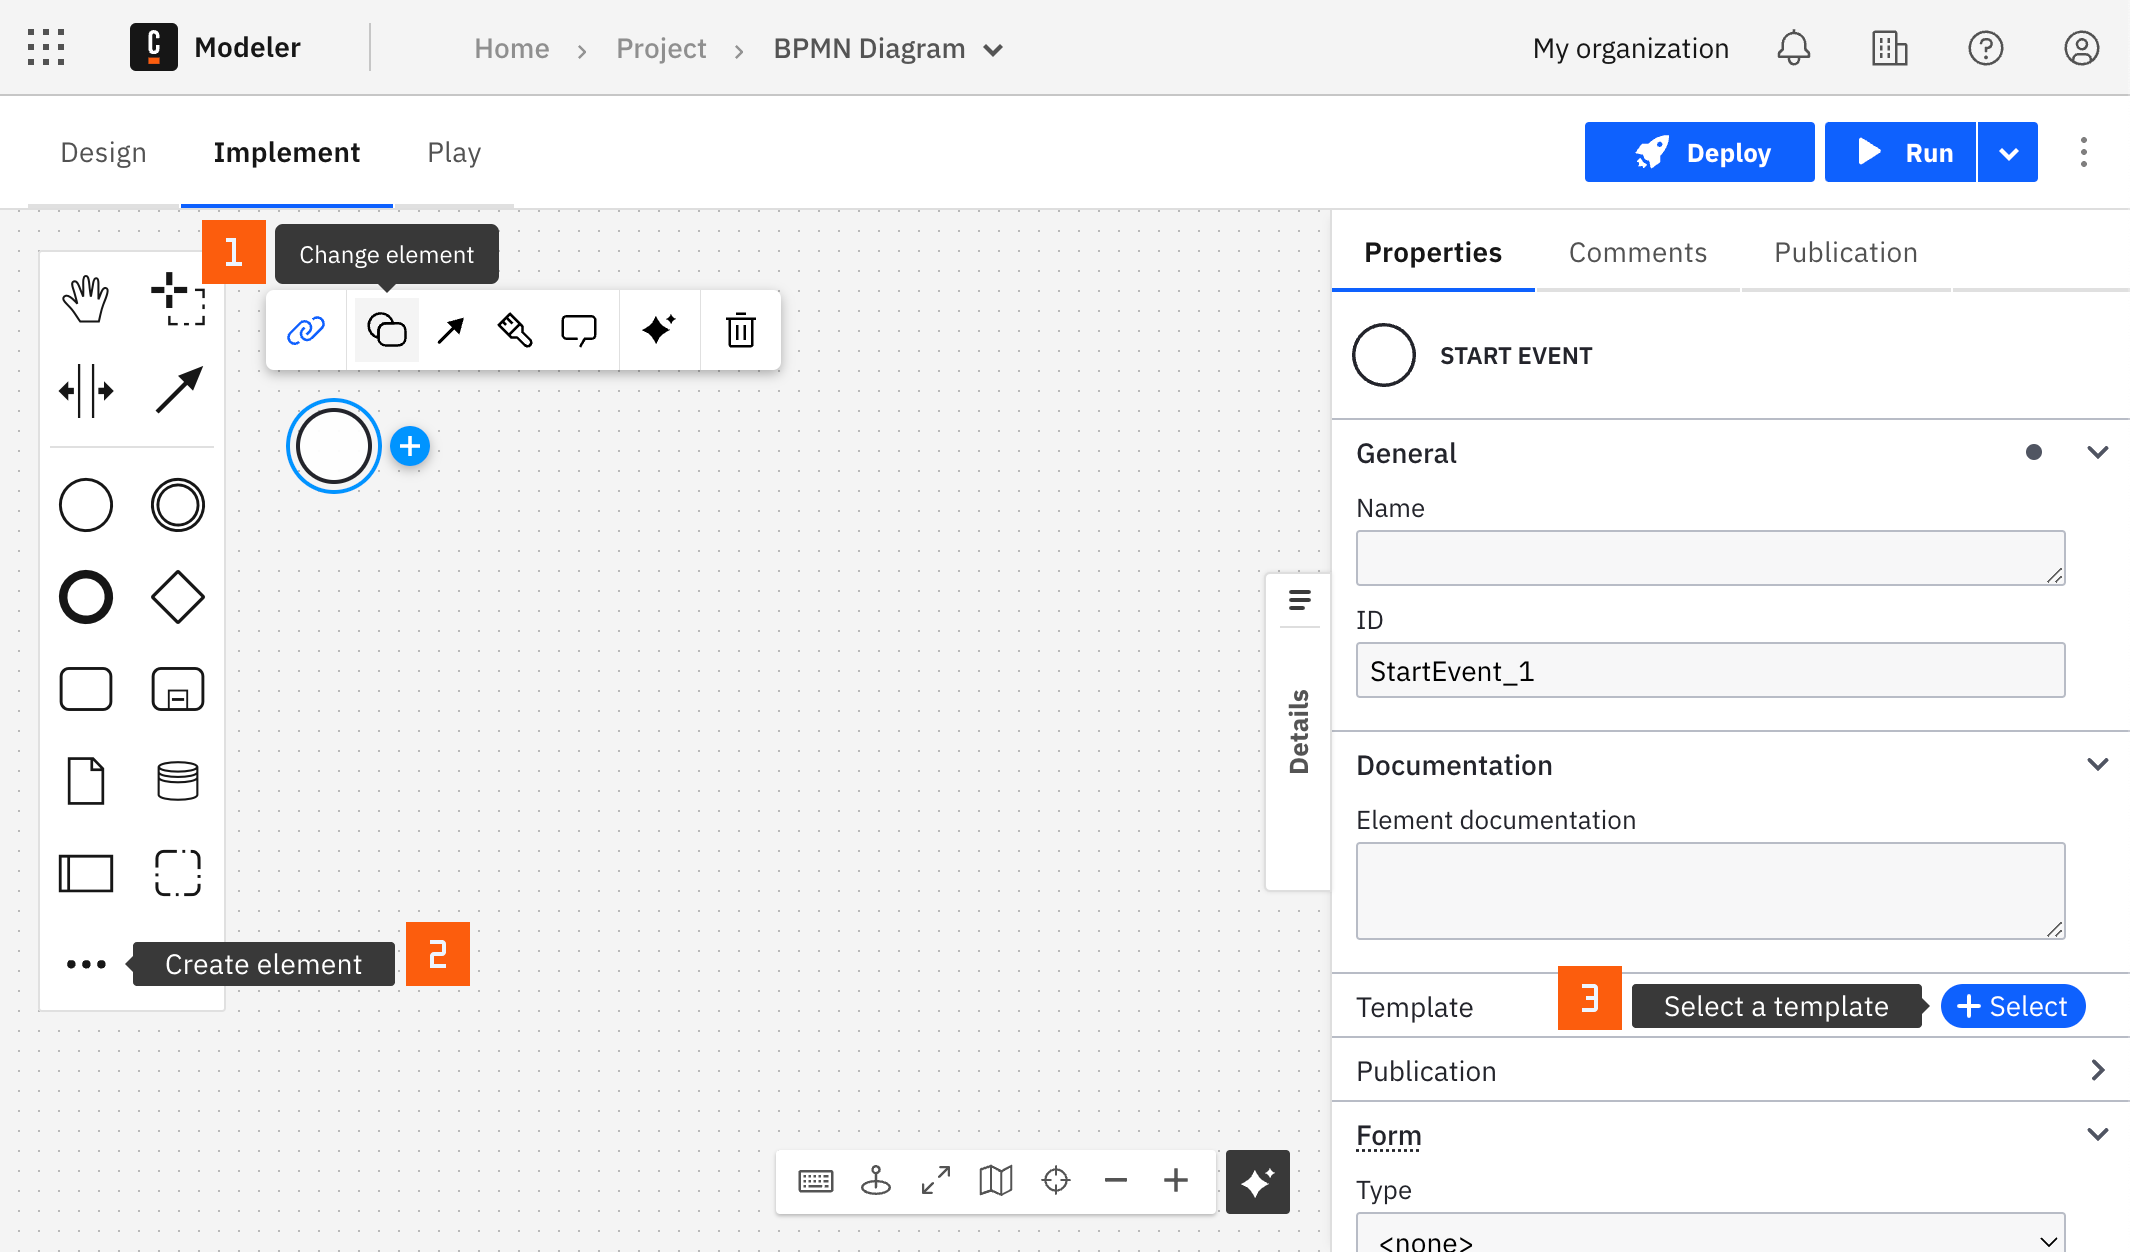
You can apply a connector to a task or event via the append menu. For example:
- From the canvas: Select an element and click the Change element icon to change an existing element, or use the append feature to add a new element to the diagram.
- From the properties panel: Navigate to the Template section and click Select.
- From the side palette: Click the Create element icon.
After you have applied a connector to your element, follow the configuration steps or see using connectors to learn more.
Make your REST connector executable
To make the REST connector executable, choose the required authentication type and fill out the mandatory fields highlighted in red in the properties panel on the right side of the screen.
All the mandatory and non-mandatory fields will be covered in the upcoming sections. Depending on the authentication selection you make, more fields might be required. We will also cover this in the next section.
Configure a proxy server in Self-Managed
In Self-Managed environments, you can configure the connector runtime to route HTTP requests through a proxy server using JVM properties or environment variables. See HTTP proxy configuration for details.
Authentication
You can choose among the available authentication type according to your authentication requirements.
REST connector (None)
Click None in the Authentication section. No extra authentication configuration is required; you can jump to the next section.
REST connector (API key)
For services that require an API key for authentication, you can configure the REST connector to include your API key in the request.
Create a new connector secret
We advise you to keep your API key safe and avoid exposing it in the BPMN xml file by creating a secret:
- Follow our guide for creating secrets.
- Name your secret (i.e
REST_API_KEY_SECRET) so you can reference it later in the connector.
Configure API key authentication
Select the REST connector and fill out the following properties under the Authentication section:
- In the Authentication section, select API key.
- Choose the location where the API key should be included:
- Query parameters: The API key will be added to the URL as a query string.
- Headers: The API key will be included in the request headers.
- Specify your API key details:
- API key name: Enter the parameter name expected by the API (e.g., apiKey).
- API key value: Reference the secret you created for your API key (e.g.,
{{secrets.REST_API_KEY_SECRET}}).
REST connector (Basic)
Create a new connector secret
We advise you to keep your Password safe and avoid exposing it in the BPMN xml file by creating a secret:
- Follow our guide for creating secrets.
- Name your secret (i.e
REST_BASIC_SECRET) so you can reference it later in the connector.
Configure Basic Authentication
Select the REST connector and fill out the following properties under the Authentication section:
- Click Basic in the Authentication section.
- Set Username (i.e.
{{secrets.YOUR_USERNAME}}). - Set Password to the secret you created (i.e.
{{secrets.REST_BASIC_SECRET}}).
REST connector (Bearer Token)
Create a new connector secret
We advise you to keep your Bearer token safe and avoid exposing it in the BPMN xml file by creating a secret:
- Follow our guide for creating secrets.
- Name your secret (i.e
REST_BEARER_TOKEN) so you can reference it later in the connector.
Configure the Bearer token
Select the REST connector and fill out the following properties under the Authentication section:
- Click Bearer token in the Authentication section.
- Set Bearer to the secret you created (i.e.
{{secrets.REST_BEARER_TOKEN}}).
REST connector (OAuth token)
Create a new connector secret
We advise you to keep your OAUTH_TOKEN_ENDPOINT safe and avoid exposing it in the BPMN xml file by creating a secret:
- Follow our guide for creating secrets.
- Name your secret (i.e
OAUTH_TOKEN_ENDPOINT) so you can reference it later in the connector.
Configure the OAuth token
Select the REST connector and fill out the following properties under the Authentication section:
- Click OAuth 2.0 in the Authentication section.
- Set OAuth token endpoint to the secret you created (i.e.
{{secrets.OAUTH_TOKEN_ENDPOINT}}). - Set Client ID to the secret you created (i.e.
{{secrets.CLIENT_ID}}). - Set Client secret to the secret you created (i.e.
{{secrets.CLIENT_SECRET}}). - (Optional) Set Scopes (i.e.
read:clients). Depending on the OAuth provider you're using, this may or may not be required. - Set Audience to the secret you created (i.e.
{{secrets.AUDIENCE}}). It is an optional field. Depending on the OAuth provider you're using, you should fill this field or not. - Choose Client authentication from the dropdown menu (i.e.
Send client credentials in body).
Find more information about the OAuth client credentials flow at the RFC reference.
Request
Under the HTTP Endpoint section, select the desired Method and fill the URL with your desired REST API.
Query parameters
The Query parameters field can be configured using the FEEL Map data type.
= {
    q: "Berlin",
    appid: "{{secrets.OPEN_WEATHER_MAP_API_KEY}}",
    units: "metric",
    lang:"en"
}
Secrets are not like regular variables and must be wrapped in double quotes (") when used in an expression.
HTTP Headers
Similarly to the Query Parameters, the HTTP headers can be specified using the FEEL Map data type.
= {
    Origin: "https://modeler.camunda.io/"
}
Content-Type
If you do not set the Content-Type header in your HTTP headers, the connector will automatically set the Content-Type to application/json.
If you set the Content-Type header to multipart/form-data, only body fields that are documents or plain strings will be sent as multipart form data. All other fields, such as JSON objects, will be ignored.
Request body
When you are making a PUT, POST, or PATCH request, you might need to provide a body. You can provide a body for your request under the Payload section in the Request body field.
= {
     "temp": 25,
     "pressure": 1013,
     "humidity": 44,
     "temp_min": 16,
     "temp_max": 30
}
File upload
To upload a file, you can take advantage of Camunda document handling.
Depending on the Content-Type, the file will be uploaded as a binary or a JSON object (base64 encoded).
- Binary: The file will be uploaded as a binary object. The
Content-Typeheader must be set tomultipart/form-data. The body must a map, where the key is the name of the file field and the value is a document reference.
- JSON: The file will be uploaded as a JSON object. The
Content-Typeheader must be set toapplication/json(this is the default). The body must be a map, where the key is the name of the file field and the value is a document reference, similar to the binary upload. The file will be base64 encoded and included in the JSON object.
Allow redirects
- Follow redirects: When enabled, the connector automatically follows HTTP 3xx redirect responses, resolving the final destination URL. When disabled (default), the connector returns the original 3xx response including the
Locationheader, leaving redirect handling to your process logic.
Encoding
In certain scenarios, such as when working with APIs that require pre-encoded URL elements, the REST connector's default behavior may inadvertently modify encoded segments.
To avoid this, set the skipEncoding value to "true" in the XML. This disables the automatic decoding and re-encoding process, ensuring the URL is sent to the server exactly as provided.
Network communication timeouts
-
Connection timeout in seconds determines the time frame in which the client will try to establish a connection with the server. If you do not specify a value, the system uses the default of 20 seconds. For cases where you need to wait indefinitely, set this value to 0.
-
Read timeout in seconds is the amount of time the client will wait to read data from the server after the connection has been made. The default is also set to 20 seconds. To allow an unlimited wait time for slow responses, set this to 0.
Response
The following variables are available in the context of the response expression:
- status: Response status.
- body: Response body of your request.
- headers: Response headers.
- document: If the
Store responsecheckbox is selected, this field represents the stored document:- documentId: The ID of the stored document.
- contentHash: The hash of the stored document.
- storeId: The store ID.
- metadata: Metadata of the stored document (if available).
- size: Size of the stored document (in bytes).
- expiresAt: Expiration date of the stored document.
- fileName: Name of the stored document.
- customProperties: Custom properties of the stored document.
- contentType: Content type of the stored document.
Starting from version 8.7.0, the REST connector supports storing the response as a document. See additional details and limitations in document handling.
Output mapping
Result variable
You can export a complete response from an HTTP REST call into a dedicated variable accessible anywhere in a process.
To do so, just input a variable name in the Result variable field. We recommend using a unique name to avoid
variables being overwritten, for example currentWeather.
Result expression
Additionally, you can choose to unpack the content of your response into multiple process variables using the Result expression, which is a FEEL Context Expression.
= {
    actual_temp: response.body.main.temp,
    feel_temp: response.body.main.feels_like,
    weather: response.body.weather[1].main,
    weather_report_id: response.document.documentId
}
Error handling
If an error occurs, the connector throws an error and includes the error response in the error variable in Operate. Click on the REST connector in Operate to see this variable.
The following example shows the error variable in an error response:
{
  "code": "400",
  "variables": {
    "response": {
      "headers": {
        "Content-Length": "70",
        "Date": "Thu, 17 Oct 2024 09:31:51 GMT",
        "Content-Type": "application/json"
      },
      "body": {
        "temperature": 36,
        "message": "My custom error message",
        "booleanField": true
      }
    }
  },
  "message": "Bad Request",
  "type": "io.camunda.connector.api.error.ConnectorException"
}
You can handle this error using an Error Boundary Event and the following error expression:
if matches(error.code, "400") and error.variables.response.body.temp = 36
then bpmnError("Too hot", error.variables.response.body.message, error.variables.response.body)
else null
In this example, passing error.variables.response.body as the third argument to the bpmnError function allows you to pass additional information about the error to the error boundary event. For example, the message, temperature and booleanField fields from the error response are passed to the error boundary event.
OData support
The REST connector supports JSON-based OData protocol.
Requesting resources
Requesting resources works the same way regular REST requests work:
- Under the HTTP Endpoint section, select the desired Method.
- Fill in the URL with your desired REST API.
- Depending on your provider, you may also need to set
OData-VersionandOData-MaxVersionheaders.
Requesting an individual resource
Similar to requesting resources, to request an individual resource you need to have a process variable. Use a FEEL string concatenation function
when building URL, e.g. ="https://my.odata.service/v4/Service/Resource('" + resourceId + "')".
Queries
Additionally, if your provider supports OData queries, such as $top, you can use these when defined in the Query parameters field, e.g. ={"$top": 3, "$select": "FirstName, LastName"}.