Create a custom REST connector
Create a custom REST connector based on and using the Camunda REST connector as a starting point.
Create a custom connector based on the Camunda REST connector
- In Web Modeler, add a task element to a new or existing BPMN diagram.
- Change the task type to REST connector.
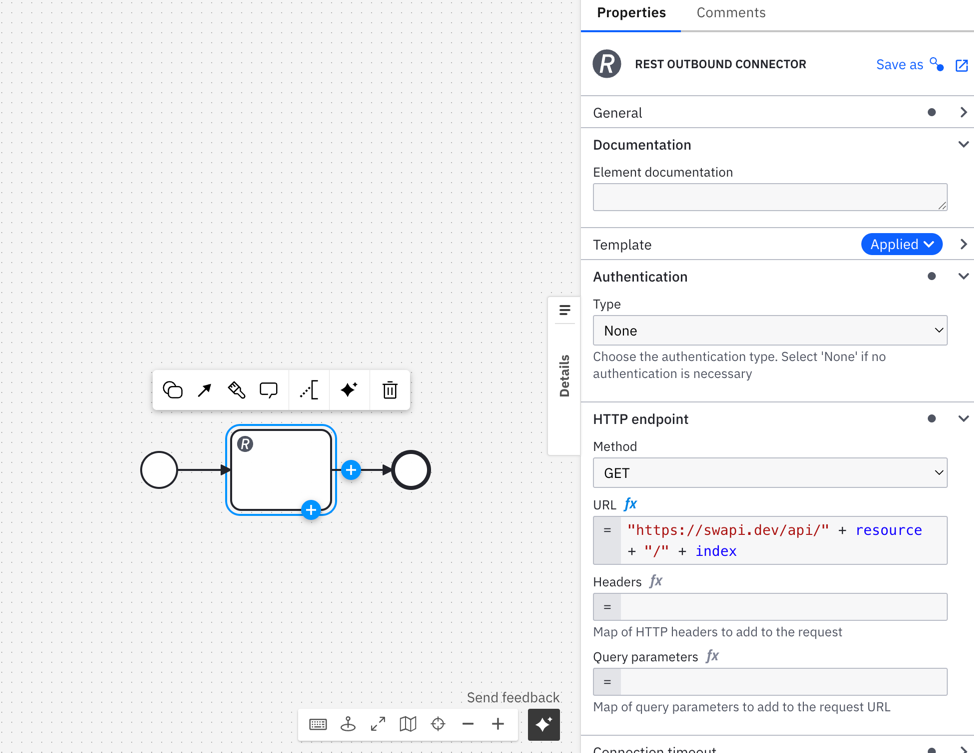
- In the Properties panel, configure the connector as required. For example, define the Authentication URL, HTTP method, and any headers or payload needed for the API request.
- Click Save as Template.
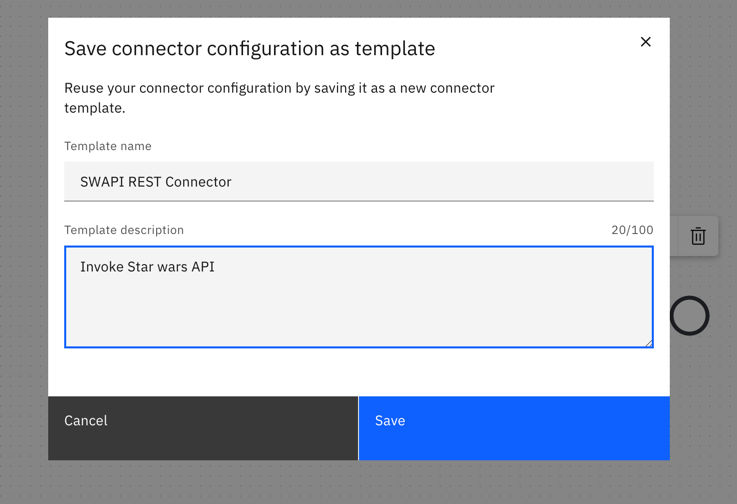
- Enter details for the new connector template, such as a name and description. Save and create the new connector template.
- Open the new connector template in the template editor and customize it as required. For example, add or remove fields, adjust default values and input parameters, and update the description and other metadata.
- Save your changes to the new connector template, and use it as required in your processes.
When creating a new template based on the REST connector, you must ensure that any field(s) used to set variables are placed before any field(s) that uses these variables. For example, in the following code, as the url requires the variables defined by swid and swresource, it is placed after them. Incorrectly placed variables will be considered as null.
{
      "id": "swid",
      "label": "id",
      "description": "Index of the resource",
      "feel": "optional",
      "group": "swapi",
      "binding": {
        "name": "index",
        "type": "zeebe:input"
      },
      "type": "String"
    },
    {
      "id": "swresource",
      "label": "Type",
      "description": "Choose the resource type",
      "value": "Planets",
      "group": "swapi",
      "binding": {
        "name": "resource",
        "type": "zeebe:input"
      },
      "type": "Dropdown",
      "choices": [...]
    },
    {
      "id": "url",
      "label": "URL",
      "optional": false,
      "constraints": {
        "notEmpty": true,
        "pattern": {
          "value": "^(=|(http://|https://|secrets|\\{\\{).*$)",
          "message": "Must be a http(s) URL"
        }
      },
      "group": "endpoint",
      "binding": {
        "name": "url",
        "type": "zeebe:input"
      },
      "type": "Hidden",
      "value": "=\"https://swapi.dev/api/\" + resource + \"/\" + index"
    }
Example: Custom Star Wars API connector
The following example shows how you can create a custom connector based on the Camunda REST connector that retrieves data from the Star Wars API (SWAPI).
Step 1: Create connector template
In this first step, create a new connector template, using the REST connector as a starting point.
-
Create a REST Outbound connector task.
-
Define the URL as a FEEL (Friendly Enough Expression Language) expression, using the
resourceandindexvariables.
-
Click Save as to create a template from your configured connector.

-
Enter the Template Name and Template Description and click Save. These fields are essential for identifying and understanding the purpose of the template.

Step 2: Edit the new connector template
Once the new connector template is created, edit and configure it to retrieve data from the Star Wars API.
-
Open the new connector template in the Template Editor.
-
Hide Unwanted Properties: For properties that are not required in your connector, set the
typetoHidden. For example, since authentication is not required in this example, it is set toHidden.{
"id": "authentication.type",
"label": "Type",
"description": "Choose the authentication type. Select 'None' if no authentication is necessary",
"value": "noAuth",
"group": "authentication",
"binding": {
"name": "authentication.type",
"type": "zeebe:input"
},
"type": "Hidden",
"choices": [
{
"name": "API key",
"value": "apiKey"
},
{
"name": "Basic",
"value": "basic"
},
{
"name": "Bearer token",
"value": "bearer"
},
{
"name": "None",
"value": "noAuth"
},
{
"name": "OAuth 2.0",
"value": "oauth-client-credentials-flow"
}
]
}Similarly, hide other fields such as
url,method,headers, andqueryParameters. If thehiddentype does not apply, ensure that you remove thefeelproperty.{
"id": "url",
"label": "URL",
"optional": false,
"constraints": {
"notEmpty": true,
"pattern": {
"value": "^(=|(http://|https://|secrets|\\{\\{).*$)",
"message": "Must be a http(s) URL"
}
},
"group": "endpoint",
"binding": {
"name": "url",
"type": "zeebe:input"
},
"type": "Hidden",
"value": "=\"https://swapi.dev/api/\" + resource + \"/\" + index"
} -
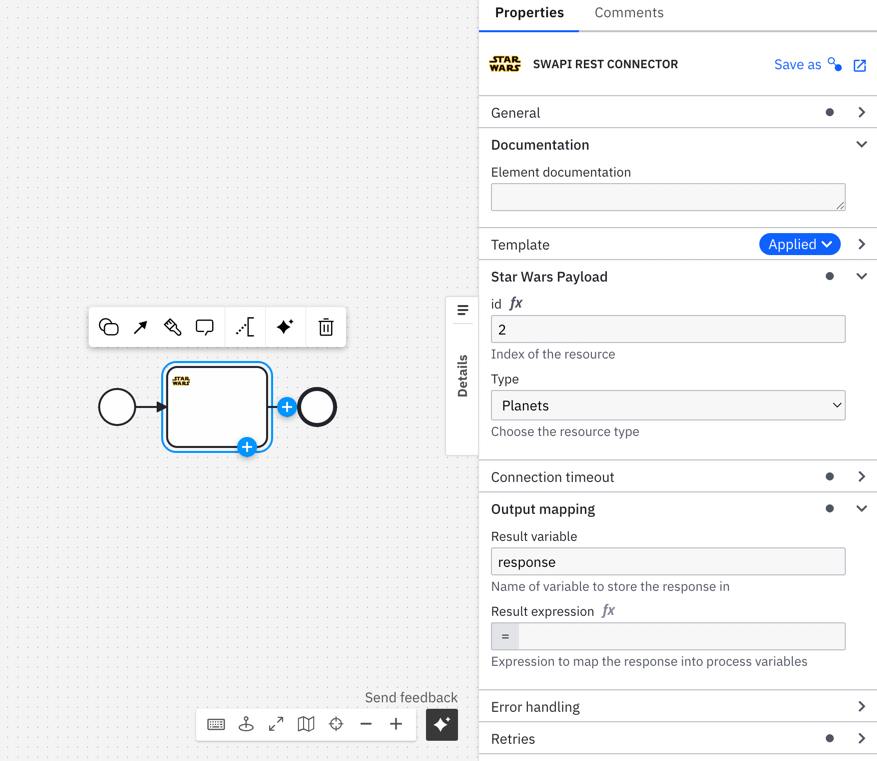
Create a Custom Group for the Star Wars API: Add a customized group named
swapifor organizing your Star Wars-related properties.{
"id": "swapi",
"label": "Star Wars Payload"
} -
Define the Properties in the SWAPI Group: Map the properties within the new group to the previously defined
resourceandindexvariables.- Set
resourceas aDropdown. - Set
indexas aString.
[
  {
    "id": "swid",
    "label": "id",
    "description": "Index of the resource",
    "feel": "optional",
    "group": "swapi",
    "binding": {
      "name": "index",
      "type": "zeebe:input"
    },
    "type": "String"
  },
  {
    "id": "swresource",
    "label": "Type",
    "description": "Choose the resource type",
    "value": "Planets",
    "group": "swapi",
    "binding": {
      "name": "resource",
      "type": "zeebe:input"
    },
    "type": "Dropdown",
    "choices": [
      {
        "name": "Planets",
        "value": "planets"
      },
      {
        "name": "Spaceships",
        "value": "spaceships"
      },
      {
        "name": "Vehicles",
        "value": "vehicles"
      },
      {
        "name": "People",
        "value": "people"
      },
      {
        "name": "Films",
        "value": "films"
      },
      {
        "name": "species",
        "value": "Species"
      }
    ]
  }
] - Set
-
Add an appropriate icon if required to enhance your connector's visual appeal.
-
Once configuration is complete, click Publish to publish the connector template and make it available for use.
-
Use your newly published SWAPI connector in your BPMN workflows.
