Camunda 8 Helm deployment
Camunda provides continuously improved Helm charts which are not cloud provider-specific, so you can choose your Kubernetes provider. The charts are available in Camunda Helm repository and we encourage you to report issues if you find any of them.
What is Helm?
Helm is a package manager for Kubernetes resources. Helm allows us to install a set of components by simply referencing a package name, and allowing us to override configurations to accommodate these packages to different scenarios.
Helm also provides dependency management between charts, meaning that charts can depend on other charts. This allows us to aggregate a set of components together that can be installed with a single command.
Components installed by the Helm charts
The following charts will be installed as part of Camunda 8 Self-Managed:
- Zeebe: Deploys a Zeebe Cluster with three brokers using the
camunda/zeebeDocker image. - Zeebe Gateway: Deploys the standalone Zeebe Gateway with two replicas.
- Operate: Deploys Operate, which connects to an existing Elasticsearch.
- Tasklist: Deploys the Tasklist component to work with user tasks.
- Connectors: Deploys the Connectors component responsible for both inbound and outbound integration with external systems.
- Optimize: Deploys the Optimize component to analyze the historic process executions.
- Identity: Deploys the Identity component responsible for authentication and authorization.
- Elasticsearch: Deploys an Elasticsearch cluster with two nodes.
- Web Modeler Beta: Deploys the Web Modeler component that allows you to model BPMN processes in a collaborative way.
- Note: The chart is disabled by default and needs to be enabled explicitly as Web Modeler is only available to enterprise customers.
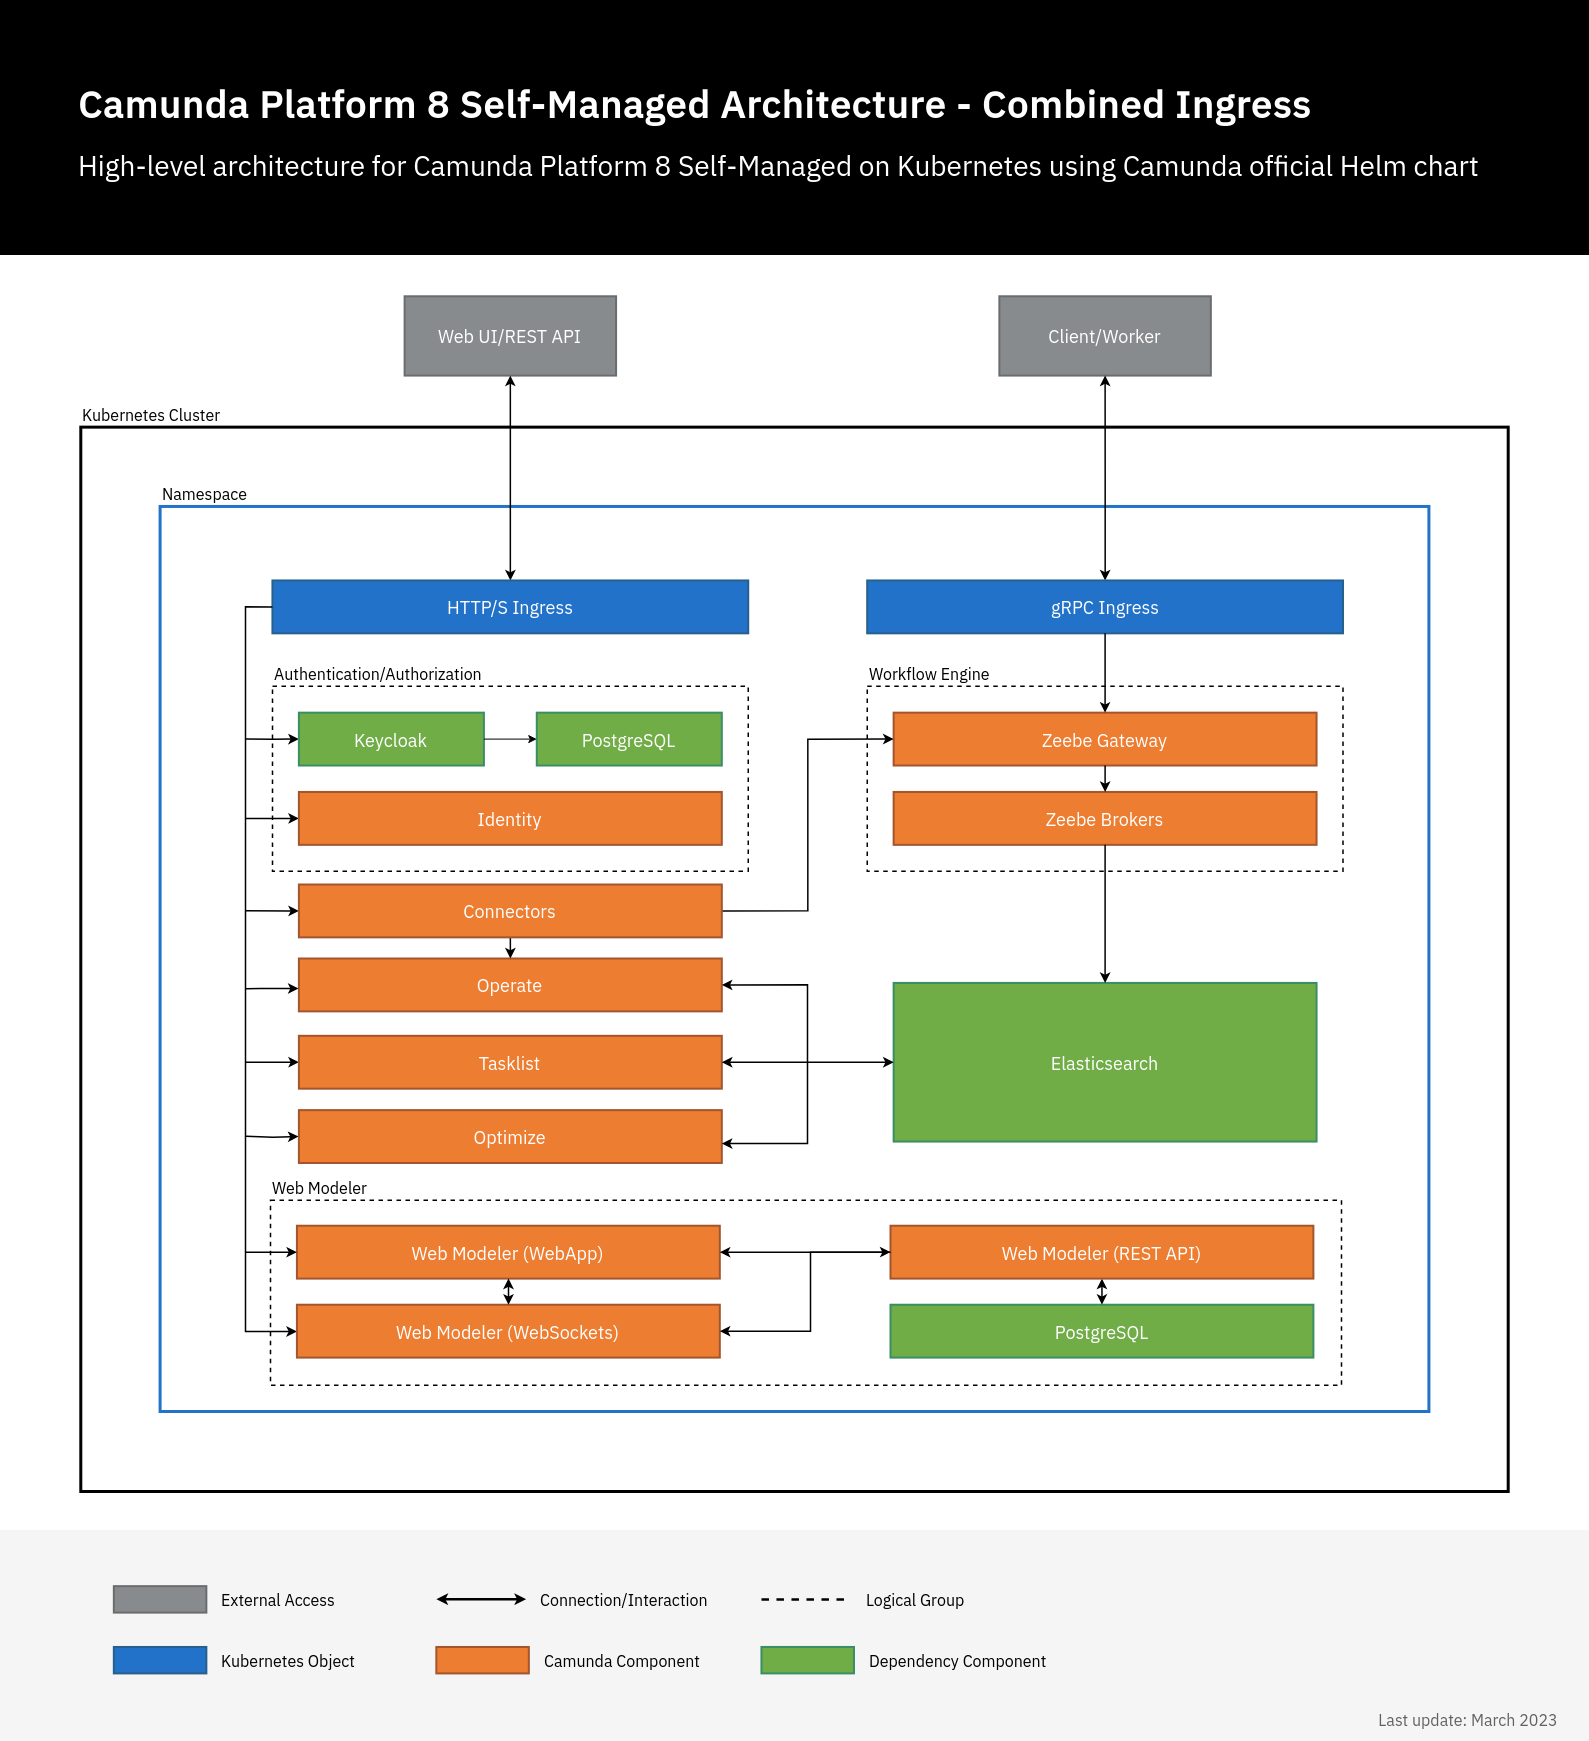
When installing the camunda-platform Helm chart, all the components in this picture are installed.
Install Camunda 8 using Helm
Prerequisites
Before deploying Camunda using Helm you need the following:
- Kubernetes cluster: either local, cloud platform, or on-premise.
- Helm binary.
- Kubectl binary.
Adding Camunda Helm repository
You have to add the Camunda Helm chart repository in order to use the charts. Once this is done, Helm is able to fetch and install charts hosted in https://helm.camunda.io:
helm repo add camunda https://helm.camunda.io
helm repo update
Once this is completed, we are ready to install the Helm chart hosted in the official Camunda Helm chart repo.
Installing the Camunda Helm chart
To install the available Camunda 8 components inside a Kubernetes cluster, you can simply run:
helm install camunda camunda/camunda-platform
You can also add the -n flag to specify in which Kubernetes namespace the components should be installed.
The command does not install Web Modeler by default. To enable Web Modeler, refer to the installation instructions below. :::
Notice that this Kubernetes cluster can have services which are already running; Camunda components are simply installed as another set of services.
Installing all the components in a cluster requires all Docker images to be downloaded to the remote cluster. Depending on which Cloud provider you are using, the amount of time it will take to fetch all the images will vary.
Review the progress of your deployment by checking if the Kubernetes pods are up and running with the following:
kubectl get pods
This will return something similar to the following:
NAME                                           READY   STATUS              RESTARTS   AGE
camunda-keycloak-0                       0/1     Pending             0          4s
camunda-identity-6bb5d864cc-kk6dv        0/1     ContainerCreating   0          4s
camunda-operate-cb597fd76-6vr2x          0/1     ContainerCreating   0          4s
camunda-optimize-676955b547-vxts7        0/1     ContainerCreating   0          4s
camunda-connectors-1bba590ff-a63dc       0/1     ContainerCreating   0          4s
camunda-postgresql-0                     0/1     Pending             0          4s
camunda-tasklist-5bf5c56f7b-sdwg7        0/1     ContainerCreating   0          4s
camunda-zeebe-0                          0/1     Pending             0          4s
camunda-zeebe-1                          0/1     ContainerCreating   0          4s
camunda-zeebe-2                          0/1     Pending             0          4s
camunda-zeebe-gateway-657b774f95-bbcx5   0/1     ContainerCreating   0          4s
camunda-zeebe-gateway-657b774f95-gmlbm   0/1     Running             0          4s
elasticsearch-master-0                          0/1     Pending             0          4s
elasticsearch-master-1                          0/1     Init:0/1            0          4s
Review the progress of your deployment by checking if the Kubernetes pods are up and running with the following:
kubectl get pods
This will return something similar to the following:
NAME                                                   READY   STATUS    RESTARTS   AGE
elasticsearch-master-0                                 1/1     Running   0          4m6s
camunda-operate-XXX                             1/1     Running   0          4m6s
camunda-connectors-XXX                          1/1     Running   0          4m6s
camunda-zeebe-0                                 1/1     Running   0          4m6s
camunda-tasklist-XXX                            1/1     Running   0          4m6s
camunda-zeebe-gateway                           1/1     Running   0          4m6s
Connectors
The Connector runtime comes enabled by default. To start using Connectors, install Connector element templates. Learn more in our documentation for Web Modeler and Desktop Modeler.
Find all available configurable options at the official Camunda Helm GitHub page.
Disable Connectors
To disable Connectors, pass the connectors.enabled: false value when deploying Camunda Helm Chart.
Polling authentication mode
Connectors use the Operate API to fetch process definitions containing inbound Connectors. Depending on your Camunda
architecture, you may want to choose one of the following values for the inbound.mode:
disabled- Polling from Operate is disabled. Connector runtime will support only outbound interactions, such as HTTP REST calls.credentials- Connector runtime will attempt to authenticate to the Operate API with password-based basic HTTP authentication.oauth- (Recommended and enabled by default) the Connector runtime will attempt to authenticate to the Operate API with an OAuth 2.0 provider. Camunda offers Keycloak as a default OAuth provider.
Installing Web Modeler (Beta)
Web Modeler Self-Managed is currently offered as a beta release with limited availability for enterprise customers only. It is not recommended for production use and there is no maintenance service guaranteed. Special terms & conditions apply. However, we encourage you to provide feedback via your designated support channel or by contacting us.
To install the Camunda Helm chart with Web Modeler enabled, follow the steps below.
Create image pull secret
The Docker images for Web Modeler are not publicly accessible, but available to enterprise customers only from Camunda's private Docker registry. To enable Kubernetes to pull the images from this registry, first create an image pull secret using the credentials you received from Camunda:
kubectl create secret docker-registry <REGISTRY_SECRET_NAME> \
  --docker-server=registry.camunda.cloud \
  --docker-username=<DOCKER_USER> \
  --docker-password=<DOCKER_PASSWORD> \
  --docker-email=<DOCKER_EMAIL>
Replace <REGISTRY_SECRET_NAME> with a name of your choice and <DOCKER_USER>, <DOCKER_PASSWORD>, and <DOCKER_EMAIL> with your credentials.
The secret must be created in the same Kubernetes namespace you will install the Helm chart in. Use the -n flag to specify a namespace.
Alternatively, create an image pull secret from your Docker configuration file.
Configure Web Modeler
To set up Web Modeler, you need to provide the following required configuration values (all available configuration options are described in more detail in the Helm chart's README file):
- Enable Web Modeler with
web-modeler.enabled: true(it is disabled by default). - Configure the previously created image pull secret in
web-modeler.image.pullSecrets. - Configure your SMTP server by providing the values under
web-modeler.restapi.mail.- Web Modeler requires an SMTP server to send notification emails to users.
We recommend specifying these values in a YAML file that you pass to the helm install command. A minimum configuration file would look as follows:
web-modeler:
  enabled: true
  image:
    pullSecrets:
      # replace with the name of the previously created secret
      - name: <REGISTRY_SECRET_NAME>
  restapi:
    mail:
      smtpHost: smtp.example.com
      smtpPort: 587
      smtpUser: user
      smtpPassword: secret
      # email address to be displayed as sender of emails from Web Modeler
      fromAddress: no-reply@example.com
Optional: Configure external database
Web Modeler requires a PostgreSQL database as persistent data storage (other database systems are currently not supported). By default, a new PostgreSQL instance is installed as part of the Helm release (using the PostgreSQL Helm chart by Bitnami as a dependency). Alternatively, you can configure a connection to an existing external database:
web-modeler:
  postgresql:
    # disables the PostgreSQL chart dependency
    enabled: false
  restapi:
    externalDatabase:
      host: postgres.example.com
      port: 5432
      database: modeler-db
      user: modeler-user
      password: secret
Install the Helm chart
Assuming you have saved your configuration in modeler-values.yaml, install the Helm chart by running the following:
helm install --values modeler-values.yaml camunda camunda/camunda-platform
Troubleshooting the installation
Check that each pod is running and ready. If one or more of your pods stay pending, it means that it can not be scheduled onto a node. Usually this happens because there are insufficient resources that prevent it. Use the kubectl describe ... command to check on messages from the scheduler:
kubectl describe pods <POD_NAME>
If the output of the describe command was not beneficial, tail the logs of these pods by running the following:
kubectl logs -f <POD_NAME>
Upgrading Camunda Helm chart
For upgrading Camunda Helm chart from one release to another, perform a Helm upgrade.
General notes
- Zeebe gateway is deployed as a stateless service. We support Kubernetes startup and liveness probes for Zeebe.
- Zeebe broker nodes need to be deployed as a StatefulSet to preserve the identity of cluster nodes. StatefulSets require persistent storage, which must be allocated in advance. Depending on your cloud provider, the persistent storage differs as it is provider-specific.